CP Napanee Industries Coil Steel Cars

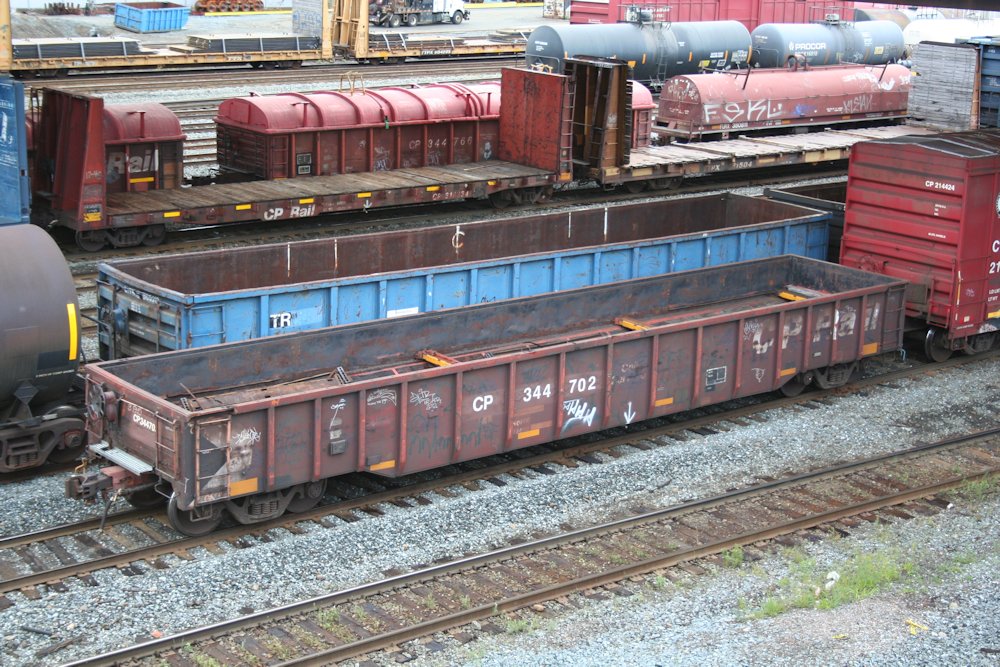
As the large Algoma Steel plant in Sault Ste. Marie is arguably the primary industry on the Algoma Central Railway in any era, steel traffic forms a major part of the tonnage carried by the railway, and included in that is “coil” steel (as far as I know, the only major steel product not produced by the Algoma mill is wire). Thin sheet steel is wound into coils that are shipped out to manufacturing plants across the continent to be turned into all manner of steel products.

To transport this valuable cargo by rail, the rail industry developed cars with V-shaped wood-lined loading troughs to transport the coils without damaging them. Some of these cars were flatcars or gondolas with the loading troughs added, but by the 1960s several builders were producing various specially designed cars for coil steel service.

Note – There seems to be a bit of a gray area in whether or not to class these special cars as flats or gondolas – indeed today most of the modern equivalents are now pretty universally considered as gons (“GBSR” AAR designation), and while many identical cars were also classed as “GBSR” by their owning roads, the cars I’m about to discuss were classed (at least initially) as “FMS” by both CN and CP.

A major builder and innovator of this type of design – a coil car with lengthwise loading troughs, removable hoods, tracks for moveable load restraint bars, and cushioned underframe to protect the contents – was Evans Products which built hundreds of these cars for most of the major American railways. A minority builder was Canada’s Napanee Industries (NI) of Napanee, ON which built a total of 75 cars in 1967 following the Evans design (probably under license for the Canadian market) for Canadian National (25 cars – CN 190200-190224) and Canadian Pacific (50 cars – CP 313500-313549).

CP 313533 in October 1970 in original as-delivered black with script logos. Jim Parker photo.

A model representing the Evans Products coil car was and is produced in HO by Walthers. (A very similar US Railway Equipment car is produced by Intermountain (formerly Red Caboose tooling) but the body is different and has a straight sill). The Walthers car is somewhat of an older model, dating back to when Walthers actually sold their cars as kits (and I picked up a 3-pack of kits quite a number of years ago that lived for a [long] time on my shelf), but with a few upgrades these can still make respectable models, and an easy kitbash to one of the Napanee cars.

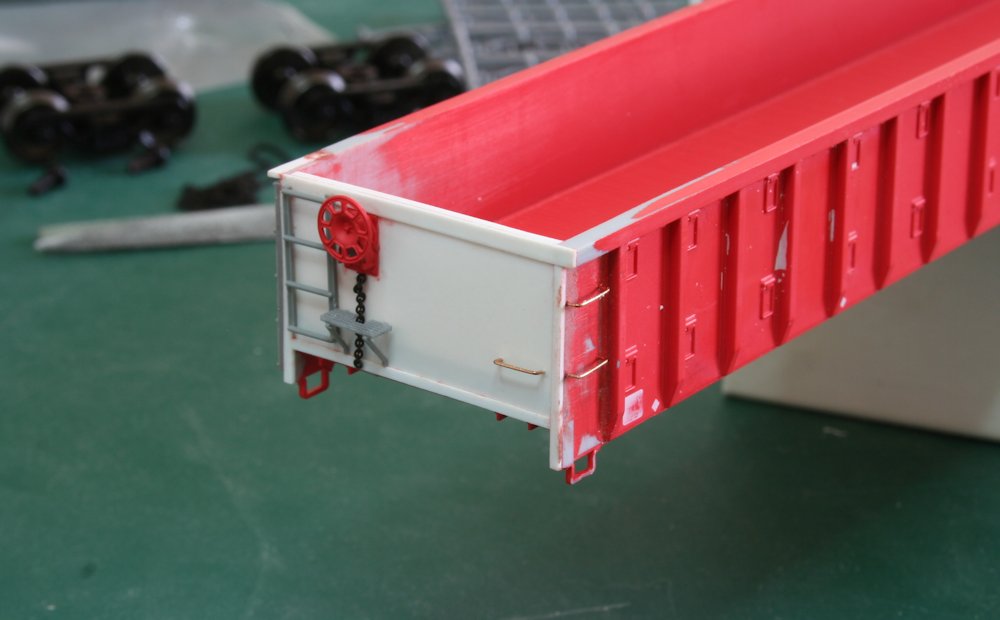
The first thing to do to the Walthers model is to cut away the original walkway and throw it out. Not only is this part rather thick and crude by today’s standards, the Napanee cars did not have the full-length side walkways featured on the model. I also carved off moulded grab irons and stirrup steps to replace them with finer wire parts.

To cover the holes left by the walkway supports and seam between the body halves, rather then trying to fill and sand body putty along the length of the body between the upper and lower flanges (or to be more honest, trying and giving up), I simply laminated 0.005″ styrene sheet cut to fit to the car side to get a smooth result.

Pre-paint construction photo.

Since the NI cars didn’t have full walkways, the removable hoods did not have lengthwise handrails on them either, which the Wathers model has. This is a pretty simple matter to carve off the handrail supports and sand them smooth. At the same time I took the opportunity to replace the corner grabs on the hoods with wire. Otherwise the hoods are essentially “stock” with all the kit parts, although I did scratchbuild matching hoods using the kit part as a pattern for a fourth car that had come with rounded hoods…

Wire grabs were mounted to the body, and step handrails also added from brass wire. The walkway grating on the ends of the cars was added using Plano etched material. The final modification is a small triangle of styrene strip angling from the side sill outboard of the trucks to the bottom of the main body, and a small loop of brass wire representing a protective guard around the brake control valve on the side.

Painting and lettering the cars is where things get a little interesting, as there’s no specific decal sets available. I built and painted two cars for CP, one in original black and one in red (2 more cars for CN are still in the paint shop).

CP 1979 “Action Red” car painted but unlettered.

The red CP car was painted and lettered following a prototype photo of
freshly painted CP 313500 on pg. 99 of “Canadian Pacific Color Guide to Freight and Passenger Equipment: Volume 2” by John Riddell and published by Morning Sun Books. This shows a car in a 1970s repaint.

The car and hoods were sprayed with Rapido ProtoPaint “CP Action Red”, and then masked off to paint the underside of the car and the draft gear black. Also the multimarks on the hoods were custom masked and painted as no decal was exactly the right size. The rest of the lettering was cobbled primarily from a Highball gondola set (although almost any CP Rail freight car decal would work as a source) and some Microscale consolidated stencils. The prototype was a 1979 repaint, so no ACI label is present on this car. Numbers and data were painstakingly put together with a magnifying visor.

Two CP cars painted and lettered.

The black car consumed no less than three sets of Black Cat decals – 2 sets of a gondola with script lettering (CPR340998) for the hood logos and end reporting marks, and a skeleton “stake” flatcar (CPR305560) set for the correct size reporting marks and numbers. This provided ample data to work with. Incidental decals such as ACI labels and consolidated stencils were added from Highball and Microscale sets. As these are 100-ton cars, U-1 wheel dots do not apply.

Perhaps if I were doing a larger set of these cars in the future I might commission a custom set of specific decals, but I was able to piece enough of it together from existing sets.

The cars still need to be sealed and weathered, but for now the paint and lettering work is for the most part completed on these two CP cars. Hopefully the CN fleet will have its pair completed soon as well.

CP 336702 65′ Gondola Painted and Lettered

IMG_1961

Over a few evenings the past week I got this car painted black and applied all the lettering. After languishing on the back burner for about a year, it feels good to put some attention towards finishing this project off.

The body was airbrushed black and then given a shot of GlossCote to prepare for decals. Lettering is (mostly) from a Black Cat set for 52′-65′ gondolas.

(The black sure is difficult to photograph well, particularly with the crappy lighting I have available in my apartment.)

IMG_1963

The digits of the car number are all individually applied. It would have of course been necessary to apply several numbers individually in any case to form the correct number, but also because of the narrow space between the ribs the numbers in this case had to be applied with almost zero spacing between them. The spacing of the C.P. initials was similarly reduced.

For this car I also applied the data to actually match the numbers on the prototype photo, and also a little trimming of the spacing was required for everything to actually fit. I left the capacity line off as this was no longer required and started to be painted over on many cars in the early 1980s and I hand painted a bead of black over where this would have been lettered.

The NSC builder’s logo and dimensional clearance Plate C stencil came from a Highball Graphics CP Rail flatcar set, and the nailable steel floor data stencil (rectangular data block to the right of the panel with the Plate C stencil) was included in the Black Cat set.

IMG_1964

Interestingly, in the prototype photo of 336702 that I have, the end reporting marks are in the modern italicized CP Rail font, which would not have been in use in 1965 when the car was built. This was probably re-applied at some point due to weathering of the original lettering on be end. I chose to reproduce this detail and used the small end reporting marks/numbers from a Highball Graphics CP Rail gondola set.

Now this car is almost ready for some basic weathering to complete its in-service appearance.

Backdated CP 65′ Gondola – Grab Irons and Final Details

Here’s an old project I was able to bring off the shelf on a peaceful Sunday afternoon. I documented the start of this project earlier in a couple of postings here on this blog, (see part one here, and part two here) and it’s been over a year since I’ve gone and done anything with this. Time to finish a few things up and get this project ready for finishing.

The next step that was holding me back on this project was drilling and installing the grab irons for the left corners on each side. Not that this was really a tough job.

IMG_1959

To aide in keeping everything neat and straight, I laid out the locations of the drill holes for the grab irons on a scrap piece of styrene to use as a drilling template/jig. The jig fits into the corner made by the top chord and first vertical rib on the side of the car. Then by drilling through the pre-drilled holes in the template into the car side, everything is lined up nice and neatly.

IMG_1958

I also reinstalled the brake wheel and housing, and used a piece of scale chain to represent the brake chain heading down from the brake wheel mechanism. The brake platform/step was cut down from the original long piece removed from the factory Exactrail model with a pair of supports out of a Tichy brake details set.

At this point the car is ready to be cleaned up and prepped for painting; I’ll probably fire up the airbrush this evening to give is a primer coat.

Freight Car Friday #12 – CP 344702

IMG_0618

This Canadian Pacific gondola is one of a series outfitted with coil steel bunks and normally has a protective fiberglass cover applied to it to protect the steel coils (you can see some similar covered cars in the background) but here the cover is missing and you can see into the interior and see how the coil bunks and bracing are designed.

CN and CP both supplied a lot of cars for steel loading at Algoma Steel, so covered gondolas like this would not have been an uncommon site in the Algoma Central yards in Sault Ste. Marie, and CP traffic to western Canada would have been interchanged at Franz.

This car was photographed on July 30, 2014 in the CP yard at Sudbury so it would actually be on the way to Sault Ste. Marie for a load of steel coils.

Updated Builders Logos on ExactRail CP Gondolas

So in a follow-up comment on one of my previous posts, I mentioned that the ExactRail CP 65′ gondolas are modeled after a series of cars built in 1979 by Hawker-Siddeley, and to which an identical series of cars was built in 1982 by Marine Industries. The ExactRail models all bear numbers drawn from the 1979 HST series, but have Marine Industries builders logos and 1982 NEW dates. (Naturally.) This is a little annoying, but fixable.

The various CP series that may be represented by the ExactRail model (with varying amounts of work) are:

Series Builder Date Notes
CP 336700-336799 NSC 10-11/1965 Flat ends, high brake rigging
CP 337185-337299 HST 11-12/1979 Ribbed end, low brake rigging
CP 337300-337449 ? 6-7/1969 Flat end, high brake rigging
CP 337450-337549 MIL 4-5/1982 Ribbed end, low brake rigging

You can follow my efforts to model a car from the 1965 336700-336799 series in this other series of posts.

I’ve been endeavoring to correct some of the other ExactRail cars I have, removing the Marine Industries logo and adding in the Hawker-Siddeley logo. The old lettering can be removed by VERY carefully scraping with a curved scalpel blade. Done very lightly and carefully, this can remove the printed lettering without damaging the paint underneath. Another method I’ve used to successfully remove lettering is to rub it with a Micro-Sol soaked Q-tip.

The Hawker-Siddeley logos came from a Microscale data set of various freight car builder logos (set # MC-4309).

The original Marine Industries logo is at left in the below photo, and the Hawker-Siddeley logo and placement is illustrated on the car to the right.

Image1

I haven’t addressed changing the new date by the weight data lettering below the car number yet; I probably will, but that will involve piecing some things together from some proper CP data lettering (which I will need to make sure I have).

To maintain a little bit of variety, I also wanted to leave one car as representing the later Marine Industries, which would allow keeping the existing MIL logos and build date data, but require renumbering the car into the new series. The snag here of course is that the numbers on these gondolas are a bit smaller than the standard numbers on other cars, so the reporting marks and numbers from standard CP Rail lettering sets don’t fit here. Naturally I fully realized this after I removed the car number from the car. (D’oh.) Hopefully I’ll be able to turn up some appropriate letters to redo the car number on that car so I can have a car from the MIL series. If not, I suppose I’ll have to rebuild it into second black NSC car from the 1965 336700-336799 series…


_______________________

Last week I stripped up to 20 of my Walther hoppers in preparation for detailing. I’m currently working on the interiors of these cars, puttying the slots and holes where the bulkhead pieces used to go and preparing for the interior bracing remodeling. This brings the total number of these cars currently in production to 27, and that’s less than half of what I have stockpiled. I’m hoping to bring this batch of about 2 dozen up to about the same point and then proceed with the next steps as I figure them out in assembly-line fashion. So it might be a little bit while I catch up, and then hopefully you’ll see new posts on that topic.