So in my previous post, I introduced this project and the prototype for these cars, 300 cars built by NSC to an Ortner design in 1974-75. Walthers makes an HO model of the Ortner design, which makes a convenient start to this project. Of course there are some details, both major and minor, that differ between the Walthers model and the AC prototype cars.
The biggest change that needs to happen is that the AC cars have tubular V-bracing between the bays, not the solid bulkheads that the model has. This takes a little bit of work, but is not difficult, and you’ll agree this makes a huge difference in appearance.
If you only want to do minimum changes or detailing to turn the Walthers car into a reasonably accurate AC car, this is the change to make. Also, since the insides of the cars were unpainted steel, this change can be done on a factory painted car while completely preserving the factory lettering, as the inside of the car should be masked and repainted a rusty colour.
The first step is the easiest, just take out the removeable bulkhead pieces and throw them away. (Or, toss them in the scrapbox. A good model railroader is a pack rat; you never know when that oddball useless leftover part now can be repurposed for something completely unintended later. Or at the very least chopped up into smaller pieces or used as part of a steel scrap load or junkyard scene.) Then I fill the holes left behind with modeling putty. Most of the cars I’ve been working on so far I’ve filled the holes using either Tamiya or Squadron putties. Other modelers also recommend Bondo putty from the automotive department, and I’ll probably try that in the future. Canadian Tire is a lot more convenient than the local hobby shops that are an hour+ away.
Once the body putty has had a day to cure, I file it down even with the inside surface of the sides and sand it smooth with progressively finer sandpapers. Once again the automotive aisle at Canadian Tire is rather handy here as a source for 1000+ grit finishing/polishing sandpapers to get a nice smooth interior side.
Smoothing out the bottom of the bays is a bit more tricky with the angled geometries, so I just did the best I could. A sanding stick from the hobby shop gets a good start here.
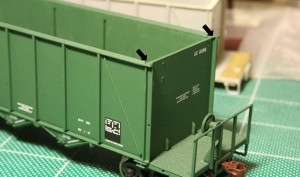
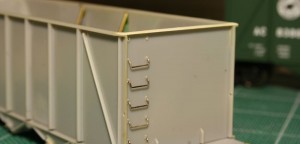
Now, before I move on to installing the interior bracing, I finish cleaning up the top of the car body. (Or this part can really be done first.) The AC cars have an overhanging lip over the top of the car end that the model doesn’t have. I modeled this simply using an HO scale 2″x6″ styrene strip across the top of the end. First, however, two little angle pieces need to be carved off the top of the corners on the model and filed flush with the top of the end, as indicated in the below photo marked with arrows:
Once this detail is removed and smoothed down, the end cap is installed. I simply cut a piece of styrene 2×6 to length and cement it to the top of the edge. Once the end cap has been installed and the cement has set, I file down the angled top chord on the model flush all the way around with the top of the 2×6 end cap.
Once the sides are finished, the interior bracing can be installed.
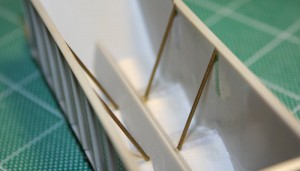
I made the braces from .040″ brass rod/wire. The rod is cut to length (approx. 1.20″) and I file one end off at an acute angle so that it rests properly against the side. Test fit this several times before glueing in place.
I drilled a small hole right next the the centre sill of the car between the bays to accept the bottom end of the brace. Then I simply use a drop of CA glue to secure both ends of the brace.


Hi Chris,
I enjoy following your new blog. Looking forward to learning more about the AC. Do you use the load that comes stock with the Walthers cars?
Cheers,
Walker
Thanks Walker.
I don’t plan on using the included Walthers plastic loads. I don’t believe they look very realistic. You’d never see a load perfectly flat and exactly even with the top edge of the car.
I’ll probably end up using some type of “live” load, with actual material poured into the cars.
Chris. This may seem like an odd question, but exactly how do you sand down that much extra putty? When I do this kind of thing, I fiddle about with a small trowel (that I normally use for applying thick acrylics or oils to canvas) to apply the least amount of putty possible because I find that it takes forever to sand the stuff down. I think you’re doing something differently and I’m missing something.
I use the Squadron sanding sticks, starting with coarse, then medium, then fine, and then I go back to shine it up with 1000 or 1200 grit sandpaper. Do you use that “band” sanding stick thingy in the photo with different grades of sandpaper? What grades do you use for the rough sanding/shaping? If so, do you find that it works better than the sanding sticks that look like the manicure style sticks that Squadron makes?
Details please 🙂
Well, first off, I’ll admit I’m still refining my technique here….
Getting rid of the extra body putty is a bit of a pain; I try to get as little as possible there, although that can be a bit of a trick when trying to fill a larger hold instead of a thin seam. Also the cars in the photo above in this particular post were some of the first ones I did a few years ago, and kicked around on the shelf for a while before I managed to really kick this project back into gear with this blog.
On the inside surface of the car side I knocked things down using some coarse emery boards from either the local drugstore or dollar store. (This step is a little time consuming and also kinda messy.) Then finer grades of finishing sandpaper from the automotive section at Canadian Tire to smooth things out and fix any scratching left behind by the rough work. It sounds like we’ve pretty much got the same approach there.
Plugging the holes at the bottom of the car between the hopper bays was a bit more of a pain in the butt, I carved any really excessive amounts away best I could with my knife/scalpel and did my best to flatten things out using a version of that banded sanding stick thing. It was still awkward, but it would be quite difficult to work down in the hopper bays any other way.