Searchmont Station Details

This series of photos of Searchmont station was taken on July 13, 2013. The station has certainly seen better days, but at least it still stands for now.

IMG_5866

Searchmont station, track (east) side.

IMG_5879

Awning over side door on south side of building.

IMG_5874

Remains of the bracket and control rods for the former semaphore train order signal in front of the operator’s bay.

IMG_5875

Roof rather ends and supports.

IMG_5878

Passenger waiting room and baggage room entrance doors on the track side of Searchmont station. A large window in the waiting room has been boarded over.

IMG_5868

The rarely photographed rear side of the station.

IMG_5876

Grounds and outbuildings behind the station. Note old storage shed hidden in the trees and outhouse at far right. Both smaller structures are painted white with dark green trim.

IMG_5877

Old 2-stall outhouse behind Searchmont station.

Searchmont, Then and Now

Searchmont, mile 31.5 Soo subdivision, is a familiar location on the Algoma Central, as it’s not too far from the Sault, and one of the very few places along the ACR with road access. Closed in the late 1990s, this station still stands and has been designated as a heritage structure under that act that protects old railway stations, however the building is totally derelict, and heritage status or not it’s just a matter of time before nature takes its course on this historic wood-frame building.

I chased the Canyon Tour Train north to Searchmont while visiting the Sault, and took the opportunity to take a few detail photos around the old station. Decrepit and overgrown, it’s a far cry from quaint little station it once was.

THEN:

(Photo links from Ted Ellis’s Algoma Central site.)

Viewed from the cab of a northbound train, about to receive orders from the operator at Searchmont in 1974:

http://algomacentral.railfan.net/images/AlgoCenRy/AC_Searchmont_
Fedorchuk_hoop_11-29-1974.jpg

Northbound regular passenger train arrives at Searchmont in 1972:

http://algomacentral.railfan.net/images/AlgoCenRy/Searchmont_4-25-1972.jpg

In 1992 the railway has switched to Occupancy Clearance System (OCS) radio dispatching and the station is no longer a train order office (note the train order boards have been removed) but still remains open as an active passenger station:

http://algomacentral.railfan.net/images/AlgoCenRy/AC_Searchmont_Station
_8-2-1992.jpg

NOW:

Searchmont station in 2013. Mostly boarded up; some of the second floor windows are intact, but a few are missing, exposing the building’s interior to the elements. The drywall or plaster on the second floor interior walls is totally disintegrating.

IMG_5866 IMG_5872

Hawk Junction postscript

Chris Wilson posted this great pic taken on August 20 to railpictures.ca of some action at Hawk Junction:

http://www.railpictures.ca/?attachment_id=10949

A nice flurry of action at this quiet station, the southbound passenger train, and southbound and northbound local freight trains are all at Hawk Junction at the same time.

The CN 5379 is the same unit that was set out by the train I shot on July 14.

One thing that I’ve been corrected on is that the freight trains are apparently daily; I had been led to believe a few years ago that these too had been reduced to only a three times a week service. Apparently this is not [or simply no longer?] the case.

AC 8201-8500 series hoppers – Part 2: Interior and Top Chord

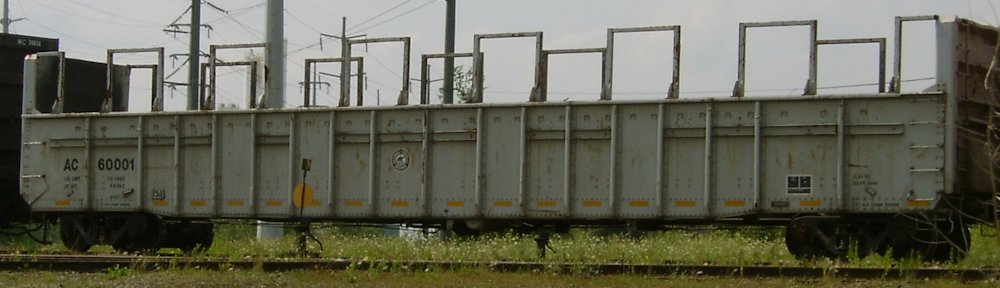
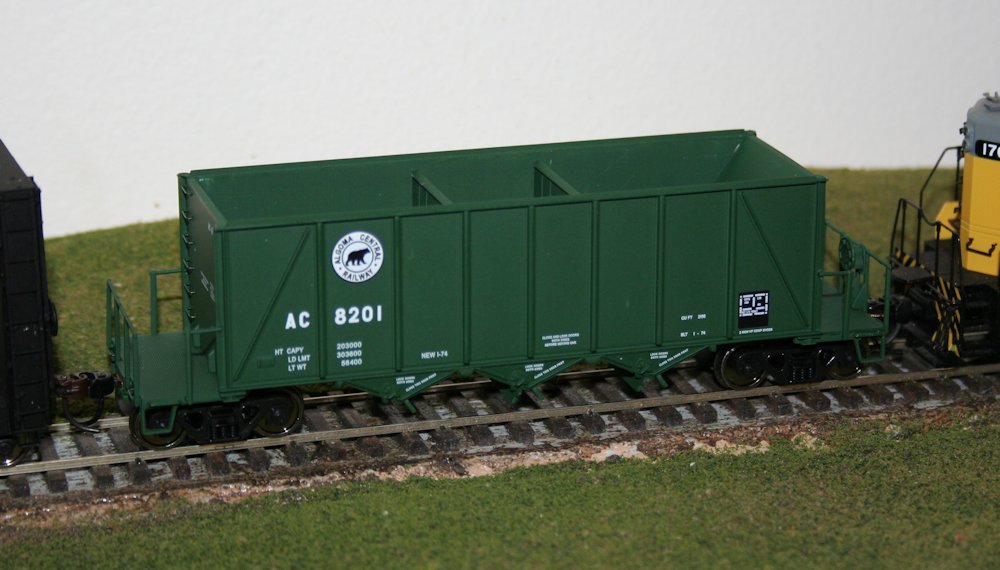
So in my previous post, I introduced this project and the prototype for these cars, 300 cars built by NSC to an Ortner design in 1974-75. Walthers makes an HO model of the Ortner design, which makes a convenient start to this project. Of course there are some details, both major and minor, that differ between the Walthers model and the AC prototype cars.

IMG_6612

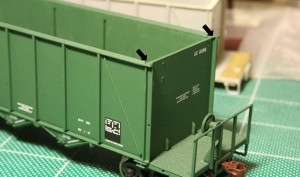
Stock Walthers model without the hokey included aggregate load.

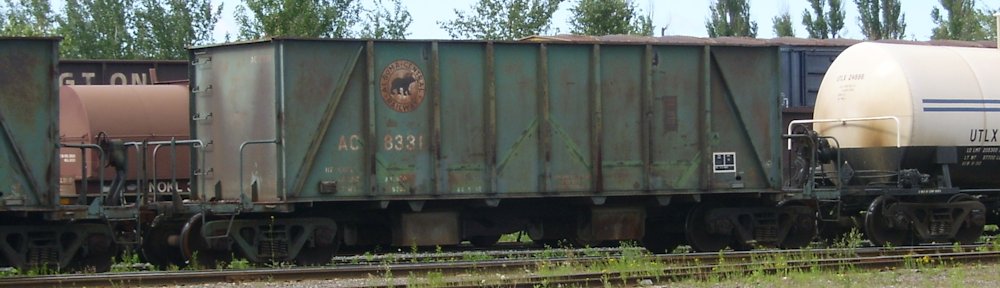
The biggest change that needs to happen is that the AC cars have tubular V-bracing between the bays, not the solid bulkheads that the model has. This takes a little bit of work, but is not difficult, and you’ll agree this makes a huge difference in appearance.

If you only want to do minimum changes or detailing to turn the Walthers car into a reasonably accurate AC car, this is the change to make. Also, since the insides of the cars were unpainted steel, this change can be done on a factory painted car while completely preserving the factory lettering, as the inside of the car should be masked and repainted a rusty colour.

The first step is the easiest, just take out the removeable bulkhead pieces and throw them away. (Or, toss them in the scrapbox. A good model railroader is a pack rat; you never know when that oddball useless leftover part now can be repurposed for something completely unintended later. Or at the very least chopped up into smaller pieces or used as part of a steel scrap load or junkyard scene.) Then I fill the holes left behind with modeling putty. Most of the cars I’ve been working on so far I’ve filled the holes using either Tamiya or Squadron putties. Other modelers also recommend Bondo putty from the automotive department, and I’ll probably try that in the future. Canadian Tire is a lot more convenient than the local hobby shops that are an hour+ away.

SAMSUNG DIGIMAX 360

Several cars in progress.

Once the body putty has had a day to cure, I file it down even with the inside surface of the sides and sand it smooth with progressively finer sandpapers. Once again the automotive aisle at Canadian Tire is rather handy here as a source for 1000+ grit finishing/polishing sandpapers to get a nice smooth interior side.

Smoothing out the bottom of the bays is a bit more tricky with the angled geometries, so I just did the best I could. A sanding stick from the hobby shop gets a good start here.

sandstick1

I used a sanding stick like this one on the inside of the bays.

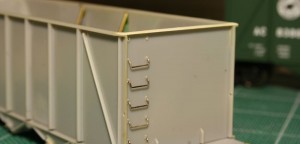
Now, before I move on to installing the interior bracing, I finish cleaning up the top of the car body. (Or this part can really be done first.) The AC cars have an overhanging lip over the top of the car end that the model doesn’t have. I modeled this simply using an HO scale 2″x6″ styrene strip across the top of the end. First, however, two little angle pieces need to be carved off the top of the corners on the model and filed flush with the top of the end, as indicated in the below photo marked with arrows:

IMG_6983

Remove corner detail on top surface at points indicated to allow 2×6 header to be installed.

Once this detail is removed and smoothed down, the end cap is installed. I simply cut a piece of styrene 2×6 to length and cement it to the top of the edge. Once the end cap has been installed and the cement has set, I file down the angled top chord on the model flush all the way around with the top of the 2×6 end cap.

IMG_6986

End cap installed. End handgrabs are partially installed on this car.

Once the sides are finished, the interior bracing can be installed.

I made the braces from .040″ brass rod/wire. The rod is cut to length (approx. 1.20″) and I file one end off at an acute angle so that it rests properly against the side. Test fit this several times before glueing in place.

I drilled a small hole right next the the centre sill of the car between the bays to accept the bottom end of the brace. Then I simply use a drop of CA glue to secure both ends of the brace.
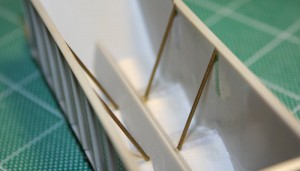
IMG_6618

Interior bracing.

AC 8201-8500 series hoppers – Part 1A: Ballast variation

S3600332.jpg

AC 8331 at Steelton Yard in 2004. Chris vanderHeide photo.

One interesting variation on these cars was a series of 10 cars, AC 8330-8339 that were rebuilt in the early 1990s with side-discharge gates suitable for ballast service.*

You can see the marks on the side of the car where the modified slope sheets have been welded to the sides, so you can see how the inside of the car peaks in the middle.

This would certainly be a neat variation to model, and an interesting kitbash, although this is several years outside of my modeling time frame of 1985.

Has anyone reading this blog ever modeled a similar sort of ballast service rebuild?

*I’ve seen video however from the early-mid 1990s of a couple of these rebuilds mixed right in with other hoppers on the branch train to Wawa/Michipicoten. It seems they were still used in regular service when not used for ballast service.