Shortened Frame and the Flaw in my Plan

The other evening I spent a few minutes filing down my cut underframe for one of these baggage cars. I glued and spliced it together, and wanted to test its fit in the body. Therein began the problem.

Of course the curved bits of the skirting make the bottom of the car a bit narrower, and I wasn’t able to get the underframe in past them. And the laminated sides are actually fairly rigid where they’re glued together and to the ends, so while trying to figure out a way to slip it in there, this happened:

IMG_8455

The damage is certainly minor; it just split the brittle CA joint between the side and the end, but it illustrates a bit of a flaw in my assembly sequence.

It’s relatively easily surmountable; I just need to file the backs of the curved skirting down to flatten the back side so that the underframe slides in past them. It’ll make me look at my plan for subsquent cars based on these sides and core kits – either I need to file the backs of the skirts on all these cars, or I really need to make the roof, rather than the floor, the removeable part. If I want to model dropped steps on some of the coaches I have on deck, I may have to do that anyway.

This car’s body and roof have already been glued together as a unit, so it will be repaired and have the backs of the end skirts filed to fit the floor. I’ll revisit this again with the next car.

AC 300 Body Assembled

A little more work on this project tonight and the first body is assembled:

IMG_8441 IMG_8444

Starting to look like something now, although there’s still a ways to go in roof and body detailing, plus the underframe needs to be tackled. (I’ve cut the frame, but that still needs to be filed down a bit and spliced back together, then the addition of all the underbody detailing.)

I’ve already started preparing the sides for the second car now as well, I’ll be building up this pair together.

AC Baggage Cars 300-301 – Part 2: Ends and Roof

With two sides finished, I moved on to preparing the ends and cutting the roof to length.

The ends from the Train Station Products Pullman-Standard core kit just needed a minor adjustment near the bottom to handle the curved skirts at the end of the cars. The stock ends have a bit of thick bracing all the way down to the bottom, which interfered with the curved skirt on the USP side. I cut this back with my razor saw, and also shortened up these tails and filed a different curve profile into them to match my sides. A picture being worth a thousand words, the below image comparing the modified end (marked with an “A”) to the stock end probably explains it better and clearer than I can:

IMG_8427

Necessary to make the sides fit the ends properly, but pretty simple.

With the ends taken care of, it was time to tackle the roof. These baggage cars are quite a bit shorter than a full size 85′ coach, so the roof needed to be cut down to length. I ended up making a total of four cuts; with the extra piece that’s removed taken out, there were three places where the roof is spliced back together.

In a lot of the reference photos I have it’s a little difficult to make out the seams in the roof, but it appears from one or two photos that the third panel from the one end is a fair bit narrower than the others. This then is where the cuts were made to remove the extra bit of roof. I also cut the two end-most panels to narrow them down a little. A lot of careful filing to clean up the cuts and remove extra material to bring the length down to exactly the right amount for the splices, and we end up with something like this:

IMG_8410

You can see I’ve also installed the baggage doors from the kit. Like the sides, these are .020″ styrene sheet with the window openings milled out. They’re cut oversize to the opening so they can be glued to the back of the clear base. I made one modification here to the doors, trimming away the extra material below the door in order to clear the floor.

Here’s the underside of the roof, showing styrene strip used to hold the spliced roof together:

IMG_8422

You can also see in the above image that I cut away short stretches of the inner ridge on the roof in order to clear the doors on the sides.

With the ends and roof prepared, next I can assemble the car’s body!

AC Baggage Cars 300-301 from Union Station Products Kit – Part 1

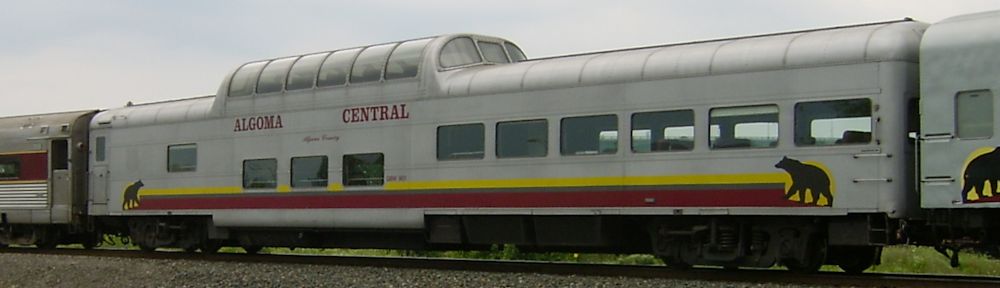
With no family commitments on the Monday of the Thanksgiving weekend, I decided to make a deliberate effort to take advantage of a day off actually spent at home to do some work on various model projects. One project I’ve been working on today is a model of one of the Algoma Central’s two ex-Denver & Rio Grande Western baggage-express cars.

These two cars are a little unusual in that the lower portion is clad in stainless steel fluting, but the upper part of the car is smooth. Built as baggage/RPO (railway post office) cars by Pullman-Standard, these cars were originally ordered by the Chessapeak & Ohio Railroad, but ended up being delivered instead to the D&RGW in 1950. The Algoma Central acquired two of the three D&RGW cars in 1973, numbering them 209-210. In 1981 when the 200 series GP38-2s were delivered, all of the AC baggage cars were renumbered into the 300 series, and these became AC 300-301.

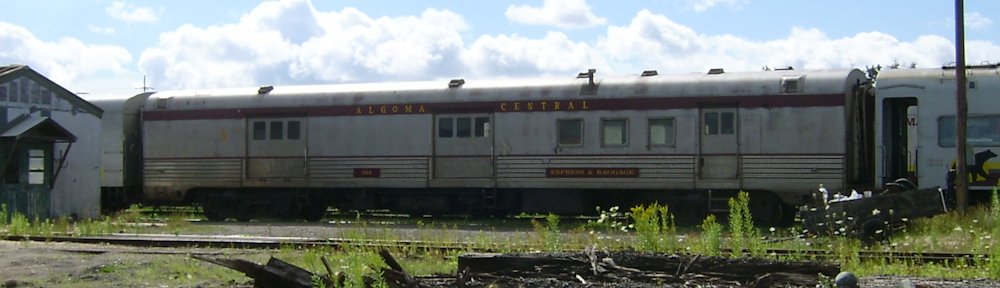
Here’s the 301 at the Steelton yard shop tracks in 2004:

SAMSUNG DIGIMAX 360

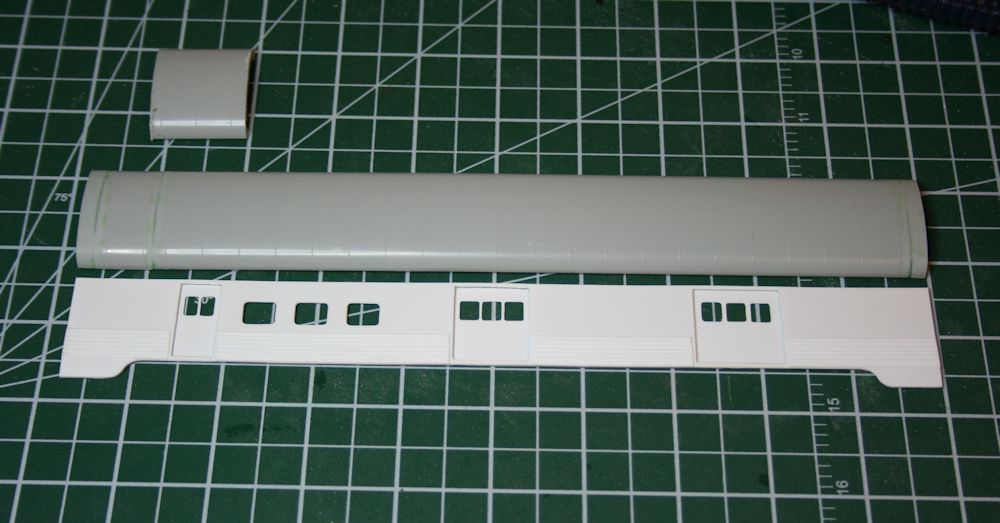
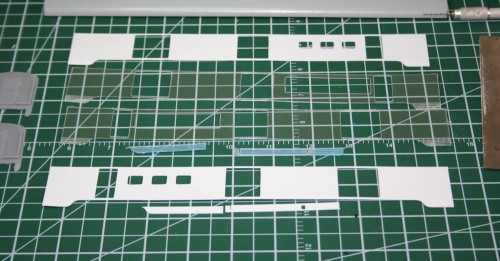
The basis for this model is a car side kit from Union Station Products. It’s one of a group of such kits I acquired back in July. (Actually I got two copies of this particular kit, so I will be able to model both car numbers 300 and 301.) The kit consists of a .020″ white styrene side and a .040″ clear plastic (acrylic?) core that are meant to be laminated together. The core has cut out sections for the windows, these to be applied later, after painting. The side kits are then meant to be used with passenger car core and detail kits from Train Station Products (which USP also resells) to provide the roof ends and underframe for the car.

The Algoma Central removed the skirting from these cars when they acquired them, so the first stop was to perform some minor surgery on the car sides to cut away the skirting between the trucks:

IMG_8399

This was easily accomplished with a straightedge and many light passes with a sharp X-acto knife to cut away the unwanted material. Following that, it was essentially a matter of cleaning up the various pieces before assembly.

The skirting area on the clear core has a bunch of horizontally scored lines in it so that the skirts can be curved inward using pliers. (The smooth side is the outside, the cut side curves inwards.) I used a a pair of flat (not needle-nose) pliers to gently curve the remaining skirting at the car ends. Just work gently and slowly and evenly along the skirt you’re bending.

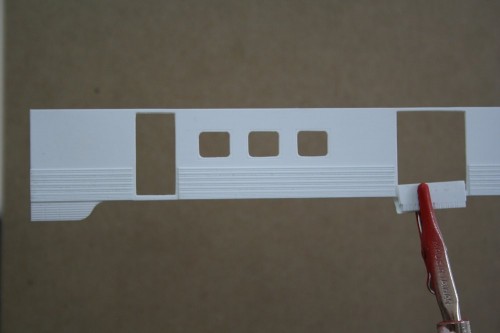
The kit instructions suggest you start with the skirting when you glue the side and core together. I started with the skirt at one corner of the car and careful to keep the whole side square and lined up, glued it to the clear core with CA glue, applied with a toothpick. After holding that in place and allowing it to set for a few moments, I proceeded out from that corner along the side of the car, applying glue to a section up to a door opening, and laminating that portion of the side. I did not go ahead and glue the skirt at the other end right away – you want to start at one end and work your way down; if you’re off by even a fraction of a millimeter you can end up with a major ripple in the side.

Once the side and core were laminated together, I spent some time going over the outer edges and also the edges of the door frames with a small flat file to clean up all the edges and remove burrs from the manufacturing process. (The sides and cores are CNC milled.)

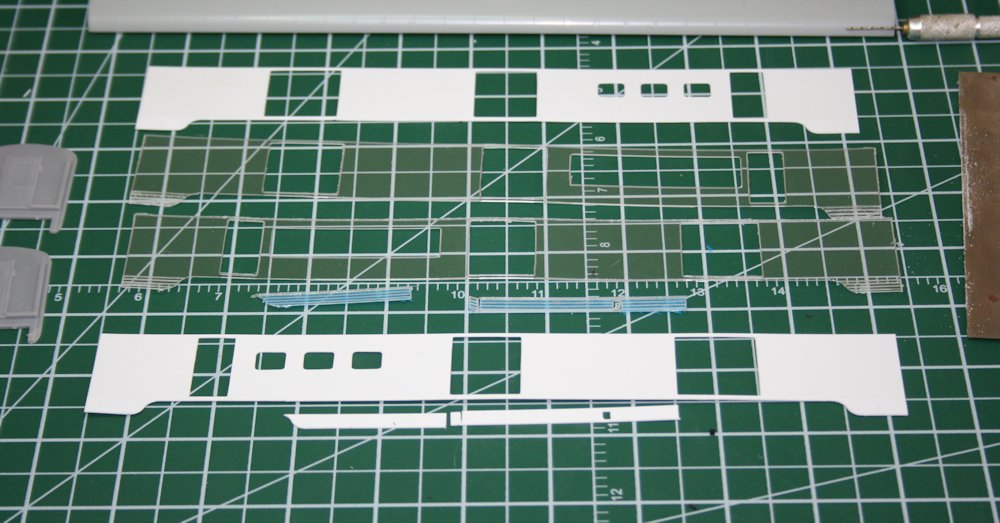
For their fluted side cars, Union Station provides a separate strip of fluting that is laminated onto the surface of the car side. This was easy to cut to length with my Chopper and apply to the side. I attached these using Testor’s liquid cement. I applied a small amount to the back of the fluting strip to tack it in place, and once properly aligned, applied cement sparingly around the edges of the strip with a very fine point brush. This wicks into the joint and makes a very clean and permanent joint.

Here’s how the one side looks so far:

IMG_8403

Just need to finish the other side (actually x3 because I’m doing two of this car) and then work on the roof and underframe, which require a certain amount of cutting and splicing because the baggage cars are shorter than a typical 85′ coach which the core kits are designed for.

ACR Survivors

On my trip to Sault Ste Marie to ride the Tour of the Line, I got to see and photograph a few examples of surviving original AC equipment.

At the yard at Steelton was a string of 5 AC gondolas loaded with track panel sections for emergency track repair and replacement work.

IMG_7351IMG_7350IMG_7349 IMG_7356

A similar set of 5 gondolas was also on hand at Hawk Junction. Note that the closest car in this string is an older 48′ gondola!

IMG_7559.jpgIMG_7981IMG_7979

These AC gons are extremely rare now. The only remaining examples are in maintenance service like these, having long been removed from any sort of revenue service. These could even be among the last 10 survivors (of the 52′ gons), although there could be a few more still in similar service on former WC lines.

Also at Steelton yard is one of the former AC steel cabooses (acquired secondhand by the AC from Canadian Pacific around 1990-91) and one of the AC’s two original steel snowplows (although the plow has several years before been repainted into WC maroon and gold colours). These were screened by the gondolas and other junk and equipment from where the passenger train boards, but fortunately I got shots from the other side using my 200mm zoom lens on my July trip:

IMG_5973IMG_5982

I also saw a few AC marked pulpwood flatcars on both trips, although it’s hard to call these original survivors, since the grey AC 238100 series pulpwood cars were rebuilt from former CP cars in 1998, well after the Wisconsin Central takeover.

Also, though it was located much farther back in the shops area and wasn’t accessible for photographs, heavyweight business car “Agawa” is still hanging around the former AC property. I have no information on the disposition of former AC business car “Michipicoten”.

Finally, I’m not sure whether you can consider this a “survivor”, but this old ex-Ontario Northland work boxcar was sitting in the weeds alongside a maintenance spur near the Oba lake “floating” trestles:

IMG_7630

Not bad for 18 1/2 years after the end of the Algoma Central as an independent railway. (The WC sale was official on Feb 1, 1995.)