With no family commitments on the Monday of the Thanksgiving weekend, I decided to make a deliberate effort to take advantage of a day off actually spent at home to do some work on various model projects. One project I’ve been working on today is a model of one of the Algoma Central’s two ex-Denver & Rio Grande Western baggage-express cars.
These two cars are a little unusual in that the lower portion is clad in stainless steel fluting, but the upper part of the car is smooth. Built as baggage/RPO (railway post office) cars by Pullman-Standard, these cars were originally ordered by the Chessapeak & Ohio Railroad, but ended up being delivered instead to the D&RGW in 1950. The Algoma Central acquired two of the three D&RGW cars in 1973, numbering them 209-210. In 1981 when the 200 series GP38-2s were delivered, all of the AC baggage cars were renumbered into the 300 series, and these became AC 300-301.
Here’s the 301 at the Steelton yard shop tracks in 2004:
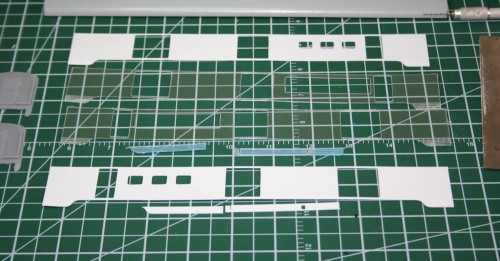
The basis for this model is a car side kit from Union Station Products. It’s one of a group of such kits I acquired back in July. (Actually I got two copies of this particular kit, so I will be able to model both car numbers 300 and 301.) The kit consists of a .020″ white styrene side and a .040″ clear plastic (acrylic?) core that are meant to be laminated together. The core has cut out sections for the windows, these to be applied later, after painting. The side kits are then meant to be used with passenger car core and detail kits from Train Station Products (which USP also resells) to provide the roof ends and underframe for the car.
The Algoma Central removed the skirting from these cars when they acquired them, so the first stop was to perform some minor surgery on the car sides to cut away the skirting between the trucks:
This was easily accomplished with a straightedge and many light passes with a sharp X-acto knife to cut away the unwanted material. Following that, it was essentially a matter of cleaning up the various pieces before assembly.
The skirting area on the clear core has a bunch of horizontally scored lines in it so that the skirts can be curved inward using pliers. (The smooth side is the outside, the cut side curves inwards.) I used a a pair of flat (not needle-nose) pliers to gently curve the remaining skirting at the car ends. Just work gently and slowly and evenly along the skirt you’re bending.
The kit instructions suggest you start with the skirting when you glue the side and core together. I started with the skirt at one corner of the car and careful to keep the whole side square and lined up, glued it to the clear core with CA glue, applied with a toothpick. After holding that in place and allowing it to set for a few moments, I proceeded out from that corner along the side of the car, applying glue to a section up to a door opening, and laminating that portion of the side. I did not go ahead and glue the skirt at the other end right away – you want to start at one end and work your way down; if you’re off by even a fraction of a millimeter you can end up with a major ripple in the side.
Once the side and core were laminated together, I spent some time going over the outer edges and also the edges of the door frames with a small flat file to clean up all the edges and remove burrs from the manufacturing process. (The sides and cores are CNC milled.)
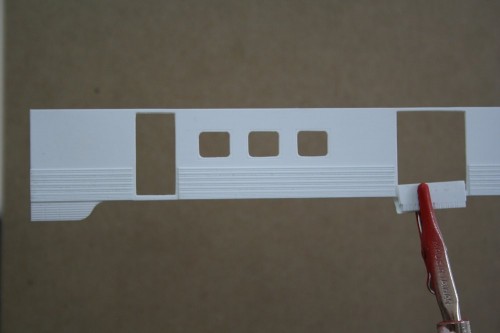
For their fluted side cars, Union Station provides a separate strip of fluting that is laminated onto the surface of the car side. This was easy to cut to length with my Chopper and apply to the side. I attached these using Testor’s liquid cement. I applied a small amount to the back of the fluting strip to tack it in place, and once properly aligned, applied cement sparingly around the edges of the strip with a very fine point brush. This wicks into the joint and makes a very clean and permanent joint.
Here’s how the one side looks so far:
Just need to finish the other side (actually x3 because I’m doing two of this car) and then work on the roof and underframe, which require a certain amount of cutting and splicing because the baggage cars are shorter than a typical 85′ coach which the core kits are designed for.


I really appreciate this page as I have two USP Budd kits that I want to assemble and finish off with Alclad2. However, I’ve been hesitant as I’ve never put together a USP kit together before. This this is helpful and I’m bookmarking it for reference.
God Bless and thank you for posting this.
Thanks Tony. This is the first USP kit I’ve put together, so there may be a little trial and error and some refinement as I go along.
I’ve got several different USP cars to represent a few of the different secondhand cars that the ACR rostered. Only a few of them have stainless steel on them, but I’d like to try using that Alclad technique on the stainless cars. I’ve never tried that one before, but it looks like a real winner.
Hi,
Thanks so much for responding. Your thread is very helpful and I’ll be turning it frequently as I attempt to put together my first USP kit, which will be a Budd Tavern-Observation car, with the blunt end. If I can be of any help with the Alclad procedure, please contact me anytime!
God Bless and thanks 🙂