36′ Wooden Box Bunk Cars

Like every railway, especially those with extensive trackage through remote areas, the Algoma Central rostered a number of bunk cars to use as crew cabins for work crews working on construction or maintenance projects. Many of these cars are customized and home built for specific needs, usually from retired passenger or freight equipment.

The Algoma Central had a number of such cars converted from their old 36′ boxcars originally built in the early 20th century. There appeared to be a number of these in the 10600-10620 range, with a few others scattered elsewhere in the 10000 series work car numbering. A few of these cars were still in service in the early 1980s although starting to be replaced by pre-fabricated bunk units on flatcars (some of which reused the same numbers), and hoistman’s bunk car 10607 was even still in service in the late 1990s at Steelton yard.

AC_10608_Steelton_9_24_1983

Engineman’s bunk car AC 10608 (above, Ted Ellis photo September 24, 1983) is a good example of the typical configuration of the ACR’s bunk car conversions from the old 36′ boxcars; although from the photos I’ve collected of about 4 or 5 different examples of these cars each one is slightly different from each other in the specific details.

Since I’ve been working on a few crane support cars, I’ve also wanted to have that old hoistman’s bunk car (AC 10607) to match up with the crane equipment set (also, that particular car was repainted in a VERY eye-catching bright yellow in the early 1980s). And if I was going to build one, I was going to at least build a second one.

I actually started these around Christmas, but during January and February I basically did absolutely no modelling as I was working on some home improvement projects. However with some of the work out of the way, lately I’ve been able to dive into this project again and make some progress on this pair of bodies.

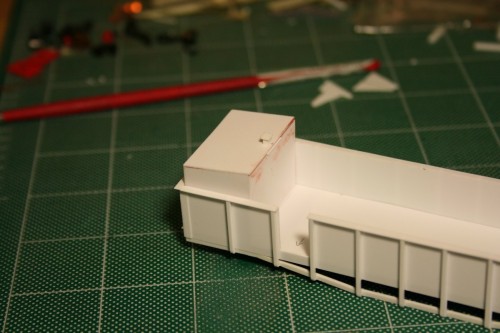
IMG_6895

(Left/rear AC 10608 Engineman’s bunk, right/front AC 10607 Hoistman’s bunk)

Each of these two cars are based off of specific prototype photos to match the subtly different details of the cars. (In this case, primarily the end doors on 10607, and differences in ladder details (still to come). Otherwise, the side door and window arrangements on these particular two cars are virtually identical, although other cars had some variations.)

The bodies are fairly straightforward, being built from .040″ scribed styrene sheet. The roofs so far are plain styrene sheet with some internal bracing to maintain the proper shape along the length of the car with some scale 1×8 for the fascia strip along the top of the body at the eaves.

091

The windows were definitely the most involved and time-consuming part of the project so far. Not having anything that would match both the small windows and larger windows by the doors (I probably could have used some Tichy windows for the smaller ones but nothing for the larger windows) I scratchbuilt all the windows entirely from styrene strip for a consistent look. The single small window shown above is 12 individual pieces of styrene strip including the window sashes and outer frame.

After cutting a scale 24″x24″ opening for the window, the outside of the window was trimmed with scale 1×4″ strip (with a piece of scale 2×3″ for the thicker horizontal sill). The inner frame (sash) of the window was made up of individual .030″x.030″ strips and the window mullions were painstakingly assembled by three pieces of .020x.020″ strip carefully cut and filed to fit exactly in the opening. (An exercise in patience and precision if there ever was one.)

This completes some of the major work on the body however. There is some additional detailing to do, and the doors need to be fashioned and all the ladders/grab irons added to complete the body details and then the roof and underframe will need to be completed yet. I’m looking forward to getting these a bit more detailed and sitting on trucks. I think some of these cars will come together into an interesting looking collection of old cars for a work train at Hawk Junction.

Gondola Details and Dimensional Information

I had some requests for some more details on the dimensions and parts used in the scratch build of these two gondolas, so I’ve scanned my rough sketches for the post spacings and overall dimensions, and will attempt to provide some further details of specific measurements and strip sizes below.

I posted a scan of my scale drawing that I used as my official guide in my previous post, here are the rough sketches with a few more spacing dimensions jotted down.

ac0027

AC 4601-4803 rib spacing sketch, not to scale. (Click on image to enlarge)

ac0028

AC 4804-4850 rib spacing sketch, not to scale.

Also, for reference, here are actual dimensions from a 1960s Official Railway Equipment Register for the two series:

4601-4603 4804-4850
I.L. 39’5″ 40’10”
I.W. 8’11” 9’0″
I.H. 4’0″ 4’0″
O.L. 40’0″ 41’8″
Ex.W. 9’9″ 9’10”
Ex.H. 7’11”

Sides

Height of the side pieces (cut from .020′ sheet) is five scale feet, even. Overall length of the sides is 40′ for the 4601-4803 cars or 41′ for the 4804-4850 cars. (This probably shortens the inside length a little, but the scale foot difference and the different rib spacing makes a pretty good difference between the cars.)

For boom cars 10587 (ex 4601-4803) or 10588 (ex 4804-4850) the angled cut out reduces the end height by 2’6″ and runs in 7’9″ from the end.

Top chord along the top edge is .010x.080″ strip.

Drop Sills

For the drop side reinforcement, I cut the pieces from .040’x.060′ strip (.060′ in the vertical direction). I started the drop 6′ in from the end on both cars. The horizontal drop portion is 10’6″ on the 4601-4803 cars or 13’6″ on the 4804-4850 cars, centred. The bottom edge of the fishbelly is 1’6″ below the edge of the side sheet.

Ribs

The prototype cars actually appear to have ribs that are a Z angle, which isn’t too hard to custom fabricate (I’ve done it before), except for the rounded off bottom bit. I ended up just making them a little more solid on this pair of cars, using plain .040x.040′ square strip on a .010x.060′ flange piece. The square stock is not centred on the flange, but aligned to one edge. Note when installing the ribs that the flange edge faces away from the centre of the car. (i.e. the “open” end of the Z would face the centreline of the car.

The height of the rib pieces then is of course cut to length – 5’6″ near the car ends, 6’6″ in the centre and cut to size when placed over the angled part of the drop.

See above diagrams for spacing.

Corners and Ends

Ends are .020″ styrene sheet again like the sides, and 9 scale feet wide.

The corners are trimmed up with .010x.080″ strip. Rivet decals will be applied later to the corner strips and at places along the bottom edge of the side.

The end bracing is .010x.060″ strip applied flat to the end sheet, and a .010x.030″ strip applied on edge on top of that to form the distinctive T section stiffening ribs.

Floor and Underframe

The styrene floor is also .020 sheet, cut to fit within the assembled body sides and ends. I used .080 spacer strips to recess it from the bottom edge, and I’m planning to apply a wood floor with 1x? strip after the body is painted.

The bolsters are built up from styrene to an overall depth of .165″ for the truck mounting following similar commercial parts. This seems to be about the right height, although may still require an adjustment washer. (I’m really hoping it doesn’t end up too far off.)

I used a piece of lead sheet for the weight (we had some old leftover flashing at the club – I’m not sure how readily available the lead sheet is still these days but there must be somewhere to find it) and then built up the underframe on top of that. The centre sills are .040 sheet and should roughly match the profile of the sides. The rest is all cut to fit to give an impression of the framework.

Lots more to be done yet, but I think that covers the current build progress so far. Hope this is of interest or help to those curious. This is an interesting build so far, and it’s been fun to have some questions and feedback.

Bucket Car Progress

My scratchbuilt model of bucket car AC 10591 has continued to make some good forward progress this weekend. Both this car and boom car 10588 now have a styrene floor, and basic bolsters and a piece of lead sheet glued in for weight, and this evening I made some additional progress on a basic interpretation of and underframe for 10591. The second car is yet to be done, but will be similar.

IMG_5604

The cars were rebuilt from flatcars, so in addition to the interesting fish-belly side reinforcements, the cars have a heavy fish-belly centre sill underframe as well. I just have a few more pieces of bracing to fabricate, and then adding brake detail to the underframe.

Also on one end of the 10591 is this large boxy structure. I’m not entirely sure of its purpose but suspect it to be an oil tank of some sorts. Most of the photos I have of the car are all from the end with the box, making visual inspection of the inside face of it difficult. What can be seen from any angle, however, is a large vent on top, and what appears to be a lifting ring in the middle of the top surface (possibly attached to an access or filling hatch?). This 1981 wreck photo from Ted Ellis shows the railway’s wreck crane in action, with this bucket car included in the train, and provides a partial view of the inside face of the box. From what is visible here, the face appears mainly plain, with no doors (so it’s does not appear to be a storage cabinet), although a short drip strip across the middle third of the top edge is interesting. Perhaps there is a drain valve or some sort of access hatch to such at the bottom?

IMG_5606

I’m hoping to find some ex-ACR guy that might remember this car and might be able to confirm those details, but in the meantime I’ve progressed with fabricating the box structure itself and the top vent. I’ll continue on with other details for now, but if I don’t find any more information I’ll just have to go with my best guess for the details to apply.

Boom Car Scratchbuild

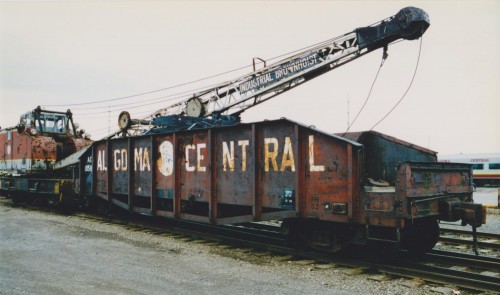
Here’s the second gondola car in progress. This one will end up becoming AC 10588, which is one of several cars modified as a boom car for one of the ACR light diesel cranes.

IMG_5532

Completed sides for 10588

Rebuilt from one of the cars in the AC 4804-4850 series, the additional unique features of this car include the angled cut offs at each end which allow the crane’s boom to clear and swing over the car. Also, slightly hidden inside the car’s side walls appears to be several equipment lockers as well as a support frame for the crane boom to rest on in transit.

ACR from Blair 001 (2)

AC 10588 with crane 10215 at Steelton yard in the 1990s. Blair Smith photo.

This evening I managed to assemble the sides of this car with low ends, and also applied the basic end bracing to both cars. Major parts still to be done on both cars is the entire underframe and floor (obviously) and the finer details like grab irons. Then of course the additional equipment storage lockers for both cars.

IMG_5540

Both bodies assembled (sides and ends). Still needs floor and under frame.

ACR Home Built 40′ Gondolas – Drawings and Scratchbuild

In the late 1940s, the Algoma Central Railway’s car shops rebuilt 250 old 40′ flatcars into gondolas by fabricating new bodies on existing underframes. This fleet comprised two unique series: AC 4601-4803, 203 cars with 39’5″ inside length rebuilt from late 1946 to late 1947; and AC 4804-4850, 47 cars with 40’10” inside length rebuilt in mid-1948. In addition to the extra one foot of length, the latter cars can be visually identified from the former by a different spacing of the side ribs. These cars lasted in revenue service into the 1970s by which time most of them were retired, but several cars remained in work service for a longer time.

ac10591

AC 10591, ex-4601-4803 series gondola in work service as a bucket car for the railway’s diesel host in the early 1990s. Photo courtesy Blair Smith.

As “new”, the cars were painted in a simple black scheme with what is probably the first usage of the black bear logo on freight cars. The logo was ringed in red, and a partial example of a 4601-4803 series car in original paint can be seen on the left edge of this 1956 photo. (Another 350 brand-new 48’6″ gondolas were also acquired in September 1947 from National Steel Car in the AC 3501-3850 series, and also painted this way when new.) Meanwhile, this 1979 photo of AC 4849 shows the paint scheme they wore in the 1960s-1970s.

Obviously such a strikingly unique car with those open fish-belly side sill reinforcements is just begging to be modeled, and this home-built car is just the thing to help capture the character of the railway. To that end, I’ve used known overall dimensions from ORER listings (thanks to Railwire user “Kisatchie” for looking up some numbers for me as my oldest copy is from 1975 which no longer includes either of these series) and photographs to try to work out some sketches and a “reasonably close” scale drawing.

ac0026

Side elevation drawings comparing AC 4601-4803 and 4804-4850 series gondolas.

Over the last couple of weeks I’ve been slowly working on a pair of these cars – one each of each type. Both will become support cars for my diesel crane: bucket car 10591 (ex-4601-4803) and boom car 10588 (ex-4804-4850).

IMG_5533

In progress model of 4601-4803 series car.

The sides are .020″ styrene, with side posts consisting of a .040x.040″ strip on a .010x.060″ bottom flange – although it appears the ribs on the prototype car are actually a Z-angle. The drop side sill is .040x.060″ strip and the top chord is .010x.080″ strip.

Stay tuned for more progress on what should be a very unique pair of cars.