AC 306 Painted and Assembled

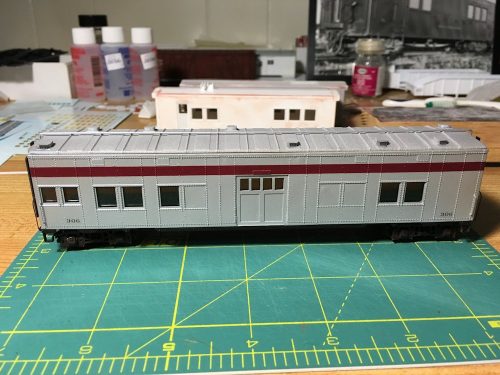
This Sunday I had the advantage of having pretty much the entire day to myself and spent the afternoon masking and painting my modified troop sleeper-cum-baggage car. Earlier in the week, the sides were assembled into the body frame and the body, roof and pipe were separately primered and painted “Aluminum”. Sunday afternoon was spent masking and painting the letterboard stripe (CPR Tuscan/Maroon) and the underbody and sills (flat black).

003

Once the paint had set and the masking was removed, I installed the window glass (using the original clear parts from the Walthers model for the existing windows and a sheet of clear styrene across the baggage door windows using a bottle of Microscale Kristal Kleer I had on hand (which seems to be more or less basically just regular white glue…?) and then installed the roof. The final bit of assembly involved installing the (previously bent and painted) air? pipe down the roof centreline, gluing it into holes above the end diaphragms, and tacked down at a couple of points to the roof carlines to keep it straight and attached. A small weight was placed on top to hold the pipe down while the glue dried.

With the body painted and assembled, one of the last tasks was to letter the car, which in this case consisted of only adding the car numbers to the four corners of the car using some of the extra digits from the number jumble in the Black Cat ACR passenger set. The railway never did get around to actually applying their name to the maroon stripe on the real car either, so that completes the lettering of this car…

A few final details remain such as stirrup steps below the baggage door and a light (passenger cars usually stayed in pretty good condition) weathering job, but this car is nearly complete!

Troop Sleeper Baggage Conversion Body Modifications and Details

So this project has been on the shelf for a long time. A very long time. I last wrote about this here in September 2013, and even that was to recount work that I had done before I actually started this blog. So far, I’ve posted about scratchbuilding the new doors, and briefly about plating some of the existing windows and vents (the easiest possible part of the job). Some of the work of cutting out the new opening had been started, but never fully cleaned up.

So recently I’ve pulled this out and started to finish that off.

The original troop sleeper configuration has a narrow personnel door in the centre, with single windows on either side. The new baggage door takes up part of this space. So the new opening needs to be marked and cut out, but also parts of the original openings need to be completely filled in. This involves filling in the windows with sheet styrene and removing all of the detail around them, as well as some of the same for the very top of the original door, which was slightly higher than the new sliding door. I used some styrene strip along the inside of the new opening to frame it up and unify the edges where the old window openings were, although this also helped correct some sloppiness in my original cut.

Then body putty was used on all the seams and areas around the door and window fill areas to fill and smooth things out, and everything sanded smooth. A bit of a rounded bevel was also filed into the door posts, although the top edge was left as square as possible.

130

The new rivet strips along the door posts were added using Micro-Mark 3D rivet decals. The small plate above the door was added using an .060″ wide strip of .005″ styrene with more Micro-Mark decals for the corner rivets. (In older photos this plate seems to have mounted some sort of hook/hanger above the door, probably to assist in hauling up express cargo. It appears though that this hook was removed by 1980s era photos of the car I’m modelling, so I don’t have to try to bend wire into such a small feature. Phew.)

This is really getting this car starting to look like something now, and is pretty much down to a few coats of paint for the next step…

Freight Car Friday #56 – CPAA 208558

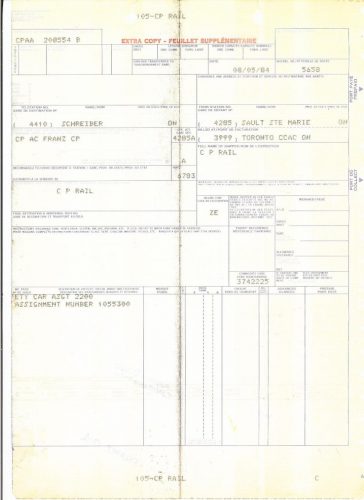
Today’s “Freight Car Friday” post is linked to a scan I received of an empty car waybill for the movement of an empty Canadian Pacific boxcar. The waybill shown below is for the movement of empty boxcar CPAA 208554 from Canadian Pacific’s Sault Ste. Marie yard to the CP yard at Schreiber, ON, via the Algoma Central from Sault Ste. Marie to Franz.

840805wb

Note a few interesting things about the waybill: there’s no actual shipper or consignee other than CP Rail itself. The notes at the bottom where the load/commodity information would be for an actual loaded shipment indicates a particular assignment number.

Presumably, based on its destination, this car is most likely a car assigned to woodpulp loading (which I’ve written about before) and was returned empty from SOO Line to CP Rail at Sault Ste. Marie, and there it received this billing for movement up to Schreiber where it will be reassigned for loading at one of the pulp/paper mills at Red Rock, Marathon, or Terrace Bay.

The car referenced on the waybill, CPAA 208554, is one of a grouping of cars built by Berwick Forge & Fabricating for the Maryland & Pennsylvania Railroad (MPA) and acquired secondhand by CP Rail in the early 1980s. Later in the late 1980s-early 1990s many of these CPAA cars were renumbered CP by removing the “AA” from the reporting marks. I caught CP (ex-CPAA) 208558, part of the same group and just four numbers away from the car on the waybill, at CP Guelph Junction (Cambellville, ON) in February 2004:

Generator End Details and Body Trim

A few more steps forward on these cars in getting the bodies finished up this week.

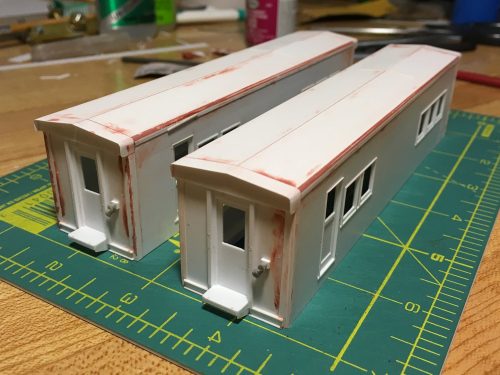
End details have been added with some electrical plugs from a Detail Associates locomotive M.U. stand detail kit, and the step platforms scratchbuilt from styrene sheet and strip. Mounting holes for all of the end of side grab irons have been located and drilled out, but these will be installed later after the bodies are painted. The final remaining details yet to be done on the ends are adding the brake wheel and hardware to the “B” end of the car, and adding ventilation louvers on the end doors using the 3D louver decals from Micro-Mark, which I do have on hand.

140

One of the interesting visual features of these cars is the sheet metal overhang over the ends; I replicated this with .005″ styrene sheet wrapped around the roof of the car. The trim work on the upper fascia of the car side and the corners was also cut from .005″ strip, and then the joints were filled and sanded down. (And rounded off on the side corners.) I also added a few more pieces of .005″ sheet (barely visible at the far ends of the cars) for the roof hatch where the steam exhaust vents are mounted.

This project may pause for a bit while I work out how to do the roof vent/stack details (try to scratchbuild, try to draw up some parts for 3D printing?) but there is also some minor underframe work to be done yet as well.

Steam Generator Doors and Windows

Over the last couple of weeks I’ve been making slow but relatively steady progress on my pair of steam generator cars, with both bodies assembled and window and door trim installed. I’ve also managed to make the side and end doors and start adding the window sash detail. (The doors are completed on both cars, and the window sashes are complete on one of the two.)

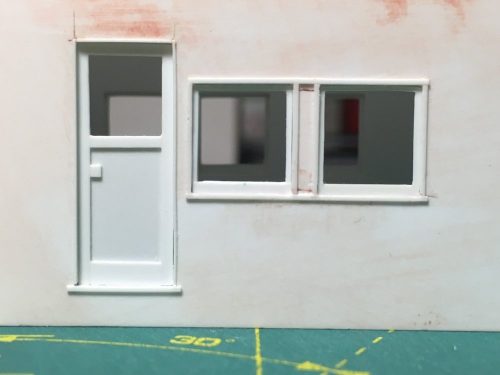
The doors are a simple construction of .010″ styrene sheet cut and filed to fit the opening with the raised framing laminated on using .010x.040″ and .010x.080″ strip. The window openings in the doors were cut out after the trim work was applied and filed flush with the trim. Once complete the doors were cemented in place in the opening. The end doors were similar but without any of the strip trim work.

005

The last step to finish the side windows is adding the window sashes inside the frames. I initially began to attempt framing this in with individual 2×4 and 2×2 strip, but after managing to get the bottom piece of the sash in all the windows, the process actually convinced me to pop them back out and take a similar tack to the doors and laminate the sash frame using .010″x.020″ and .010″x.040″ strip on a .010″ sheet backing and the VERY CAREFULLY cut and file out the opening. The .020″ thin sash frame is extremely fragile at that point, but once installed the effort is worth it and I found the process to be going much better than trying to build up the sash frames inside the opening from individual strips.

I have a few more windows to do on the second car yet before I move on to the next detailing stage in construction.