Tar and Gravel Flat Roof Surface

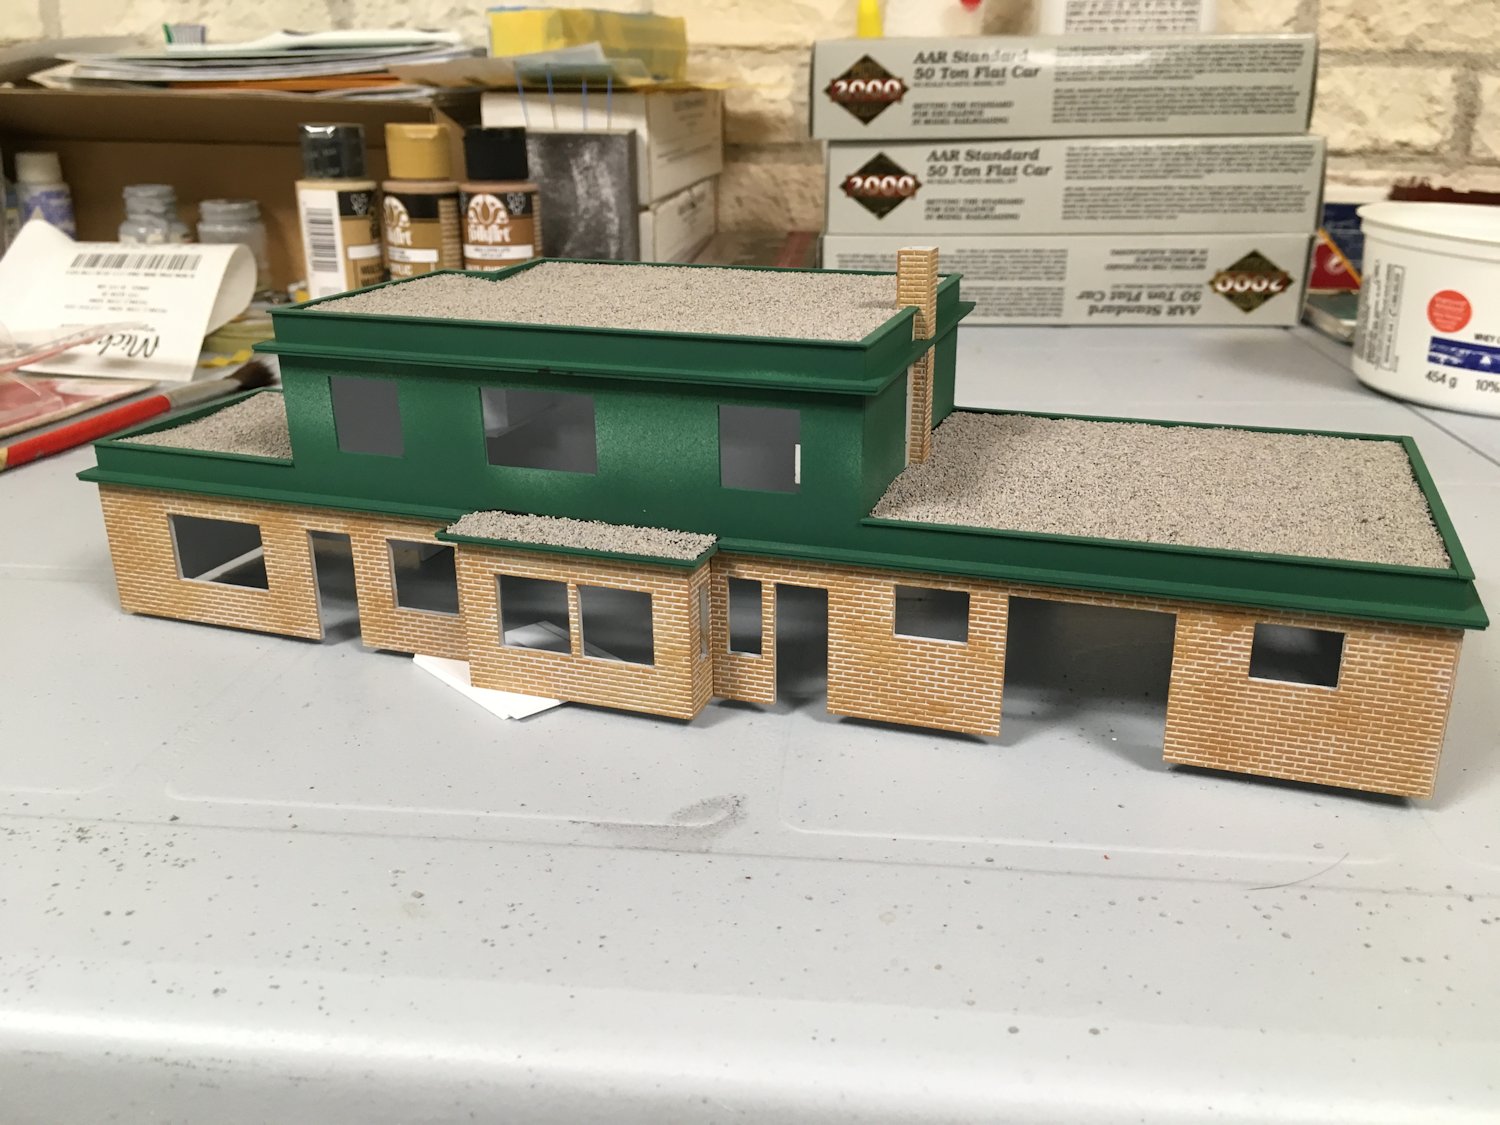
A bit more work with paint and gravel and the roof of the station is now surfaced.

As noted in a previous post where the slope of the roof was built up from styrene sheet, the “flat” roof is not, in fact, actually flat but does slope in order to provide drainage. That slope is in fact there, although with the gravel surface added, it almost completely visually vanished, except in that one subtle spot in the corner where the roof actually slopes against the top of the wall. (That reminds me, I need to go in yet and actually add a couple of round plugs to represent the drains, as well as a vent pipe for the toilet plumbing. All easy bits to add…)

Actually flat or not however, the technique for making the tar and gravel roof is pretty simple. After applying a thick brush coat of black paint (just regular flat black acrylic) and while the paint is still wet, sprinkle on a liberal coating of gravel and let sit. I used some fine ballast which I sifted to make sure I was only left with the finest grains. The effect is good, however it’s still a bit coarse actually for a gravel roof. I may yet scrape this off and re-do it with finer hand-sifted natural materials – I’ll have to sleep on that idea yet for a bit – but the technique is still sound.

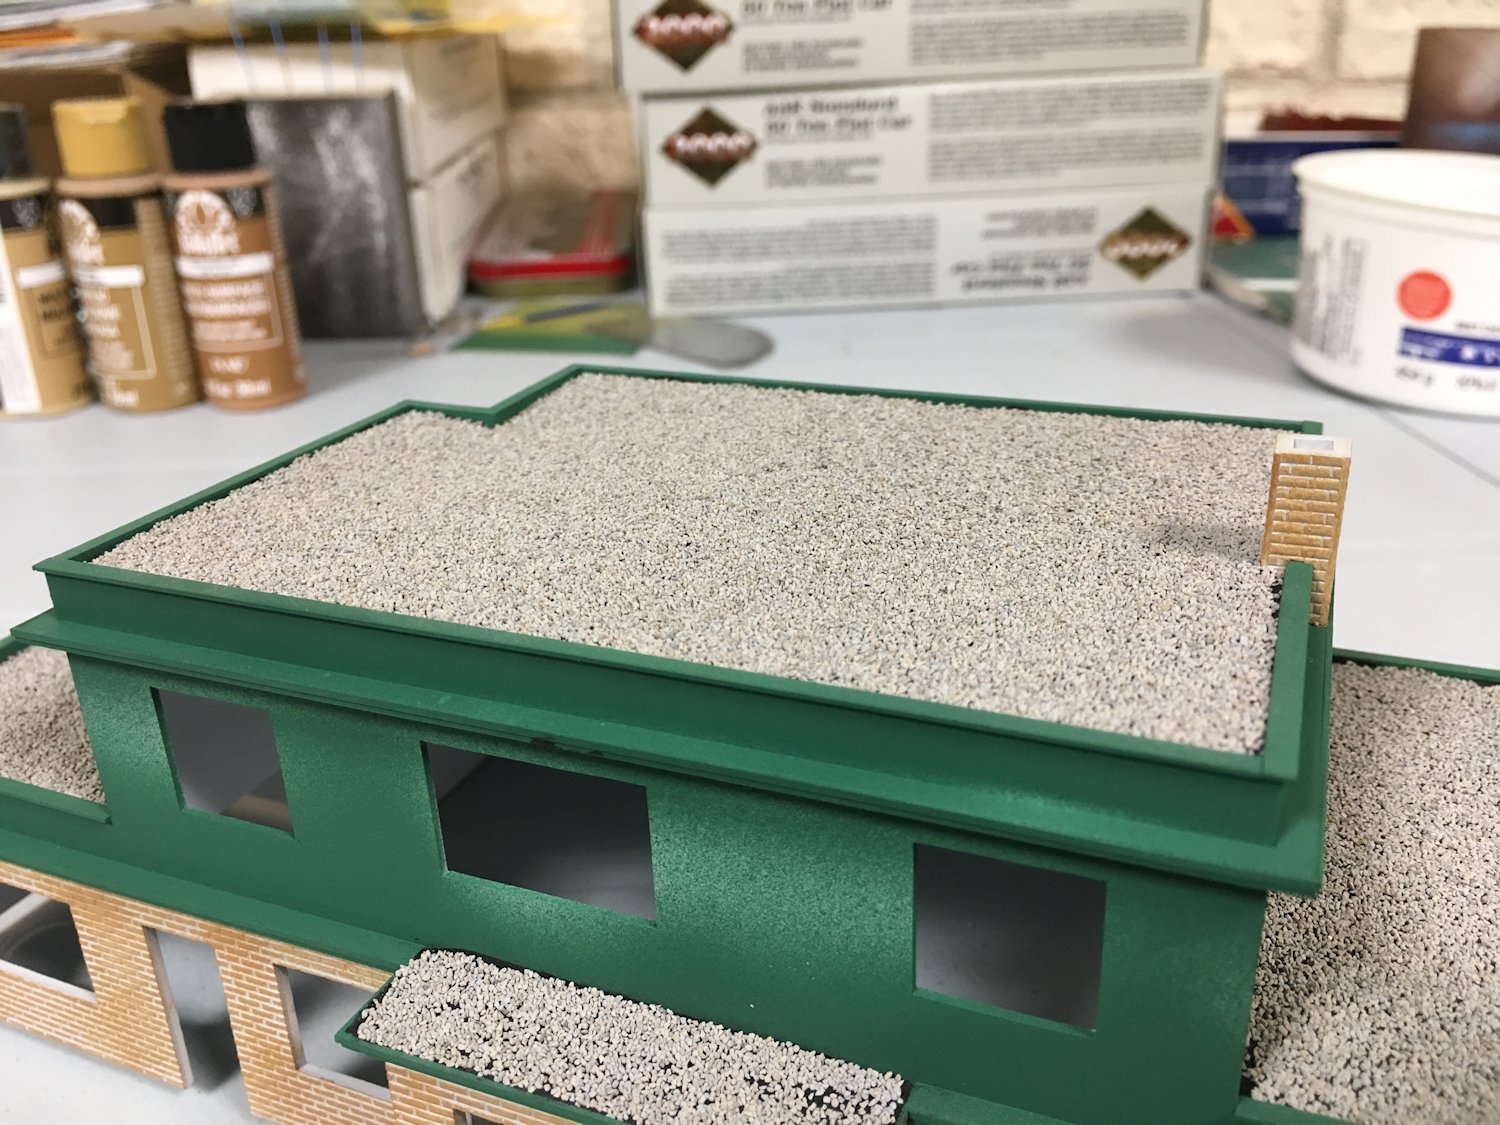
You’ll also notice I sprayed the Sylvan Green colour for the trim before doing the roof, as the trim borders the roof surface, and that would be more than a little bit impossible to mask and spray after the fact. The bold green colour on the upper walls though will not last – only the trim is actually this colour, and light grey siding is yet to be applied to the wall surfaces, so the station will have one last drastic colour change for completion.

Painting Brickwork

I also got some painting done on my Wawa station build this weekend.

Wawa station was a light buff coloured brick on the lower story. The model was coloured by first spraying the model with grey primer and then drybrushing the brick colour over the grey, leaving the brick faces coloured and the mortar lines in grey. The brick colour is two different shades of tan-brown craft store acrylic randomly mixed together on a pallet. (Comparing to a printout of a screen capture image of a video, I picked out a pair of colours called “Honeycomb” and “Coffee Latte” – these were just eyeballed against the printed image.)

A little grimy weathering when the station is more complete will further blend the colours.

Scale Test Car 10302 Model

In the previous post, I discussed background information on the Algoma Central’s old steel ore hoppers from the early 1900s, and the surviving example that was converted to a scale test car and operated into the mid 1980s.

Fortunately Westerfield makes a detailed craftsman kit for a couple of variations of the Pressed Steel Co. ore hopper, making it possible (although a bit of work) to model either the early 1900s ore fleet or the surviving scale test car.

The instructions provided with the kit are quite detailed, so I won’t go into a detailed blow-by-blow of the construction, except to point out the major deviations and additions I made based on the modernizations performed on the prototype car.

The most obvious modification when modeling the scale car conversion is of course the steel roof that was added to the car. This was simply fashioned from some .020″ sheet with some interior bracing and a 1×4 ridge pole to set the appropriate peak height and slope. This was glued to the tops of the sides with ACC. Fascia trimwork on the ends was added with 1×4 strip cemented to the roof.

Tichy running boards support and brass wire corner grabs added. I plan to try to add the actual wood running boards using weathered strip wood later once the car is painted.

Another modernization feature on the prototype car is upgraded grab iron arrangements with full ladder grabs at the opposite corners of the car. This required drilling a number of new holes for the additional grab irons and bending them from brass wire.

Also, the original hand brake was upgraded with a power hand brake with the familiar vertically mounted brake wheel with geared housing, although the car retained the original split “K” air brakes. This was added by building up the mounting bracket for the brake wheel housing with styrene strip and adding a brake wheel & housing from a Tichy brake detail sprue.

One last note I should make on the brake equipment is that the kit box contained a Tichy parts sprue for a standard “one-piece” K brake, when the car should have a split K brake with separate piston and air reservoir. This may have just been a packaging mistake on my car, but I had to obtain another Tichy part sprue for the split version of the K brake system. The extra Tichy parts may eventually find their way under other old work equipment at some point.

The car still needs to be painted, and custom decals made to finish it off.

Freight Car Friday #68 – CGTX 71506 Model

CGTX 71506 is the first addition to my (hopeful) fleet of tank cars for sulphuric acid service. Sulphuric acid is a common industrial chemical and a by-product of ore smelting operations. I’ve posted prototype photos in previous “Freight Car Friday” themed posts of acid cars running over the former ACR, likely from the operations at Timmins, ON or Rouyn-Noranda, QC via the Ontario Northland Railway through Hearst.

This model is a Tangent Scale Models car which was purchased as an undecorated/lettered but assembled and painted (black) model. The model represents a General American Transportation 8000 gallon car for acid service built in the late 1940s, but is very similar (identical in size and overall profile with only minor detail differences that you’d only notice if doing a direct side by side comparison of the model and prototype photo) to several older CGTX cars as well, so I was able to use it as a nice stand in. I’m unsure of the exact original build date of the CGTX cars but they would be from the same period – late 1940s-early 1950s and with railroad cars having about a 40-year lifespan, it’s plausible to be running out its last miles in the mid 1980s.

I didn’t actually change any details but just lettered the car following a late 1970s prototype photo with an old Herald King CGTX tank car decal set, with some additional detail lettering and COTS, ACI and U-1 decals to bring it up to a 1980s appearance from various Microscale sheets. With a little bit of in-service weathering, this car’s appearance will be completed and it will be ready to haul loads of acid from the smelters to industrial users in the central/mid-west USA.

Scratchbuilt underframes for 36′ boxcar bunk cars

I’ve been cycling through a few different projects on the workbench lately, including updating a few older projects. One of which is this set of old bunk cars rebuilt from 36′ wooden boxcars from the turn of the century. I started on the first pair last year, building up the bodies, adding basic styrene floors and also adding a third modernized car to the collection. I never finished detailing the underframes though and the project rotated to the side as other projects like Wawa station took the forefront this winter.

As I work through various smaller projects, I decided it was time to finish detailing the brake system on the underframes and move these projects a bit closer to completion. The main underframe is of course scratchbuilt from a floor of .040″ styrene sheet and the bolsters, main sill and braces built up from various sizes of styrene strip. I also scratchbuilt the coupler pockets right into the frame with a styrene strip box and a piece of .125″ O.D. tube for the mounting point, securely welded in place with styrene cement and tapped for a 2-56 mounting screw.

(I ended up locating the mounting point a bit far back, not accounting properly for the full thickness of the end sill on the body, but a long-shank Kadee coupler compensated for that, and having the mounting point a bit farther from the edge of the floor sheet is probably more stable.)

The truck bolsters are also built up from various pieces of strip and sheet, with a solid block formed from a stack of styrene pieces drilled and tapped for a 2-56 to mount the truck.

Brake details were added using a Tichy K brake detail set and brass wire for the rodding. It’s not a “contest-level” brake rigging system, but it gives approximately the right impression and shows an appropriate level of rigging detail for a track-level side view.