Over the last few weeks I’ve been slowly working on this hopper project again, drilling out the myriad holes for the car body grab irons. This project languished for a while as I didn’t have any #80 drill bits (darn things are so easy to break!) so I had to order a few, and I’ve just been pretty busy through the last couple of months with the December holiday season and other things. However a week or two after New Year’s I got my order of fresh drill bits, and I’m trying to deliberately spend a little time at least one or two nights a week on projects. Of course the primary project I’ve started to get back into is my 25 car batch of hoppers where each step of progress takes a bit of time due to the volume of cars being worked on at the same time. And drilling out that many small holes on 25 bodies and frames has taken a few weeks to complete. So that has accounted for my dearth of recent updates. However I am trying to get some momentum going again, and hopefully get some other smaller projects finished off as well.
So, without further ado, back to the hopper project! Over the years this model has moved between different product lines at Walthers: first their standard line, then “Gold Line” with metal wheels, then “Platinum Line” which have wire grab irons factory installed. (And I think with the latest release(s) the model has been shifted again into the “Proto” series (the old Proto 2000 line inherited from Life-Like), although I really don’t think this model belongs in that category.) Earlier releases before the models were upgraded to the “Platinum” line did not have grab irons installed. I’ve been collecting these cars for quite a while now (and grabbing cheaper pre-“Platinum” cars at shows and on eBay to build up the fleet) so I have a lot of both.
Body Grabs
A bit of comparison of prototype photos to the model reveals a couple of interesting minor details.
First, the prototype AC cars have an additional grab mounted off the top cap on the end (which of course the model does not have, and which I discussed in an earlier post).
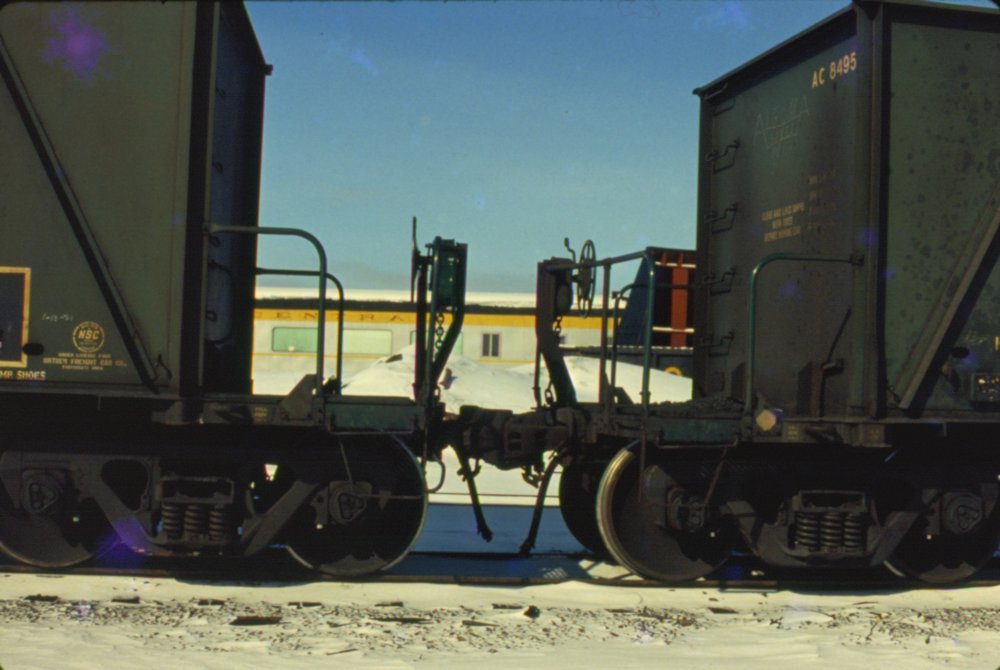
Secondly, when comparing end photos of the first batch of cars (AC 8201-8400) to the second batch (AC 8401-8500), notice that the first series has one extra grab iron compared to the later series:
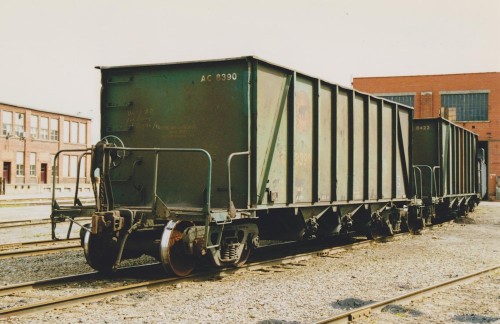
AC 8390 end view. At Steelton shops, August 1997. Blair Smith photo.
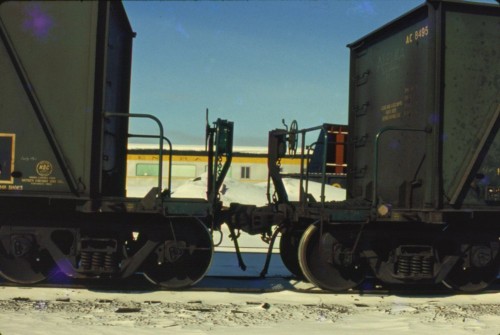
AC 8495 end details. March 1981. Photographer unknown, Chris vanderHeide collection.
Notice that the 8300 series car at top has a total of 5 end grabs plus the vertical grab mounted to the top chord, with the topmost end grab being almost directly below the vertical one, giving a doubled effect near the top of the car. The 8400 series car has 4 end grabs, without the grab nearest the top of the car.
Compared to the model, the model is actually molded with locations for 6 grab irons. With the amount of cars I am working on, I decided it was not worth the amount of effort it would take to competely remove all of the molded bolt detail and the pre-molded drilling dimples and trying to make a template to re-drill it all to have 5 evenly spaced grabs instead of 6. (For the 8200/8300 series cars, or 4 (without the top one) for the 8400 series cars.) However, removing the detail for the top grab would provide that different visual detail between these two batches of cars. With the extra rung of the model, the spacing doesn’t quite work out perfectly, but the effect is close enough. For the 8400 series cars, I simply carefully carved away the bolt/drilling dimple detail for the top grab from the surface of the body and wet sanded the area with fine (1000-2000 grit) automotive finishing sandpaper.
The remaining dimples are all drilled out with a tiny #80 drill bit in a pin vise.
With the holes all drilled out, the grab irons can be installed. These are 18″ drop grabs. These formed wire details are available from several sources such as Tichy, Details Associates, Details West, etc. I place a drop of CA on a scrap piece of plastic and carefully dip the tails of the formed wire grab irons
To maintain a proper even depth for all the grabs, I use a piece of .030″ strip as a spacer when installing each grab:
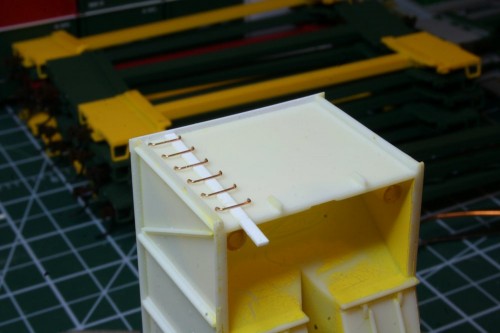
Using styrene spacer to install end grab irons.
When installing the grabs, cut the tails to length before installing; the open space inside the car end will be filled with the large metal weight that comes with the car, so these can’t extend into the interior. I trim the tails shorter before installation with a pair of flush cutters, and once installed and the glue is dried, finish off the interior with a few swipes of a flat needle file so the weight will sit properly into the cavity.
By comparison, the top grab is a straight 18″ grab. I used my calipers to line up the locations of the drill holes for the top grab with the end ladder and drilled them out as close to the edge of the strip as possible. This offsets the grab from the end and lines it up vertically with the end grabs. The grab is inserted (without trimming the tails in this case) from the bottom using tweezers and CAed in place, using my same .030″ spacer to obtain an even level on the grab. Once the CA sets, I cut the tails off with my flush cutters and file the ends of the wire flush with the top of the cap strip.
Here we can see both version of the car with the end and top grab irons installed; 8201-8400 series car at left, 8401-8500 series car at right:
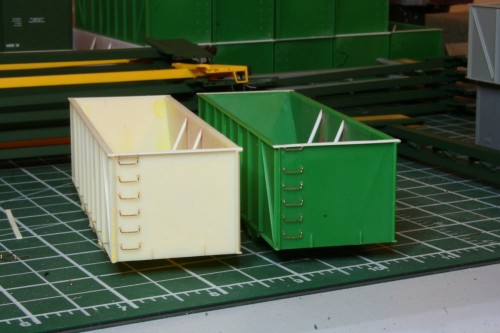
Finished grab irons. 8201-8400 series (left) and 8401-8500 series (right) versions.
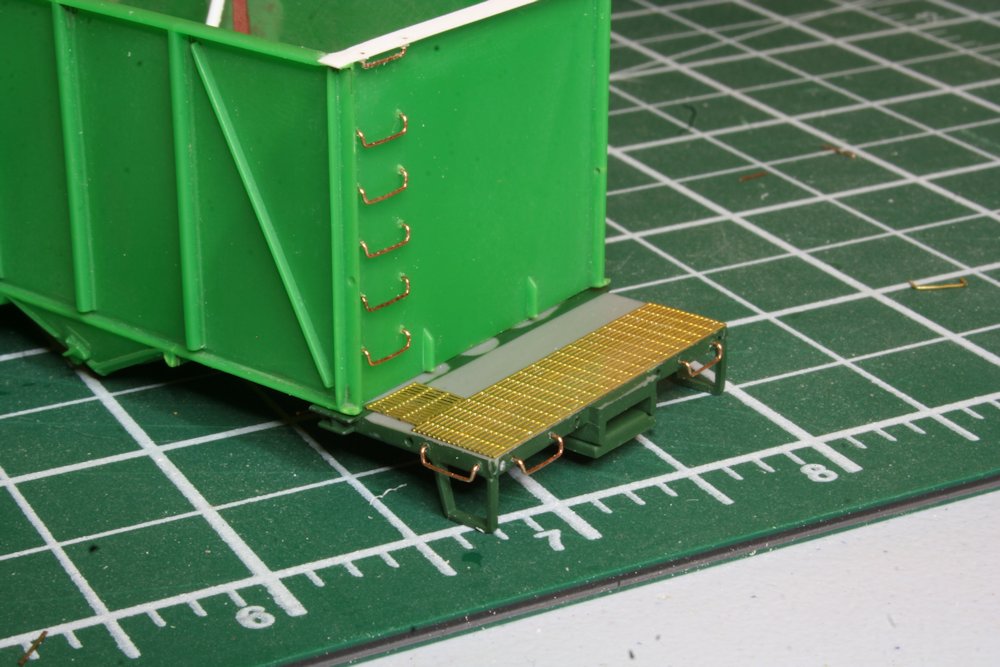
End Platforms
I’ve also been working on drilling and installing the grab irons on the end platforms of the car underframes. Nothing fancy here, just drill out the provided dimples and install the grab irons.

Finished end and platform grabs.
All of the drilling was completed first; I’m working my way through installing the grab irons and that part is still in progress on the majority of the cars. About half a dozen of the bodies are complete so far. You might note in the backgrounds of the photos above that the deck grating on a large number of the frames still also needs to be completed yet, so it will still take a while to get all 25 cars completely up to this point, though I may progress some cars to the next point even while still catching up with some of the others.
This completes the major visible body detailing. The next major assemblies to figure out will be the altered end handrails for these cars, and the underframe detailing, which will be more or less installed as intended by the original kit and which should complete the assembly of these cars.


