AC 8201-8500 Series Hoppers Underbody Detail

This post is mainly just included for completeness for the hopper series, as the details are basically just assembled according to the kit instructions, although as Walthers doesn’t really sell cars with modeler-applied parts anymore, I should perhaps note a couple of things.

IMG_5144

Here’s four of the around two dozen cars currently in progress, with many more still in boxes waiting their turn. You can see the door connecting/locking bars and spring details all installed. You’ll note if assembling a kit car, or re-assembling a stripped down car (in which case you’re not likely to have a diagram/instruction sheet) that there are two distinct versions of the bar details that definitely have to go on in a certain direction, as one has an extra bit of the locking mechanism detail and needs to align with the cast lock detail on the hopper bottom. (However the arrangement of the mounting pins makes this impossible to screw up.)

If you’re adventurous you could also replace the flat thick kit pieces with styrene channel to better represent the prototype parts in finer detail, replace the tail end bits of the door bracing with additional bits of styrene strip, fabricate the extra loop for the door lock on the appropriate bars. I did not do this.

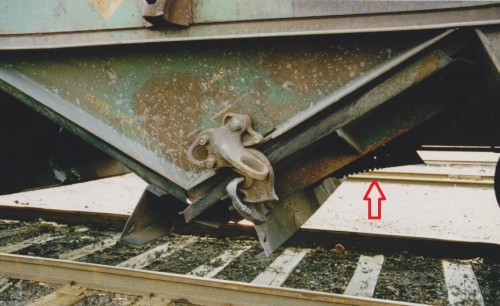
One major note that apparently needs to be mentioned is the door springs, which attach to the door bars on one end, and the centre sill of the underframe on the other to cushion the impact of the doors dropping open when the car is unloaded, as the rapid-discharge hopper design basically opens up the entire bottom of the car. You can see them installed in the model photo above, and half-visible in shadow to the right side of this detail photo (courtesy of Blair Smith) below:

ac8390detail

If you get some of the latest Platinum Line releases from Walthers, any of their cars without additional detail parts for air-actuated doors (i.e. a big air tank mounted on the car end) have omitted the spring details. And unfortunately, since the detail parts are not add-on pieces on an included parts sprue, the springs are just not included in the box.

Apparently Walthers thinks that only the cars with air-actuated equipment has these door springs, which is entirely false. Sadly there’s not likely too much that can be said there, and since they don’t stock additional parts (I tried and failed to get replacements from them, and they seemed not to consider the missing parts a mistake) I will likely be saving a couple of parts sprues to make a mold and copy-cast in resin the needed parts for about 2 dozen such cars missing the springs.

Completed E.B. Eddy Lumber Load

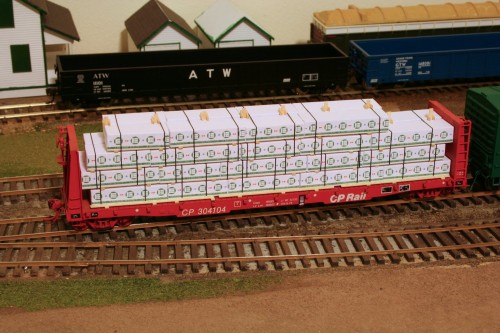
Here’s a completed load for E.B. Eddy Forest Products that I finally finished up this evening. It’s one of a pair of loads that I made to fit a kitbashed CP 51’6″ bulkhead flatcar.

IMG_4748

This pair of loads will be used out of the E.B. Eddy sawmill at Nairn featured on the club layout.

I also have a small collection of extra stacks of bundles that will be placed along the backdrop at the mill site as part of the scenery for the mill.

The flatcar itself is one of several cars kitbashed by other members of the club to represent Canadian Pacific’s 51’6″ bulkhead flatcars. It was built from an older MDC/Roundhouse (now Athearn) bulkhead flatcar with a shortened body, shortened bulkheads and altered details.

Temrex Lumber Wrap

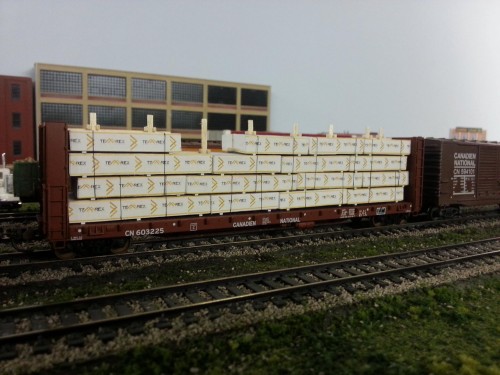
Another reader-submitted lumber wrap comes from Taylor Main, this one representing Temrex, a local mill in Nouvelle, Québec, in the Gaspé peninsula. Below is a photo of Taylor’s load, and his graphics can be found at the bottom of this post.

12184300_10156097288625062_7050513518063323865_o

A company background indicates that from 1987-2002 the mill was owned by Tembec. In 2002, Tembec entered into a partnership with a subsidiary of Société générale de financement du Québec (SGF) Rexfor creating a joint venture under the name Produits forestiers Temrex. In 2009, SGF bought out Tembec’s interest in the mill and in 2011 merged with Investissement Québec which became Temrex’s sole owner.

This logo then would date from approximately 2009 or 2011 forward.

During the 2002-2009 period, according to Taylor:

I can remember their logo was identical to the Tembec one except it read Temrex in the same blue font and they would have started using the new orange and yellow logo in either 2009 or 2011.

Anyway, without further ado, here’s the printable files:

PDF | XLSX Prototype

Edit: revised version: PDF | XLSX

Painting and Weathering Started on 55 ton Twin Hoppers

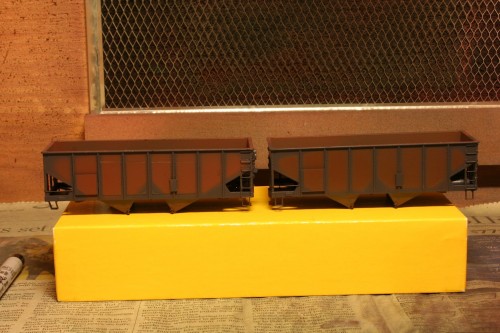
This weekend I had the chance to do some basic painting on this pair of hoppers and start some of the initial weathering of the cars. I gave the two cars an initial spray of weathered black for the basic body colour a while back, and now I had a chance to do the next step.

IMG_4747

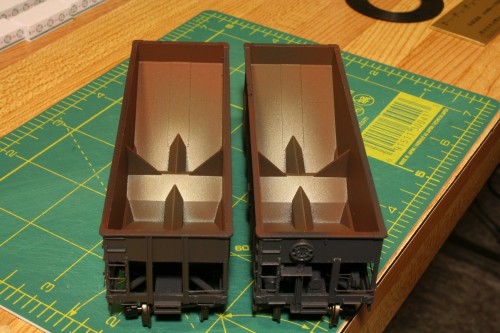
First, I painted the interiors. To get the initial base colour for the interior, I actually used four different colours, lightly blending the colours up the sides with the airbrush. First I sprayed the lowest parts of the interior a metallic silver colour (Model Master “Steel”), then working up the sides with Gun Metal, Rail Brown and Rust, lightly blending each colour together so the the colour gradually transitions from a bare metal appearance on the centre sill and lower parts of the bays (where the load flowing out of the car during dumping would have the effect of “polishing” some of the rust off) to a more oxidized appearance on the sides and further up the hopper bays where less material is moving around during loading and unloading. This will likely be supplemented yet with a little bit of powders or pan pastels, but I’m liking the effect so far.

The next major step is weathering the exterior bodies of the cars. Most of these old cars on the ACR had a pretty distinctive weathering pattern caused by an older practice of loading sinter into the cars while still hot, resulting in much of the paint on the side sheets burning off over the years  causing the sides of the cars to essentially become an expanse of rusted metal, following the shape of the interior bays. Check out this early 1970s prototype photo from Ted Ellis to see what I mean.

IMG_4744

To begin replicating this pattern, I used a somewhat experimental technique. I masked off the sides and spayed them a mix of roof brown and dark rust. I first covered the ribs with strips of masking tape, as the burning effect of course only effected the sheet metal of the side sheets with which the hot material had direct contact. Then the bottom and side sills were also masked, and then the rest of the sides roughly masked in the shape of the load inside. The key here while masking is to deliberately NOT be too precise with it. Most importantly, prevent the masking tape from actually laying down on the sides of the car. The ribs were covered with a strip of tape wide enough to completely cover the rib, but these were not folded down over the shape of the ribs. The side mask was just laid down on the tops of the ribs and deliberately prevented from touching the surface of the side. My goal here was a nice soft edge that is NOT clearly defined when the rust colour is airbrushed. The masking thus completely, the sides were sprayed with a dark rust colour and the masking then removed.

IMG_4745

You can see the preliminary result above; so far, so good, I think. I have a ways to go yet with blending in darker colours with pan pastels to really make it look like rust. Eventually the raised panel at the left hand side car number and date will a shot of black before adding lettering.

55 Ton Twin Hoppers

This is another pair of cars pulled out of a box on a shelf somewhere that I started years ago and then put aside at some point. This week I got them out again, cleaned them up and finished off the detailing on them.

These two cars represent the older hoppers on the Algoma Central’s roster. Information on these cars’ history is scarce, but sources suggest they were acquired secondhand from multiple sources in the United States. Studying the ACR roster over time, it appears that several sub-groups with at least 4 different listed cubic capacities were added beginning in 1938 (when the sinter plant at Wawa was built) with more added throughout the 1940s and 1950s. As these were all acquired secondhand, build dates ranged as early as before the Great War (a.k.a. WWI). It appears there may have been around 300-400 of these cars at some point.

By the 1970s, these old cars were in really rough shape with some derailments said to have resulted from one or more of the older cars essentially being pulled apart. From 1971 through 1975, 400 brand new, larger 100-ton cars were acquired from National Steel Car to replace the aging smaller cars and the old cars were scrapped. A 1984 freight car list republished in Dale Wilson’s “The Algoma Central Story” however shows 16 cars remaining within the number range 6605-7604, a range covering several original sub-groups in the 6600-6900, 7000-7100, 7500 and 7600 series. These cars would have been non-interchange, and very likely reserved for company service at this point. Official Railway Equipment Registers stop including any of these cars in public listing early in the 1970s.

IMG_4341

The main visual feature of the ACR’s 55 ton hoppers was the reporting marks and data being place on a sheet steel plate between the first two ribs on the left of the car side, rather than directly on the car body.

At one time, all the lettering may have been painted on the car side itself, but for many years there was a practice of loading these hoppers with sinter from the ore processing plant while still hot, which had the effect of burning off the paint, leading to some really interesting weathering patterns with most of the car sides being bare rust and the practical solution of putting the car data on a separate plate instead of the car side itself. The Kar-Trak ACI labels were also placed on a smaller plate mounted towards the right-hand end of the car side.

Both cars have the data plate and a smaller plate for the ACI label fashioned from styrene sheet and strip. On the lower car, I also used .005″ [clear, because that’s what I had on hand at the time] styrene sheet to represent repair panels welded on to the side of the car. The way the light caught them doesn’t show really nicely in the above photo, but shows a bit better below.

IMG_4343

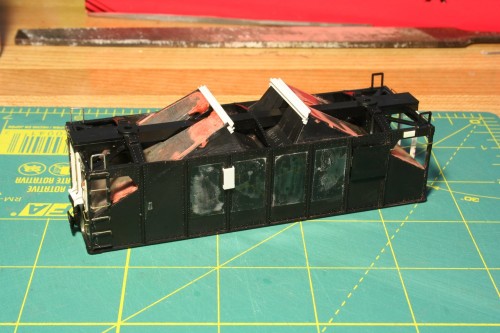
Underside improvements to the car involved using body putty to fill the gaps around the metal weights installed below the car’s slope sheet and new door bars and a representation of the locking mechanism scratchbuilt from various styrene strips to match what showed in the prototype photos.

IMG_4340

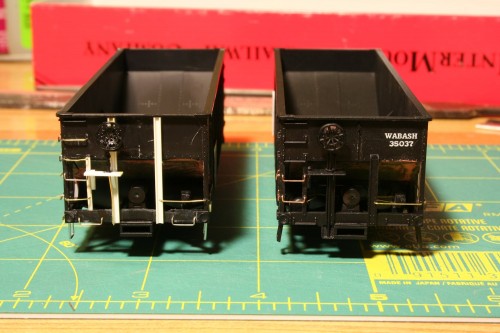
Both cars got a little bit of upgrading on the ends as well. The model represents a car with vertical brake shaft, and I gave both cars a brake wheel housing. The car at left also got new vertical braces that extend over the full height of the car compared to the original uprights as on the car at right. This was following prototype photos, but I decided to leave the second car alone; after all, there was a certain amount of variety in this fleet.

I didn’t replace all of the body grab irons on these cars, but I did at least upgrade the ladders in the open ends with wire grabs to get rid of the look of deep, flat steps that often plagues models of hopper cars with one-piece bodies and cast ladders.

I also didn’t necessarily bother to add all the proper piping and brake linkages between the components under the ends. They may not be contest models, but they should look good on my [future] layout when rusted within and inch of their life and loaded with ballast in a work train.