40′ ex-ONT Boxcars Progressing

This pair of ex-Ontario Northland boxcars has also been receiving some attention lately, with new stencil reporting marks and numbers applied, and some basic weathering with pan pastels. The weathering still has a ways to go, and they also need a little touch up in some areas yet (like some minor patching in the data and re-weigh information to properly date the cars and vary things up a bit more) and the ladders and end details to be re-installed.

IMG_1562

As on the model, the real cars were purchased second-hand from the Ontario Northland and just crudely patched out with AC markings. Both of these cars specifically follow the patch patterns of the prototype numbers they represent.

The 2906 is one of roughly 15 former Ontario Northland boxcars put into a series of general service cars; now when I say this, these cars were still basically non-interchange and captive to the ACR, and mostly commonly used for company materials and local wayfreight deliveries.

The 10352 has a work service number, and was likely a tool or work materials storage car. The real car has a pair of turbine style ventilators on the roof which will also still need to be added at some point.

I also have a couple of brown Ontario Northland cars in the wings which will also soon become another 2900 series car and probably another 10000 series work storage car.


Incidentally, this is the 100th post published to this blog!

Rapido Gondola Renumberings and Alternate Logo

Tonight’s project is working on lettering on a few cars. Since I acquired “more than one” 6-packs of Algoma Central gondolas when Rapido Trains released their new Canadian gondola in AC colours, I have a number of cars with duplicate numbers to change. Also, some later repaints had a simplified version of the bear logo without the railway’s name spelled out in an encircling band around the logo. I have several sets of CDS dry transfers for AC gondolas in my lettering stash, and these sets include both versions of the logo, so I decided that on at least a few cars I will also replace these logos for some visual variety.

IMG_1558

Two Rapido ACR gondolas. Top car is unaltered factory paint/lettering; bottom car is renumbered and has a different logo applied, although differences are more obvious in close up or in person.

To remove the original lettering, I used the edge of a curved scalpel type blade. If you work very carefully, and with a light touch, you can scrape away the original lettering with little trace remaining. The new number and logo will also cover over the same spots, and a little bit of light weathering will completely hide any uneven spots.

IMG_1559

Logo comparison. Above is unaltered factory painted car. Below, the original logo has been carefully removed and replaced with the simplied logo from a CDS dry transfer set.

In the close-up photo you can more clearly see the difference between the logos. The top logo, as featured on the factory-painted Rapido model, includes an outer band around the logo with the railway’s name. The lower logo, applied from a CDS dry transfer lettering set, is a simplified version without the railway name and a proportionally larger bear silhouette.

I also removed the NSC builder’s logo (below the car data) and the fill lines (above the “GO MA” and “NT RA” panels) from the lower car, and I’ll probably actually be going over all of the cars I have and removing the builder’s logo from all of them. (Information suggests that when brand new/as built the original series of cars acquired in 1958 (AC 601-800) were originally painted *brown*, although photos of these cars in original paint are extremely hard to come by. AC 801-875, built in 1961-62 were probably delivered in black, as were coil steel service cars in series AC 900-924, built in 12/1962 and for which I have photos that clearly show the original NSC builders logo. The 900-series also had a slight variation in the font of the billboard lettering…)

Oba Lake Trestle Bent Drawing

So this evening I got a little bored and looking through and organizing some of my reference photos and ended up studying some of the photos from the Oba Lake area and specifically of the long wooden trestles that cut directly across several bays of the lake.

I also have several images of a 1951 AC&HB drawing for a standard timber trestle from the Sault Public Library Archives, and I started looking at this in detail and comparing it to the Oba Lake photos, figuring out the construction and trying to estimate the height of the structure. Looking at the timbers in the abutment at the end of one bridge, the height from the top of the bottom sill (which rests on pilings right around the waterline) seemed to be roughly 7-8 feet. Subtracting the thicknesses of the ties, heavy stringers, and the bent cap and sill, I estimated an approximate height of about 4′ for the height of the vertical members in the trestle bent and started sketching, and before long I had drawn an exact scale section drawing of a representative bent, based on this height.

So I thought I’d throw this up here. Since I don’t have a layout space, it’ll be a long time before I could ever actually model a representation of this, but maybe someone else finds this useful, even if you just enjoy the details of trestle construction. Since the height is estimated, this may not be exact, but seems to work out fairly well.

ac0023

ac0024

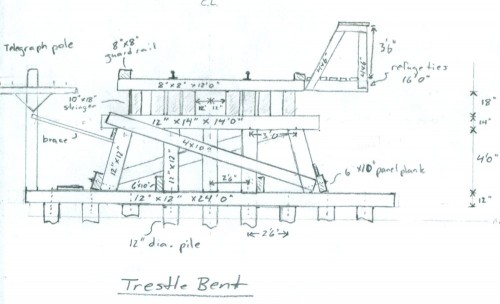
All timber sizes, lengths and spacing are taken directly from the standard drawing except for the vertical member and the bottom sill (lengths estimated) and the diagonal braces of course adjust to fit.

I drew the side elevation with cross bracing every other span similar to the standard drawing, but due to the low height of the trestles over Oba Lake, they don’t appear to actually have any, so these should be left out. Unfortunately side photos of these bridges are almost impossible to find thanks to the remoteness of the location, but close inspection of the next photo below shows that there isn’t any X-bracing on the outside of the trestle. This doesn’t necessarily rule out any additional hidden internal bracing between the bents though.

The water level was high when I rode the Tour of the Line to Hearst and took these photos at the Oba Lake trestles, so the lower sills of the bents are just barely even poking out of the water. I’ve come across and saved some other photos from online with lower water levels though, where the sills are at least a foot above the waterline and you can see that they rest on the tops of the actual pilings driven into the lake bottom. Also, the longest bridge was replaced sometime in the late 1990s or early 2000s and the pilings for the original bridge can still be seen off to the side, although with the high water level on my trip they were below the surface of the water – you could see them from the rear of the train but they don’t show in my photos.

IMG_7629

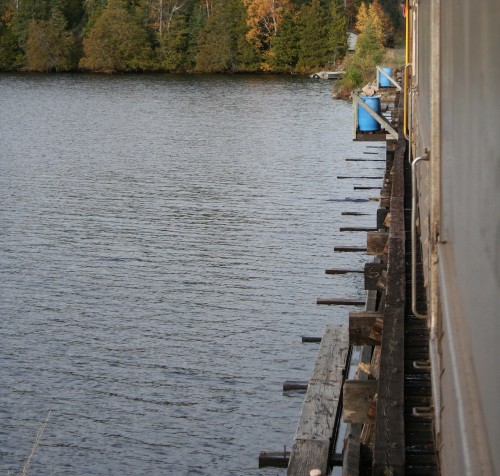
If you look carefully at the above photo, taken of the southernmost bridge at mile 211.9, one can pick out most of the features including the extended length of the sills almost under water, the heavy bent caps, the ends of the angles sway braces bolted to the cap and the horizontal plank just above the sills stabilizing the structure.

At the north end of the replaced bridge at mile 212.7, one of the original timber sills for the old trestle still remains and is visible right at the waterline, and you can see the notches in it where the vertical 12″x12″ posts once sat.

IMG_7633

Freight Car Friday #10 – AC 2420 Model

IMG_1162


AC 2420 is a factory painted, ready-to-run model from Walthers that accurately represents the Algoma Central’s first series of 25 52’8″ inside length bulkhead flatcars built new for the ACR in 1975.

The wrapped lumber load is a kit from Kanamodel products, although I didn’t see the lumber load kits listed on Kanamodel’s web site recently, so I’m not sure if the lumber loads are still in their product offerings.

Speeder Shed Roof and Fascia Trim

I had a chance this evening to spend a little more time on these speeder sheds and finish off the roofs and basic detailing.

IMG_1556

The roofs are cut from .040″ thick sheet, with the edges bevelled with a flat fileĀ and I trimmed the fascia around the edge .010″x.060″ strip for the angled fascia boards on the gable end, and .010″x.080″ to match on the sides.

Now they’re pretty much ready for painting and windows (on order). I’ll do the rolled roofing once the main structure of the shed is painted.