Styrene Strip Sorting and Storage Rack

I got a little tired of digging around in my box of packages of styrene strip to try and find the specific size I need for whatever project I’m working on, so I broke out the foam core board and whipped up a little something.

Fine precision isn’t necessarily key to this project but the overall size is 11.5” wide, 18” tall overall and 4” deep. The rear set of pockets has a 2” deep false floor to stagger them higher than the front row so the labels are visible. All of the pieces are glued together with regular PVA white glue. Other that that, what you see is pretty much what you get.

Now my styrene supply is much more organized and easy to access. A must have for any serious hobbyist’s workshop. I’ve been meaning to do this for a while, and should have done a while ago…

Freight Car Friday # 69 – ONT 6051

While today’s Freight Car Friday subject isn’t an AC car, nor taken anywhere near the ACR, it is definitely related.

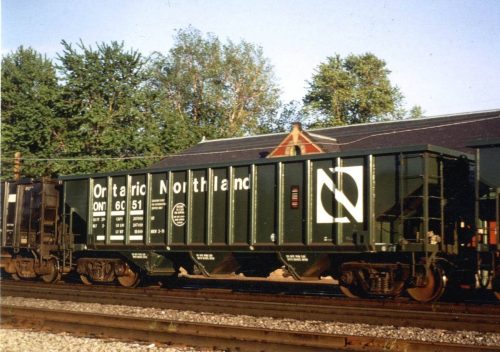
This shot courtesy of an antique show find by Keith MacCauley shows an almost brand-new Ontario Northland triple hopper # 6051. 72 of these cars numbered ONT 6000-6071 were built by National Steel Car in 1971 for use carrying iron ore from Adams Mine near Dane, ON to steel mills in Pennsylvania. Canadian National, Ontario Northland, and New York Central/Penn Central provided cars into a pool for this service, with many of the PC’s portion coming from the Toronto, Hamilton & Buffalo and Canada Southern Railways (although that’s clearly an actual PC car coupled at left in this photo). Given the freshness of the ONT car, the date is almost certainly summer 1971. We haven’t identified the location, but it’s likely somewhere in the States.

In the late 1970s this service ended, and these cars were disposed of by the Ontario Northland, with the Algoma Central picking up thirty of these cars in 1978. They would run for several years in original numbers with just the reporting marks patched out, and then in the mid 1980s these cars were renumbered from their 6000 series numbers to the 8600-8629 series.

Tar and Gravel Flat Roof Surface

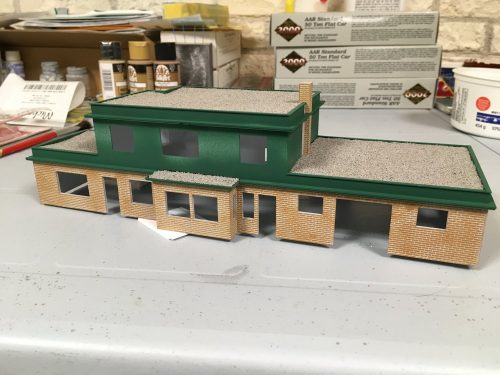
A bit more work with paint and gravel and the roof of the station is now surfaced.

As noted in a previous post where the slope of the roof was built up from styrene sheet, the “flat” roof is not, in fact, actually flat but does slope in order to provide drainage. That slope is in fact there, although with the gravel surface added, it almost completely visually vanished, except in that one subtle spot in the corner where the roof actually slopes against the top of the wall. (That reminds me, I need to go in yet and actually add a couple of round plugs to represent the drains, as well as a vent pipe for the toilet plumbing. All easy bits to add…)

Actually flat or not however, the technique for making the tar and gravel roof is pretty simple. After applying a thick brush coat of black paint (just regular flat black acrylic) and while the paint is still wet, sprinkle on a liberal coating of gravel and let sit. I used some fine ballast which I sifted to make sure I was only left with the finest grains. The effect is good, however it’s still a bit coarse actually for a gravel roof. I may yet scrape this off and re-do it with finer hand-sifted natural materials – I’ll have to sleep on that idea yet for a bit – but the technique is still sound.
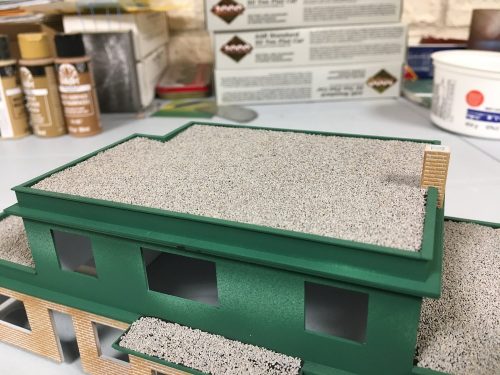
You’ll also notice I sprayed the Sylvan Green colour for the trim before doing the roof, as the trim borders the roof surface, and that would be more than a little bit impossible to mask and spray after the fact. The bold green colour on the upper walls though will not last – only the trim is actually this colour, and light grey siding is yet to be applied to the wall surfaces, so the station will have one last drastic colour change for completion.

Painting Brickwork

I also got some painting done on my Wawa station build this weekend.

Wawa station was a light buff coloured brick on the lower story. The model was coloured by first spraying the model with grey primer and then drybrushing the brick colour over the grey, leaving the brick faces coloured and the mortar lines in grey. The brick colour is two different shades of tan-brown craft store acrylic randomly mixed together on a pallet. (Comparing to a printout of a screen capture image of a video, I picked out a pair of colours called “Honeycomb” and “Coffee Latte” – these were just eyeballed against the printed image.)

A little grimy weathering when the station is more complete will further blend the colours.