Section House Progress

While I was mostly busy with other things over the Christmas and New Year’s period, I’ve been managing to poke away at a couple of projects and have managed to complete another milestone on my Franz section house project, and now I have my first actual project posting of 2015.

The house is now painted, and has shingles applied.

IMG_1714

The house was airbrushed white and the trim carefully masked and painted Southern Sylvan Green. I had a setback at this point that rather threatened to ruin the entire project – on one side I sprayed a little too heavily with the green and it leaked and spread under the masking. After venting some frustration (“Model Railroading is Fun”?? – MR’s old tagline) including some choice words that would have disappointed my mother, I tried to recover the project by scraping away some of the green paint, and repainting the side again with white to touch it up and once again masking off the trim and windows and then touching up the green.

I think I managed to not botch it too much the second time around. Phew.

IMG_1717

The shingles are a heavy paper product from Rusty Stumps. They are pre-cut for a standard 3-tab shingle pattern and can be ordered with or without an adhesive backing. (Rusty Stumps has several different variations of shingle types available, and different colours are also available. Their dark green will likely come in handy when I build Hawk Junction station…)

You can see above that I have also been working on finishing off the assorted tool and speeder sheds with shingle roofing material as well (I actually completed a few of these over the Christmas season, and applied the last shingles to the section house tonight). Some of these small structures are known to have tarpaper/roll roofing but I’ve managed to source some photos here and there and some of the specific locations I’m intending these for (Franz, Mosher) had shingle roofing on these sheds. Even some of the different section houses had varying roofing and siding treatments, with some of them also having tar paper roofing as well. Franz however, is well documented as having normal black asphalt shingles.

All of the model structures just need a ridge cap applied yet to complete the roofing treatment.

IMG_1715

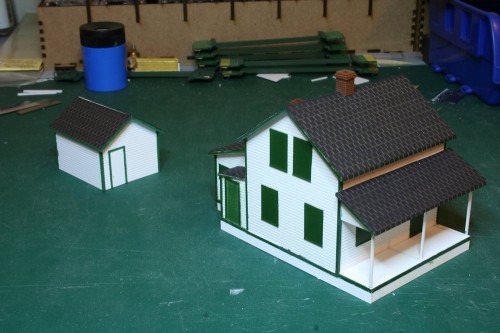
Here we see what the Franz section house would look like in context with its storage shed, although you kind of have to imagine a forest around and behind it, a nearby outhouse, and chances are when I actually build Franz, you’ll end up looking at the back of the house from the aisle.

It’s taken a while, and had it’s bumps along the way, but I’m happy that these structures are really starting to look a bit more like the real ones they represent.

Speeder and Tool Sheds Painted

IMG_1620

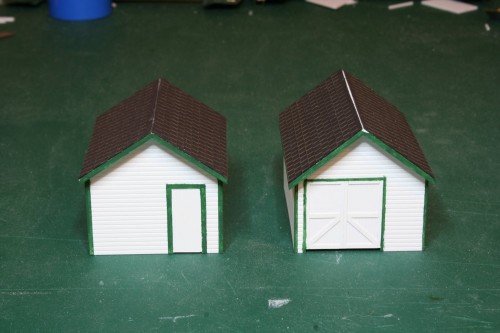
This week I’ve spent a few evenings finishing up this collection of small speeder and storage sheds. Roofs were installed on the three storage sheds and then all 6 structures were painted in the ACR’s standard white and green colour scheme.

The bodies were given a coat of white with the airbrush, and then I tried to carefully mask off the corner and door trim and touch it up with a fine brush.

These structures now just need to have shingle or roll roofing applied as appropriate to complete, other than a little bit of weathering/aging.

Tool Shed Doors and Trim

IMG_1568

A little bit more work on these sheds this evening and the corners and door frames are all trimmed, and doors cut to fit the opening.

The doors are cut from a sheet of simple scribed siding (Evergreen “Car Siding”) to fit tightly into the door opening. The door frame is trimmed with .010x.060″ strip.

Unlike the speeder sheds, I added all of the corner trim after assembly using strip styrene. To do this somewhat balanced, I used a scale 1×4 strip (.011x.044″) first on the sides to cover the exposed edge of the front wall sheet, and a .010x.060″ strip on the front and rear ends, overlapping the edge of the side strip. This makes the overall angle of the corner trim about .060″ on the front side and .055″ on the side. Close enough to appear pretty square to the eye and look just right.

More Small Tool Sheds for the ACR

IMG_1567

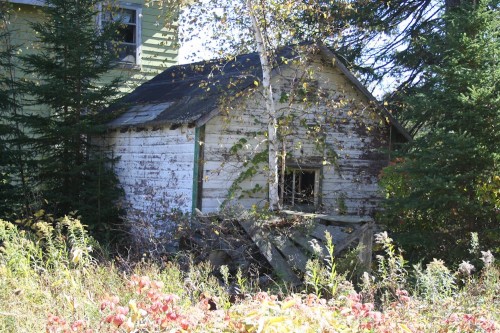
Here’s another grouping of small tool/materiel storage sheds, following a common ACR pattern. These storage sheds are commonly found with the section houses that dot the line at periodic intervals that once supported track maintenance workers. Below can be seen a classic example with the old section bunkhouse at Franz:

IMG_7615

And this similar shed is almost obscured in the weeds and bushes behind Searchmont station, but appears to follow the same pattern and dimensions, although comparing photos of various sheds at different locations, some of the minor details like the position of doors (either centered, or offset to the left or right on the front of the shed) and windows (some on the rear wall as at Searchmont, and other examples showing a small window on one side of the shed) vary a bit from one example to the next.

IMG_8326

Nathan Brown of the Searchmont Station Preservation & Historical Society was able to send me the following measured dimensions of the existing shed at Searchmont, which were extremely helpful in laying out the pieces for these sheds. Thanks Nathan for the data!

Hey Chris,
Here are the specs on the shed behind the station.

Door: 4ft 10inches from left

2ft 6in opening

window:

4ft 4in from left

5ft 2 in from right

6ft 5in from the peak

3ft 5in from ground

2ft 8 1/2 in opening

shed size is 14 f 3.5 in x 12ft 4.5 inches

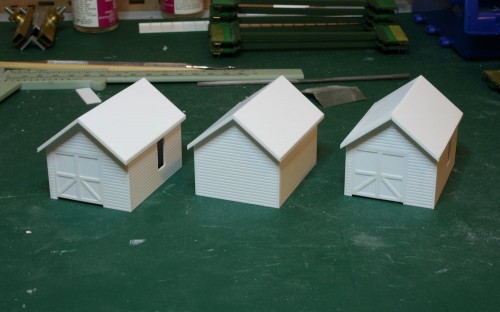
Armed with a collection of different photos of various section locations, and particularly of Perry, Franz, and Mosher, which locations I’ll hopefully include in my future layout, I was able to lay out three similar sheds. I don’t have shots that show all four sides of any of these structures but I do have at least one photo at each location showing the shed or part of the shed to know where the front door was located. Given the lack of photos of the rear and both sides, the small window locations were somewhat freelanced based on positions shown in collected photos of similar sheds at different locations. (Each shed has only one window, and on each of the three models below I located it in a different place, but always following precedents shown in prototype photographs.)

IMG_1565

Speeder Shed Roof and Fascia Trim

I had a chance this evening to spend a little more time on these speeder sheds and finish off the roofs and basic detailing.

IMG_1556

The roofs are cut from .040″ thick sheet, with the edges bevelled with a flat file and I trimmed the fascia around the edge .010″x.060″ strip for the angled fascia boards on the gable end, and .010″x.080″ to match on the sides.

Now they’re pretty much ready for painting and windows (on order). I’ll do the rolled roofing once the main structure of the shed is painted.