A few more lumber wrap graphics

I did some playing around this evening with downloading some company logos and making a few more variations on lumber wrap graphics. Some of these are modern, some a few years old. Most aren’t necessarily applicable to what I’m doing with the Algoma Central, but a couple of these were pretty easy to do with logos taken from online.

I used Excel this time to create a template worksheet to consistently line everything up to the millimeter for printing. These also include marks for cutting the edge of the wrapper, particularly as some of the wraps have some white space around the edges.

As my posts on the Newaygo load have generated a significant amount of interest I’m sharing the printable PDF files for each one here.

Newaygo Forest Products (Mead, ON) – 1974-1984 Reprint PDF – Prototype

Tembec – up to 2012 PDF Prototype

Tembec – 2012+ PDF – Prototype

Lecours Lumber (Calstock, ON) – Current PDF – Prototype

Interfor (International Forest Products) – Current (Style 1) PDF – Prototype

Interfor (International Forest Products) – Current (Style 2) PDF – Prototype

TOLKO – ~1990 PDFPrototype

Blank Excel Template – XLSX

(These are of course all sized for HO scale.)

Newaygo Lumber Loads

So a couple months back, I showed the first few completed blocks representing wrapped lumber bundles for Newaygo Forest Products which operated a sawmill at Mead from roughly 1974-1985. Well over the last two months, that small pile of about half a dozen blocks has turned in to a much larger pile of blocks in four different lengths, and I’ve been able to start building the first few loads.

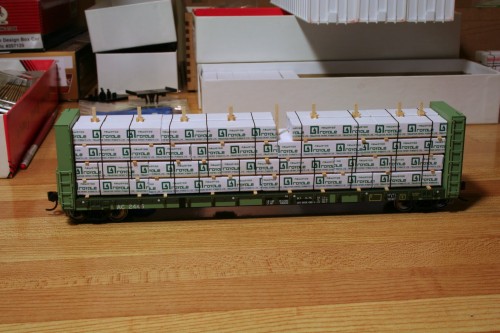
This is the first full-size load completed and I probably have enough material for at least 8 to 10 more.
IMG_4123

The blocks are glued together into a solid mass with scale stripwood spacers between the blocks, paying close attention to how the blocks align and staggering different lengths to represent how the load would be secured as a cohesive unit. In the model world, the load is all glued together, but in the real world it’s all held together with strapping. (Spend some time studying older photos of lumber loads on standard (not the modern centre-partition lumber cars which are loaded a little differently) flatcars to see how the bundles are secured together.) The strapping on the model is represented with 1/64″ wide Chartpak graphics tape, which actually roughly scales out to about 1.5″ wide, not too oversize.

It’s taken a LOT of work to get to this point (researching, creating the graphics on the computer when I’m not an expert at graphics design and drawing programs, cutting all the blocks (actually that part just took an hour or two), **sanding** all the blocks (and this week’s Blu-ray movie selection(s) are…), gluing the paper wrappers on all the blocks, cutting the stripwood spacers for the load, finally building the load, and applying the strapping details) but the end result totally kicks the pants off some generic block of plastic or resin, the graphics actually match the particular prototype mill that the railroad served, and each load can be a little varied and completely unique from each other. This load ended up with a slight gap in the top row. I plan to have others with the small gaps at the ends, hopefully a few that are actually solid, and at least one with only a half row on the top.

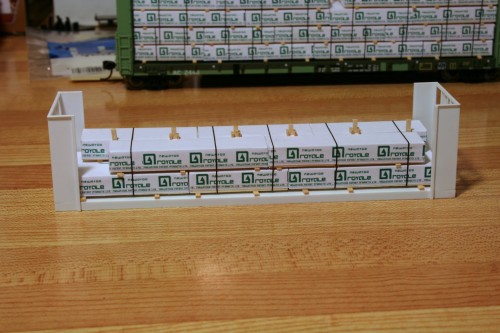
I’ve also made four of these little loads for the 40′ cars based on a pair of late 1970s photos.
IMG_4124

These cars were non-interchange though at this point, so presumably anything being shipped on these would have to be transloaded in the Sault. These small cars also have about a third of the capacity of the larger, more modern 52′ bulkheads so they probably won’t get used regularly, but might be thrown in occasionally for some variation. The rest of the loads I build will all be for the larger cars that will typically be used.

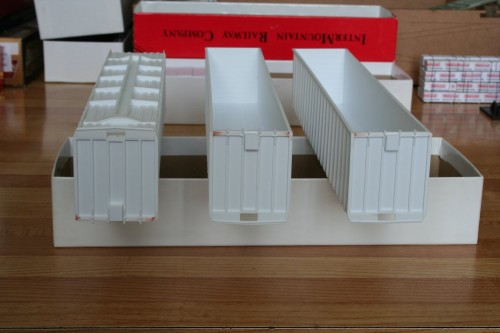
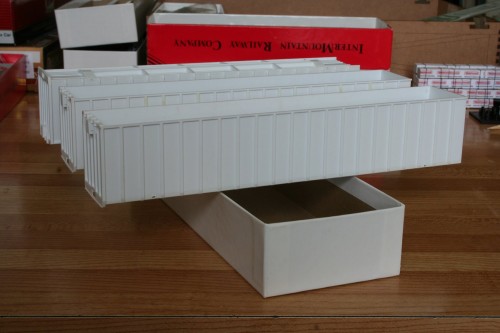
Woodchip Gondola Basic Underframe and Body Assembly

Another project starting to look like something.

I’ve been slowly working on the basic underframe for these three cars over the last several weeks, and this afternoon I got the all of the body components put together.

IMG_4109

There’s a lot of underframe & body details to do yet, obviously, but with the main pieces assembled into bodies, they at least start to give the impression of what these will look like.

IMG_4110

A trio of (almost) finished 40′ AC boxcars

Enjoying a weekend at home by myself to get back into a few projects. One project that received a fair bit of attention today was finishing off the paint, lettering and weathering on a few of the Algoma Central 40′ boxcars I’ve had in progress for a while. Three cars are now basically complete, with three more in various stages of lettering (included the 9′ door rebuild which will become AC 2917. It’s now on the workbench in green and yellow and half lettered. A little ways to go on that one yet.) When all six are complete, I’ll have four 2900 series general service (but still non-interchange) boxcars and two 10000 series work supply/tool cars.

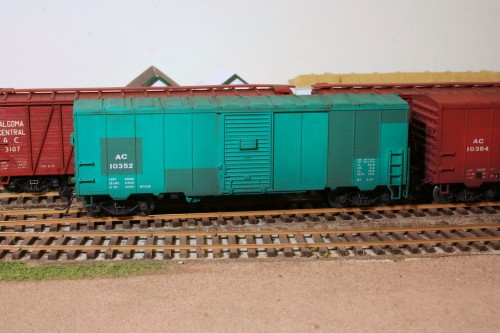
Here’s a few roster shots of the three finished cars. They’re all TrueLine Trains Ontario Northland NSC 40′ boxcars with custom paint patches and lettering. Weathering is a combination of airbrush and pan pastels.

IMG_4102

AC 10352, tool/supply car. The prototype car also has turbine style roof vents and a step below the door which will have to be added. The step won’t be a problem, but I’m not sure how to solve the ventilator detail yet.

IMG_4104

AC 10364, tool/supply car. Like 10352, it just needs the addition of roof vents (although a different sort) and a stirrup step under the door to finish off.

The photo loses some of the detail and character of the weathering, and this car actually ended up a fair bit dirtier than the prototype photos of this specific car that I was working from, but it’s not atypical of other cars in the series, and I actually like the final look, so I think I can live with that.

IMG_4106

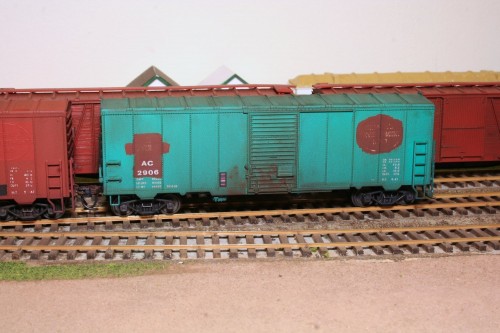
AC 2906, general service boxcar. I sanded the paint patch a little to let some of the original “Ontario’s Development Road” logo show through a bit.

Like the other two cars this car received a general grunge with the airbrush and streaking and detail work with pan pastels. I also tried to get a bit of rust splotching going on in the door using a little bit of acrylic paint and pastels. The weathering isn’t quite to the level of some other things I’ve seen online (some of which will blow your mind) but it’s serviceable and I’m still learning and getting the hang of it.


(This is post #200 published to this blog!)

Freight Car Friday #46 – ESAX Flatcars

IMG_3067

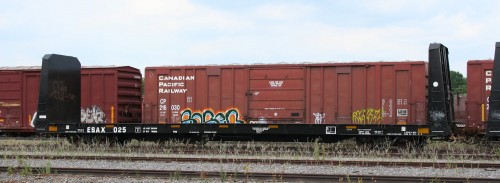
These two cars represent a brand new (built in February of 2015) series of bulkhead flatcars operated by Essar Steel Algoma with their own reporting marks (ESAX). The first example above, ESAX 25, was photographed in the Huron Central yard in Sault Ste. Marie on July 12, 2015. Almost an entire track appeared to be filled with these empty cars.

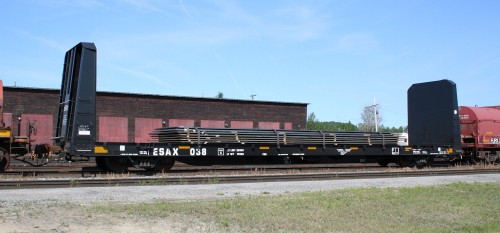
The second example below, ESAX 38, was photographed with a load of steel in a westbound Canadian Pacific train at White River on July 15, 2015. Presumably this car (and several other steel loads, mostly coils, next to it) were interchanged from CN at Franz.

IMG_3435