Freight Car Friday #70 – GBW 8077 Model

This car started out as an Athearn RTR boxcar factory decorated for the Providence & Worcester Railroad which I picked up “used”/new in box at a train show about a year ago specifically with this patch job in mind. It was weathered, patched and re-stencilled following a 1989 photo on rr-fallenflags.org. I have a certain fondness for shortline boxcars and patched out reporting marks of cars in second-hand ownership and I’ve been working on collecting a few appropriate cars from nearby US connections that can fit in to my area and era. These ex-PW cars, as well as other cars from the New Orleans Public Belt (NOPB), East Camden & Highland (EACH) and Wabash Valley (WVRC) Railroads, were acquired by the Green Bay & Western in the early 1980s.

Weathering was done in a few layers/stages. The body was given a general airbrush grime coat (with particular concentration along the lower edges and some vertical “wheel spray” patterns on the car ends) and the rust effects on the door were hand painted with acrylics and a fine-tipped brush. The original reporting marks were painted out with some SOO red I had on hand and new reporting marks and numbers added with Microscale stencil alphabet decals. A bit of work with pan pastels blended the rusty areas, added some streaking off the ends of the door tracks, and added light surface rust to the galvanized steel roof. A final coat of Flat Haze sealed the decals and pastel effects and slightly dulled and faded the body colour.

Painting/Weathering Modern Gondola Interiors

If you actually look at most modern gondolas out there today, you’ll find that most open top cars from the last 30 years or so actually don’t have any interior paint or coating, but instead the interior of the cars are raw, unpainted steel (other than perhaps some overspray from the painting of the exterior of the car).

Of course, with some exceptions, most model cars do not reflect this and instead of masking and painting the interior a rust or brown colour (which would really still need to be painted/weathered for a proper rusty steel look anyway) the whole car, interior and exterior, is painted the body colour.

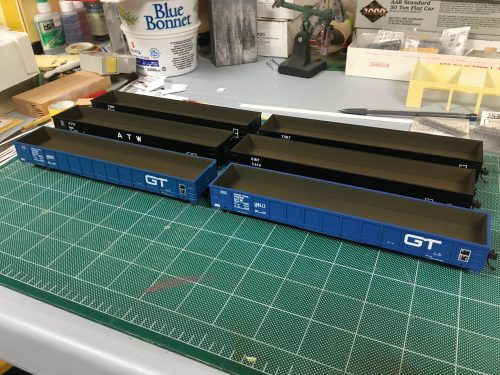
I was having a bit of a painting and weathering weekend this weekend, and got out this sextet of Atlas Trainman SIECO gondolas to paint the interiors “rust”.

Six Atlas Trainman gondolas with the interiors painted to look like bare steel with rust. (Exterior weathering still to be done in this shot.)

To get a good steel colour, I start by giving the inside of the cars a good base coat of Gun Metal. This gives a nice dark metallic colour as a base to work on. Then the rust colouring is added with several very thin coats of Rail Brown, Roof Brown and Rust. These brown/rust coats should be very light and thin, not going for solid coverage and allowing the lower colours to show through. The layers of colours and natural variation created by the light, uneven coats of brown/rust provide a nice rusty steel look.

I may complete the weathering with additional application of rust-coloured powders and some bits of debris from former loads, but the basic painting of the interior to change it from the main body colour (bright blue for the two GTW cars) to something that looks like unpainted steel really gets the cars popping with minimal effort.

Hopper Interior Paint and Weathering

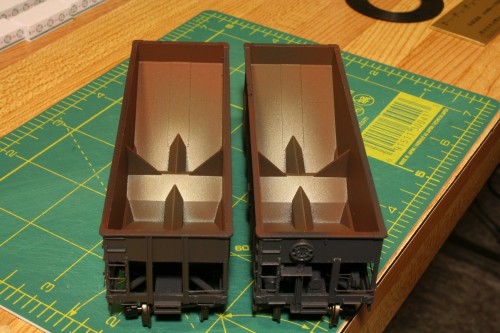
While I had the airbrush and paint booth fired up this evening to do some priming and initial paint work on a different project I’ve been working on this weekend (more on that sometime later when I’ve made some more progress) I also ran about a dozen of these hoppers through the paint shop to paint the interiors.

IMG_5146

I picked up at least part of the technique (with regards to some of the colours and order of use) from an old RMC magazine article, although probably any time anyone ever does something, they always put their own slight twist on it.

My first step is to paint the interior with a light primer colour. For some cars in raw grey this was not always necessary, but as I have several cars molded in several different colours including red, yellow, green and gray (most were stripped from various roadnames) and a primed interior is required to let the actual colours cover properly. Once primed, I gave the interior a base coat of Model Master “Steel” to give it the metallic silvery of bare polished steel. Then – working very lightly, and progressively up the sides of the interior – blend in Gunmetal, Rail Brown and Rust. Go real easy on the gunmetal and rail brown – the gunmetal is a dark almost black colour, and the rail brown just helps blend with the rust and shouldn’t be too prominent – and the whole interior can get a really light final mist of rust to blend all together.

The one really tricky bit about these interiors is the angled pipe bracing. You really have to be careful to mist the colours in from both sides around the braces to avoid “paint shadow” where the brace blocks the spray. (I did end up with a couple cars with a slightly noticeable vertical line at some of the braces.

IMG_5147

I may go over some of these interiors later again, after the cars are fully painted and lettered, with some powders and pan pastels to add a bit of additional colour for specific loads that these cars carried around Michipicoten and Wawa – limestone, coke, sinter and raw ores, but otherwise this is the basic colouring for the car interiors. The top of the car will later be masked off completely to paint the exterior body of the car.

Painting and Weathering Started on 55 ton Twin Hoppers

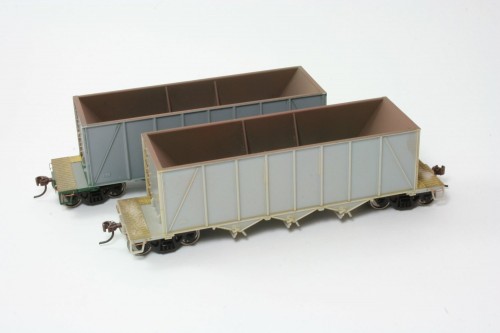
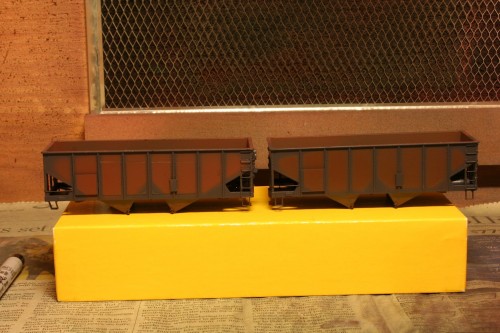
This weekend I had the chance to do some basic painting on this pair of hoppers and start some of the initial weathering of the cars. I gave the two cars an initial spray of weathered black for the basic body colour a while back, and now I had a chance to do the next step.

IMG_4747

First, I painted the interiors. To get the initial base colour for the interior, I actually used four different colours, lightly blending the colours up the sides with the airbrush. First I sprayed the lowest parts of the interior a metallic silver colour (Model Master “Steel”), then working up the sides with Gun Metal, Rail Brown and Rust, lightly blending each colour together so the the colour gradually transitions from a bare metal appearance on the centre sill and lower parts of the bays (where the load flowing out of the car during dumping would have the effect of “polishing” some of the rust off) to a more oxidized appearance on the sides and further up the hopper bays where less material is moving around during loading and unloading. This will likely be supplemented yet with a little bit of powders or pan pastels, but I’m liking the effect so far.

The next major step is weathering the exterior bodies of the cars. Most of these old cars on the ACR had a pretty distinctive weathering pattern caused by an older practice of loading sinter into the cars while still hot, resulting in much of the paint on the side sheets burning off over the years  causing the sides of the cars to essentially become an expanse of rusted metal, following the shape of the interior bays. Check out this early 1970s prototype photo from Ted Ellis to see what I mean.

IMG_4744

To begin replicating this pattern, I used a somewhat experimental technique. I masked off the sides and spayed them a mix of roof brown and dark rust. I first covered the ribs with strips of masking tape, as the burning effect of course only effected the sheet metal of the side sheets with which the hot material had direct contact. Then the bottom and side sills were also masked, and then the rest of the sides roughly masked in the shape of the load inside. The key here while masking is to deliberately NOT be too precise with it. Most importantly, prevent the masking tape from actually laying down on the sides of the car. The ribs were covered with a strip of tape wide enough to completely cover the rib, but these were not folded down over the shape of the ribs. The side mask was just laid down on the tops of the ribs and deliberately prevented from touching the surface of the side. My goal here was a nice soft edge that is NOT clearly defined when the rust colour is airbrushed. The masking thus completely, the sides were sprayed with a dark rust colour and the masking then removed.

IMG_4745

You can see the preliminary result above; so far, so good, I think. I have a ways to go yet with blending in darker colours with pan pastels to really make it look like rust. Eventually the raised panel at the left hand side car number and date will a shot of black before adding lettering.

AC 3100 series wood boxcars from Accurail’s 40′ wood boxcar kit

This weekend I got back to working on a couple of assorted modeling projects that I’ve had on the workbench for a while. One of these is this trio of 40′ wood boxcars.

These models represent cars from a 100-car batch built in late 1927 numbered AC 3101-3200; by the late 1970s any of these cars still running would have been restricted to maintenance service; in 1970s-1980s freight car lists in the Official Railway Equipment Register the Algoma Central lists no boxcars in interchange service. My three cars will therefore likely spend the majority of their life parked in a side track with other maintenance equipment at Hawk Junction yard as material storage cars, or moving occasional OCS (“On Company Service”, i.e. non-revenue) cargos. Here’s a good prototype photo from Ted Ellis’s Algoma Central site of one of these cars in a work train at Frater (mile 102) in 1977:

http://algomacentral.railfan.net/images/AlgoCenRy/AC_3195_Frater_6-12-1977.jpg

These three cars were modelled using Accurail’s 40′ wood boxcar kit with wooden doors and ends. This kit is a pretty close match to the AC cars; they might not be 100% dead-on – I note some minor differences in the horizontal metal straping at the top of the vertical end braces, and the doors stops are located differently, but the side bracing looks pretty much the same – it’s close enough for me.

I chose not to do a lot of fine detailing on these cars; while Accurail’s details (i.e. grab irons and ladders) are molded onto the car body and not separately applied freestanding pieces, Accurail’s tooling is fairly well rendered, and on the wood car it’s not really bothering me that much. If it was a steel car, I’d probably upgrade the detail. Might seem a bit quirky, but in this case I can accept the level of detail of the car body.

The shells were actually painted quite some time ago; these were some of the first things I painted while practicing with my new airbrush. I sprayed the shells with CN Mineral Brown from TrueLine Trains; really any shade of generic “boxcar red”/freight car brown will do here.

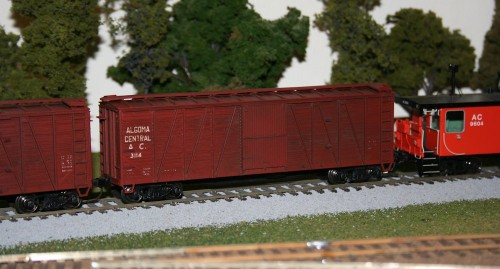
Lettering is from a rub-on “dry transfer” lettering set from CDS Lettering. Following photographs, I deviated from the lettering set a little. The set includes horizontal lines above above and below the reporting marks (initials) and numbers. While when new these cars would have included those in their original lettering, all photographs from later years around the 1960s-80s show these cars without these lines. As I’m modeling this later period, these lines were excluded, and the reporting marks and numberes were moved up a bit, to put the reporting marks and number around the upper grab iron on the left side.

IMG_3892

Once all three cars were lettered, I weathered them up with Bragdon weathering powders applied with a stiff brush. I kept mostly to the darker browns – burnt umber and burnt sienna – as these are wood cars I avoided the oranger rusty colours. I also used a bit of black (soot) on the roof to darken it and accent the roof ribs; and also on the sides to darken and bring out the board detail of the sides. The Accurail car has a lot of grain molded into the sides and accenting this really gives the car a more worn appearance. I also tried concentrated the darked colours around the door opening and the end of the door track where rain would tend to wash off the car roof to try to make these areas a bit darker and more weather-worn. This wasn’t precision detailing, and it spreads out a lot by working it with the brush, and the effects of the powders are actually very subtle, but I think it did generally work to darken the general area just a bit. It’s not necessarily really consciously noticeable that those areas specifically have been darkened, but it brings out the details and the wood grain of the sides, and darkens and varies the colour of the car a bit. And on a couple of the cars even from a distance (maybe even more from a distance) the door and right side of the car is slightly darker in colour than the left side where the majority of the lettering is.

I then gave the three cars a quick spray of Dullcote last night to seal the lettering and weathering. Here’s a pair of the cars mounted back on their underframes and posed on my switching layout with one of my Overland cabooses:
IMG_7291

There’s a few details to be done yet, and the underframe needs some minor detailing and then the frame, trucks and wheels all need to be painted/weathered. The completed car will probably get some additional road weathering along the bottom at that time yet as well, but that’s another day.