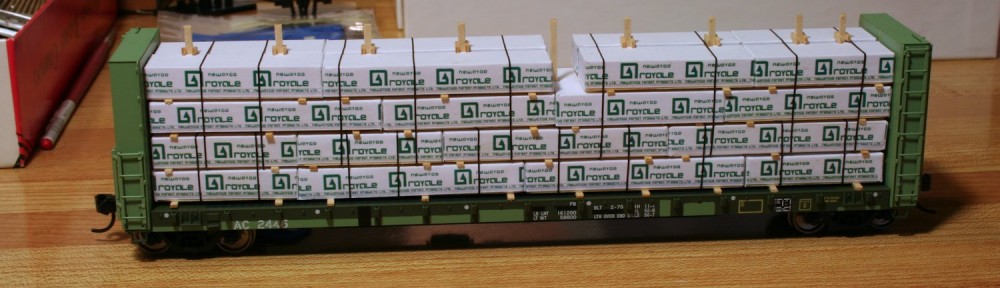

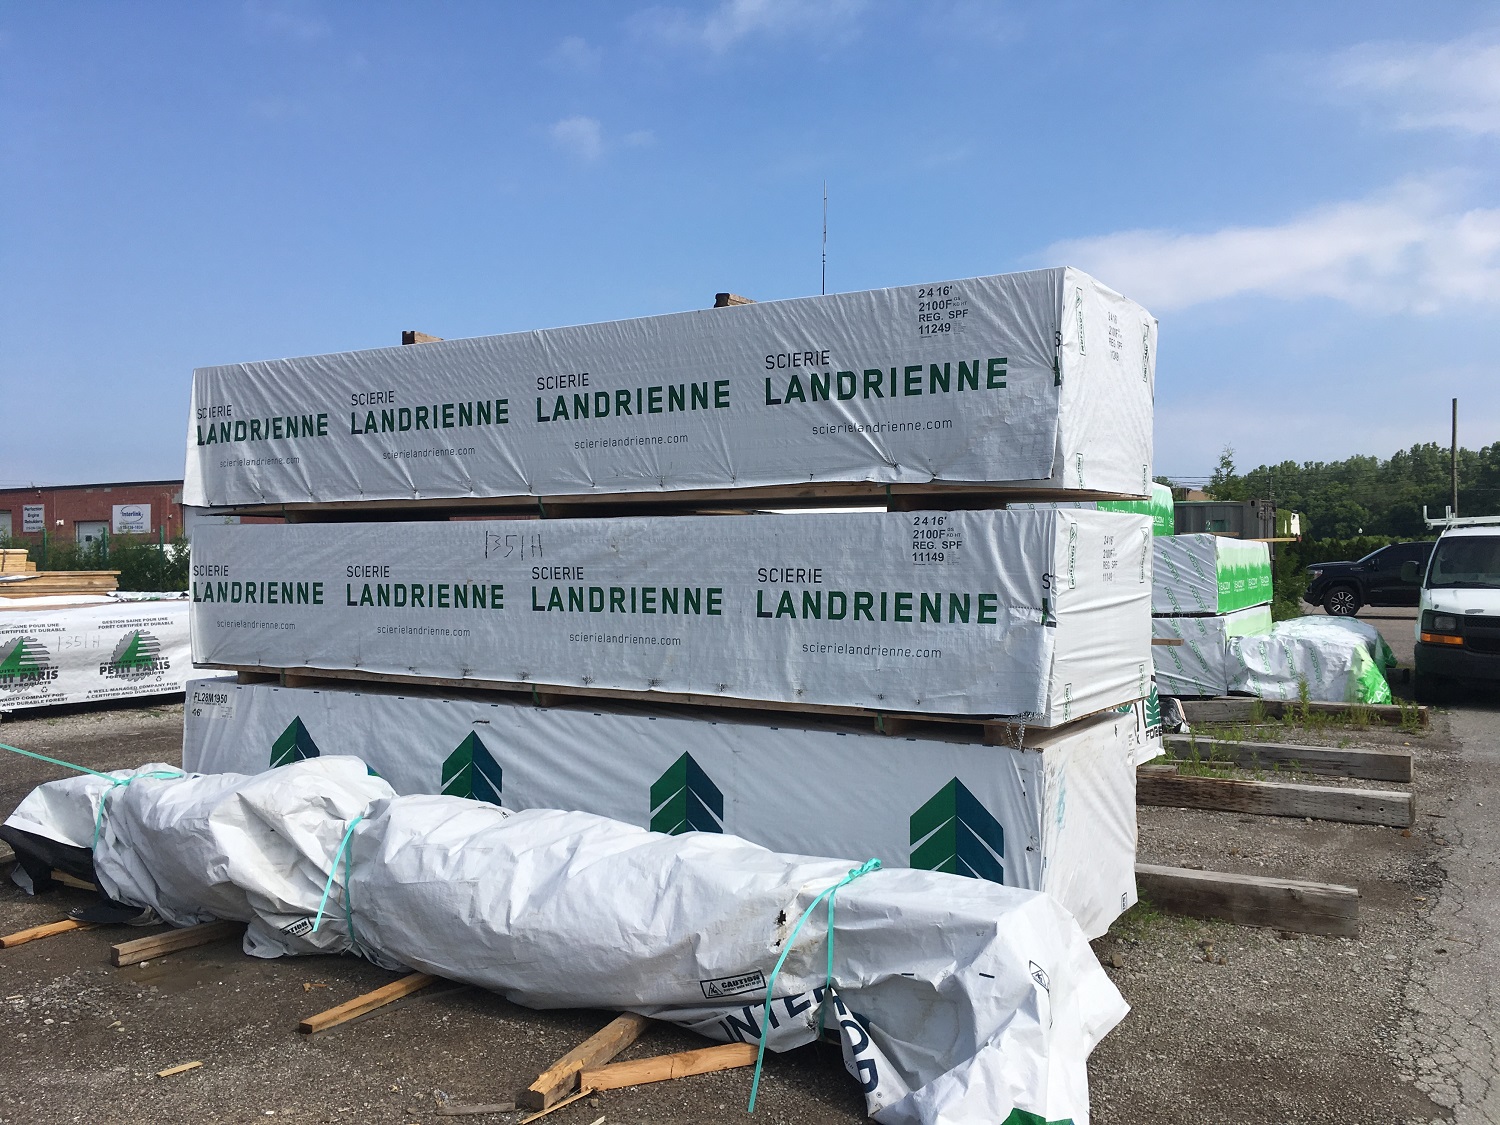
This page details how I construct custom flatcar lumber loads for my model railway. While significantly more work than a pre-made molded and painted or printed resin or plastic load, the result is a more realistic looking three dimensional load with actual spacers and gaps between rows and strapping. It also avoids the cookie cutter look by making every load a little unique from each other by varying the exact combination of bundle sizes and the locations of any gaps or spaces in the rows. It also means I’m not limited to whatever larger lumber companies are featured on commercially available lumber loads, and I have lumber graphics specific to the smaller mills that were actually served by my railway.
Printable graphics for several different lumber companies are provided at the bottom of this page, below the instructions. Feel free to print these and use them to create your own loads. (In fact if you do, I’d love to see them!) There’s also a blank template for which you can create your own graphics or download company logos from online to make your own variations.
The general technique can also be adjusted with different size blocks to model wrapped engineered joist and drywall loads.
Instructions
Wood blocks:
- Choose a nice, piece of wood, preferably a good quality scrap of pine, with no warps and square edges.
- Rip into strips on a table saw or band saw 4 scale feet (13mm for HO scale) by 2 1/2 scale feet tall (8.5mm for HO) for standard size bundles. (Fits four rows to a car.)
Some bundles are wrapped to 2′ (5 rows) and 3 1/2′ (3 rows) heights. - Cut the strips into blocks matching the bundle lengths.*
- Sand any burrs and splinters from the edges.
*Real sizes for scale bundles:
| Dimension | N | HO | O |
|---|---|---|---|
| (Height) 2′ | 3.5mm | 7mm | 12.5mm |
| (Height) 2.5′ | 4.5mm | 8.5mm | 16mm |
| (Height) 3.5′ | 6.5mm | 12mm | 22mm |
| (Width) 4′ | 7.5mm | 14mm | 25mm |
| (Length) 8′ | 15mm | 28mm | 50.5mm |
| (Length) 10′ | 19mm | 35mm | 63mm |
| (Length) 12′ | 22.5mm | 42mm | 76mm |
| (Length) 16′ | 30mm | 56mm |
Paper wraps:
- Print out the selected graphics file on regular white paper.
- The printed graphics show black marks at each end; use this as a guide to cut out the graphics into strips using a sharp hobby knife and straightedge
- Cut the strips to length with a small square to wrap the various sized blocks.
- 8′ (HO: 44 mm)
- 10′ (HO: 51 mm)
- 12′ (HO: 58 mm)
- 16′ (HO: 72 mm)
Bundles:
- Apply glue to the back (un-printed) side of the paper wrap using a standard craft glue stick.
- Center a wood block of the matching size on the edge of the long side of the paper and press down.
- Fold the wrap over the long sides of the block, making sure it glues down securely. Use your fingers to get a sharp crease in the corner of the paper that extends out past the end of the block.
- Using a sharp hobby knife, cut along the inside of the folded corner beyond to separate the sides and top of the overhanging wrap into separate flaps.
- Fold the side flaps in first. (Re-apply glue if necessary.)
- Fold down the top flap over the end. (Re-apply glue if necessary.)
- If the paper wrap extends below the bottom surface of the block, trim flush with sharp knife to complete.
Assembling the loads: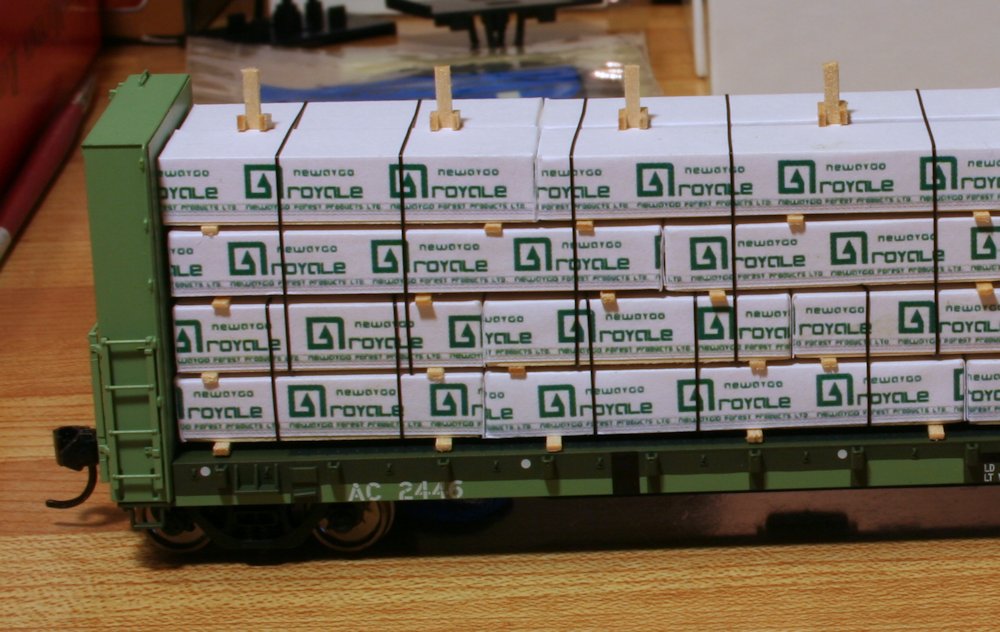
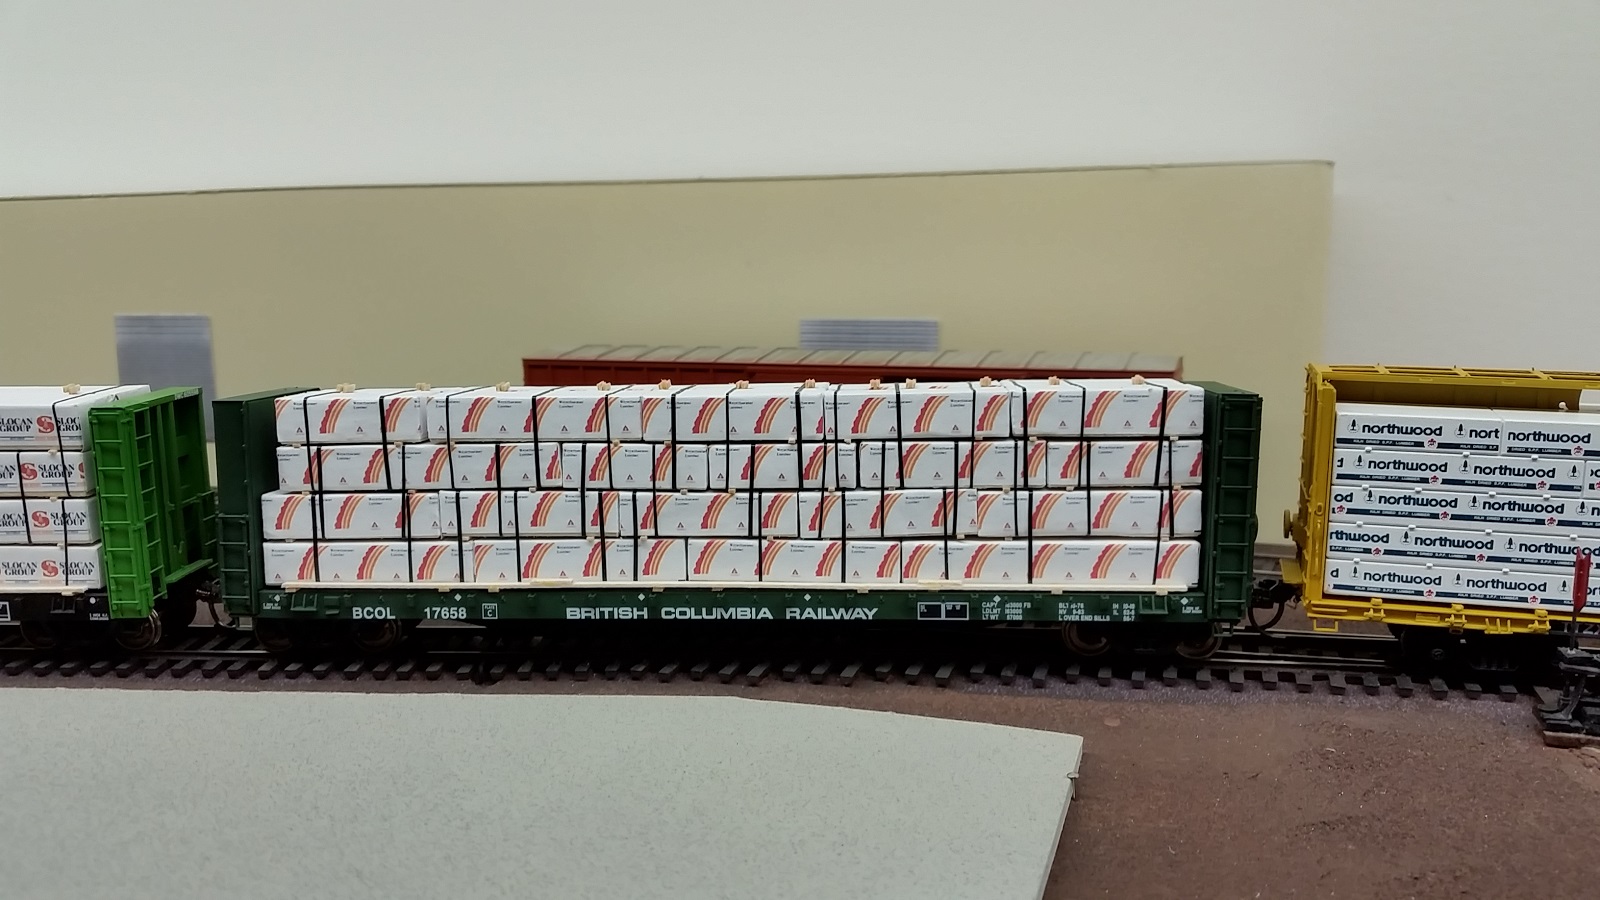
Note: Spend some time studying older photos of lumber loads on standard flatcars or this actual Conrail reference guide to see how the bundles are staggered and strapped together. In the model world, the load is all glued together, but in the real world it’s all held together with strapping, so the bundles are staggered so that bundles beside each other are connected by being strapped to the one above or below in order to unitize the load. At minimum, each end of any bundle should be strapped to one above or below it.
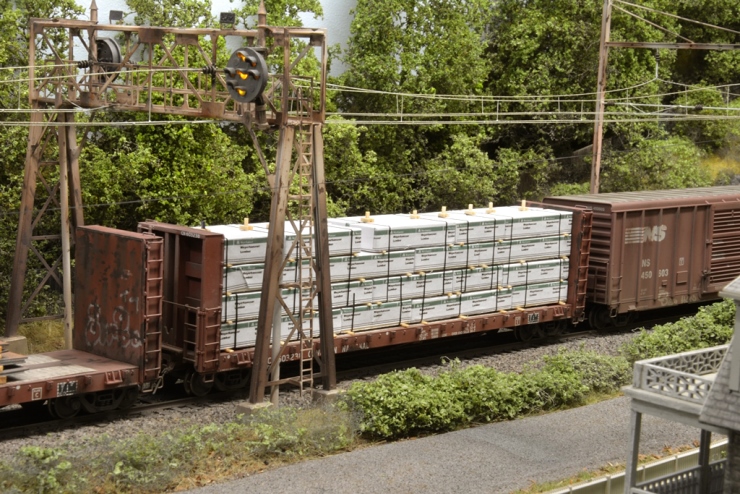
For modern centre-beam cars, the central truss structure and ratchet & cable tie downs standard to the car means the bundles can be stacked and secured with no staggering, although some staggering may still occur when different lengths of lumber are included in the same load.
- Cut the bearing pieces for the bottom of the load, short spacers for between the rows and longer ones for between the halves of the stack from scale strip wood. I used 2×6 strip wood for my spacers, but mills might use various stud sizes from 2x4s to 4x4s. The diagrams in the Conrail reference guide linked above show either 2×4 or 2×6 pieces as standard to use for these spacers.
The bearing pieces (bottom spacers) should be the width of the car. Short spacers between levels can be just the width of the lumber bundle. The vertical stabilizers/spacers should be about 10 1/2 scale feet, or a little taller than the stack of bundles. - Glue the small spacers to the bottoms of the lumber bundles with white glue, except for the bottom row which should rest on the longer bearing pieces.
- Assemble the bottom row by gluing bundles together end to end. Use glue sparingly. Make sure the row stays straight.
(Assembly of the bundles may be done on the car in question to ensure a good fit. Avoid glue drops or place a piece of waxed paper on the flatcar deck to protect. Don’t glue bundles directly to the car – the load will be removable when done.) - Assemble the second, third and fourth rows as above, gluing them to the top of the lower row. You may assemble each side independently, or at the same time, gluing the bundles to the vertical centre spacers.
- Let the glue dry before moving to the last step.
- The strapping on the model load is represented with 1/64″ wide black Chartpak graphics tape (obtained online from an art/graphics supply store), which actually roughly scales out to about 1.5″ wide, not too oversize. I applied this after the load was assembled and glued together using tweezers and a pin to insert the tape in between the layers. Apply a drop of glue with a pin or thin toothpick in a hidden place if necessary to secure the tape, so the natural adhesive doesn’t loosen.
- Add the guide rails along the sides of the loads; these should be out of 2×6″ stripwood and will be glued to the tops of the extensions of the bearing pieces that stick out beyond the sides of the bundles. Add short retainer stakes to several of the side pockets.
Related Blog Posts
- Wrapped Lumber Bundle
- Assembled Newaygo Load
- Conrail Lumber Loading Reference Guide
- Lumber Traffic on the ACR
Printable Lumber Wrap Graphics
Unless specifically stated, all graphics are sized for printing for HO scale standard size 2 1/2′ tall bundles although you can play around with your own graphics and logos to print out wraps for larger or smaller bundles. To ensure that the graphics are printed the correct size, make sure the “Print Actual Size” option is selected in the printing options. (Note – The PDF viewer built into Edge on Windows 10 doesn’t have the “Print actual-size” option and will always shrink to fit. The alternative Reader app also has the same problem. If you’re on Windows 10, either use the Excel spreadsheet files, or download and install the actual Adobe Acrobat Reader application (free), so you have full control over scaling when printing.)
Note: I’ve noticed some possible issues with Internet Explorer trying to download the XLSX links off the site. Not sure why, since it’s just a link to an Excel file and Microsoft’s own browser should understand that. If you do get a page of gibberish opened up in your browser when clicking on one of those links, right click on the link and “Save As” or try an alternate browser like Chrome or FireFox.
Dates in the listings below preceded with ‘~’ may be approximated based on photographic sightings, and may be applicable for a larger date range than stated.
Blank Excel Templates
Make your own wraps for freelance names and logos or other companies not provided here using these blank templates.
HO Scale
XLSX (HO scale 2’0″ bundle height – 5 rows loaded on flatcar)
XLSX (HO scale 2’6″ bundle height – 4 rows – most common)
XLSX (HO scale 3’6″ bundle height – 3 rows)
O Scale
XLSX (O scale 2’6″ bundle height)
N Scale
XLSX (N scale 2’6″ bundle height – 4 rows)
XLSX (N scale 3’6″ bundle height – 3 rows)
Company Graphics By Region
- Maritimes & Gaspe Penninsula
- North-Eastern Quebec (north of St. Lawrence R)
- Southern Quebec (south of St. Lawrence R)
- Ontario and North-West Quebec
- Central Canada (Manitoba & Saskatchewan)
- Western Canada (B.C. and Alberta)
- Canada-Wide & International (generally larger companies)
- United States
Gaspé & Maritimes
Gaspe region and atlantic provinces.
Cedrico Lumber (Price, QC) – ~2011-2019
[HO 2’6″] PDF | XLSX – Prototype
Cedrico Lumber (Price, QC) – ~2020
[HO 2’6″] PDF | XLSX – Prototype
Fornebu Lumber (Bathurst, NB) – ~2013
[HO 2’6″] PDF | XLSX – Prototype
Fornebu Lumber (Bathurst, NB) – ~2019
[HO 2’6″] PDF | XLSX – Prototype
Irving – ~1999-2004
[HO 2’6″] PDF – Prototype
(Artwork file courtesy Andrew Castle)
Temrex (Nouvelle, QC) – 2009-Present
[HO 2’6″] PDF | XLSX – Prototype – Model (Taylor Main)
Twin Rivers (Plaster Rock, NB) – ~2011-2012
[HO 2’6″] PDF | XLSX – Prototype
North-East Quebec
St. Lawrence north shore east of Quebec City.
Boisaco (Sacre-Coeur, QC) – ~2015
[HO 2’6″] PDF | XLSX – Prototype
Donohue Inc. – ~1991 (to Abitibi-Consolidated in 2000)
[HO 2’6″] PDF | XLSX – Prototype – Model (Matthieu Lachance)
Uniforêt (Port Cartier, QC) – ~2004
[HO 2’6″] PDF | XLSX – Prototype
Southern Quebec
Montreal-Quebec City and south of St. Lawrence River.
ARBEC – 2015+
[HO 2’6″] PDF | XLSX – Prototype
Clermond Hamel (Saint-Ephrem-de-Beauce, QC) – ~20xx?
[HO 2’6″] PDF | XLSX – Prototype
Clermond Hamel – ~2014
[HO 2’6″] PDF | XLSX – Prototype
Clermond Hamel (125th Anniversary) – 2015
[HO 2’6″] PDF | XLSX – Prototype
Matériaux Blanchet (Saint-Pamphile, QC) – ~2015
[HO 2’6″] PDF | XLSX – Prototype
Portbec Forest Products (Quebec, QC) – ~2015
[HO 2’6″] PDF | XLSX – Prototype
Northern Ontario & North-West Quebec
Northern Ontario and Abitibi-Temiscaming region.
Chantier Chibougamau (Chibougamau, QC) – ~2013-2017
[HO 3’6″] PDF | XLSX – Prototype
Domtar – ~1991
[HO 3’6″] PDF | XLSX – Prototype
[N 3’6″] PDF | XLSX
Domtar – ~2000-2010 (sold sawmills to EACOM in 2010)
[HO 2’6″] PDF | XLSX – Prototype
[HO 3’6″] PDF | XLSX – Prototype
Dubreuil Forest Products (Dubreuilville, ON) – ~1989-1995
[HO 2’6″] PDF | XLSX – Prototype
Dubreuil Forest Products (Dubreuilville, ON) – ~1997-2007 (closed 2007)
[HO 2’6″] PDF | XLSX – Prototype
EACOM – ~2011-2022 (acquired by Interfor in 2022)
[HO 2’6″] PDF | XLSX – Prototype
E.B. Eddy Forest Products – ~1980s-1990s (to Domtar in 1998)
[HO 2’6″] PDF | XLSX – Prototype – Model (CV)
[O 2’6″] PDF | XLSX
Forex (Mont-Laurier, QC) – ~2019
[HO 2’6″] PDF | XLSX – Prototype
[O 2’6″] PDF | XLSX
Kirkland Lake Forest Products (Kirkland Lake, ON) – ~2017
[HO 2’6″] PDF | XLSX – Protoype
Lecours Lumber (Calstock, ON) – ~1999
[HO 2’6″] PDF | XLSX – Prototype – Model (CV)
Lecours Lumber (Calstock, ON) – ~2013
[HO 2’6″] PDF | XLSX – Prototype
Longlac Lumber Inc. (Longlac, ON) – 2015-Present
[HO 2’6″] PDF | XLSX – Prototype
Malette Timber (Hearst, ON) – 1989-1997 (now Tembec)
[HO 2’6″] PDF | XLSX – Prototype
Nakina Forest Products (Nakina, ON) – ~2004 (closed 2008)
[HO 2’6″] PDF | XLSX – Prototype
Nakina Lumber Inc. (Nakina, ON) – 2018-Present
[HO 2’6″] PDF | XLSX – Prototype
Newaygo Forest Products (Mead, ON) – 1974-1984 (closed 1985)
[HO 2’6″] PDF | XLSX – Prototype – Model (CV)
[O 2’6″] PDF | XLSX
[N 2’6″] PDF | XLSX
Normick Perron (Amos, Senneterre, QC) – ~1994
[HO 2’6″] PDF | XLSX – Prototype – Model (CV)
Olav Haavaldsrud (Hornepayne, ON) – ~2015
[HO 2’6″] PDF | XLSX – Prototype
Rayonier Advanced Materials – RYAM – 2018-present (was Tembec)
[HO 2’6″] PDF | XLSX – Prototype
[O 2’6″] PDF | XLSX
[N 2’6″] PDF | XLSX
Scierie Landrienne Inc. (Landrienne, QC) – ~2013
[HO 2’6″] PDF | XLSX – Prototype
Scierie Landrienne Inc. (Landrienne, QC) – 2015-present
[HO 2’6″] PDF | XLSX – Prototype
Tembec – ~2000-2012
[HO 2’6″] PDF | XLSX – Prototype
Tembec – 2012-2017 (to Rayonier Advanced Materials 2017)
[HO 2’6″] PDF | XLSX – Prototype
[O 2’6″] PDF | XLSX
White River Forest Products (White River, ON) – ~2017
[HO 2’6″] PDF | XLSX – Prototype
Manitoba & Saskatchewan
Edgewood Forest Products (Carrot River, SK) – 2012-Present
[HO 2’6″] PDF | XLSX – Prototype
Alberta & British Columbia
Aspen Planers (blue logo) (Merritt, BC) – ~2007
[HO 2’6″] PDF | XLSX – Prototype
Aspen Planers (red logo) (Merritt, BC)
[HO 2’6″] PDF | XLSX – Prototype
Babine Forest Products (Burns Lake, BC) – ~1990-Present
[HO 2’6″] PDF | XLSX – Prototype
Canadian Forest Products (CANFOR) – ~1990
[HO 2’6″] PDF | XLSX – Prototype – Model (Craig “BNML2″)
[O 2’6”] PDF | XLSX
[N 2’6″] PDF | XLSX
Canadian Forest Products (CANFOR) – ~2003-2006
[HO 2’6″] PDF | XLSX – Prototype
[O 2’6″] PDF | XLSX
Canadian Forest Products (CANFOR) – ~2010-Present
[HO 2’6″] PDF | XLSX – Prototype
Canadian Forest Products (CANFOR) Red – ~2015-Present
[HO 2’6″] PDF | XLSX – Prototype
[O 2’6″] PDF | XLSX
Carrier Lumber (Prince George, BC) – ~2013
[HO 2’6″] PDF | XLSX – Prototype
Conifex Timber (Fort St. James/Mackenzie, BC) – ~2014
[HO 2’6″] PDF | XLSX – Prototype
Decker Lake (Burns Lake, BC) – ~1995
[HO 2’6″] PDF | XLSX – Prototype
Decker Lake (Burns Lake, BC) – ~2005-2012
[HO 2’6″] PDF | XLSX – Prototype
Dunkley Lumber Ltd. (Hixon, BC) – ~2003-2012
[HO 2’6″] PDF | XLSX – Prototype
Finlay Forest Industries (Mackenzie, BC) – ~1980
[HO 2’6″] PDF | XLSX – Prototype – Model (CV)
Finlay Forest Industries (Mackenzie, BC) – ~1990 (to Abitibi-Consolidated in 2000)
[HO 2’6″] PDF | XLSX – Prototype
Finlay Premium (Mackenzie, BC) – ~1996 (to Abitibi-Consolidated in 2000)
[HO 2’6″] PDF | XLSX – Prototype
Foothills Forest Products (Grande Cache, AB) – ~2016
[HO 2’6″] PDF | XLSX – Prototype
Nechako Lumber (Vanderhoof, BC) – ~2010
[HO 2’6″] PDF | XLSX – Prototype
parallel55 (Prince George, BC) – ~2004
[HO 2’6″] PDF | XLSX – Prototype
Riverside-TOLKO (Kelowna, BC) – ~2005-2015
[HO 2’6″] PDF | XLSX – Prototype
[HO 3’6″] PDF | XLSX – Prototype
Silvertree (1) – ~1970s
[HO 2’6″] PDF | XLSX – Prototype – Model (CV)
Silvertree (2) – ~1970s
[HO 2’6″] PDF | XLSX – Prototype – Model (CV)
Skeena Sawmills (Terrace, BC) – 2013-Present
[HO 2’6″] PDF | XLSX – Prototype
[N 2’6″] PDF | XLSX
Slocan Group (Quesnel, BC) – ~1990
[HO 2’6″] PDF | XLSX – Prototype – Model (Craig “BNML2″)
Slocan Group (Vanderhoof, BC) – ~2004 (to CANFOR in 2005)
[HO 2’6”] PDF | XLSX – Prototype
[O 2’6″] PDF | XLSX
Stuart Lake Lumber (Fort St. James, BC) – ~1980s
[HO 2’6″] PDF | XLSX – Prototype
(With assistance from A.J. Shewan)
Stuart Lake Lumber (Fort St. James, BC) – ~1996-2004 (closed 2007)
[HO 2’6″] PDF | XLSX – Prototype
TOLKO – ~1990
[HO 2’6″] PDF | XLSX – Prototype
TOLKO – ~2005-2015
[HO 2’6″] PDF | XLSX – Prototype
West Fraser – ~1974
[HO 2’6″] PDF | XLSX – Prototype
West Fraser – ~1986
[HO 2’6″] PDF | XLSX – Prototype
West Fraser – ~2004-Present
[HO 2’6″] PDF | XLSX – Prototype – Model (John Menges)
[N 2’6″] PDF | XLSX
Westar Timber (Watson Island, BC) – ~1986
[HO 2’6″] PDF | XLSX – Prototype
Country-Wide & International
Larger companies operating in multiple provinces or cross border.
Abitibi Bowater – 2007-2011 (renamed Resolute Forest Products in 2011)
[HO 2’6″] PDF | XLSX – Prototype
Abitibi-Consolidated – 1997-2007 (to Abitibi-Bowater, 2007)
[HO 2’6″] PDF | XLSX – Prototype
Abitibi-Consolidated (Finlay Premium) – 2000-2007
[HO 2’6″] PDF | XLSX – Prototype
Canadian Wood Products
[HO 2’6″] PDF | XLSX – Prototype
iLevel Lumber (Weyerhauser) – ~2009
[HO 2’6″] PDF | XLSX – Prototype
International Forest Products (INTERFOR) #1 – 2011-Present
[HO 2’6″] PDF | XLSX – Prototype
International Forest Products (INTERFOR) #2 – 2011-Present
[HO 2’6″] PDF | XLSX – Prototype
Kruger – ~2005
[HO 2’6″] PDF | XLSX – Prototype
MacMillan Bloedel – ~1995
[HO 2’6″] PDF | XLSX – Prototype
Resolute Forest Products – 2011-2017 (was Abitibi-Bowater)
[HO 2’6″] PDF | XLSX – Prototype
Resolute Forest Products – 2017-2023 (to be acquired by Domtar in 2023)
[HO 2’6″] PDF | XLSX – Prototype
Weyerhaeuser ‘Shed-Pak’ – ~1972
[HO 2’6″] PDF | XLSX – Prototype
Weyerhaeuser Building Products – ~1976-1985
[HO 2’6″] PDF | XLSX – Prototype – Model (CV)
[O 2’6″] PDF | XLSX
Weyerhaeuser Lumber – ~1985
[HO 2’6″] PDF | XLSX – Prototype – Model (Craig “BNML2″)
[O 2’6”] PDF | XLSX
Weyerhaeuser Lumber – ~2004-Present
[HO 2’6″] PDF | XLSX – Prototype – Model (Tim Nicholson)
[O 2’6″] PDF | XLSX
United States (West)
American lumber companies.
Clearwater Paper – ~2011
[HO 2’6″] PDF | XLSX – Prototype
Idaho Forest Group – ~2014
[HO 2’6″] PDF | XLSX – Prototype
Potlatch – ~2005-2017
[HO 2’6″] PDF | XLSX – Prototype
Simpson Lumber Co. – ~2005-2012
[HO 2’6″] PDF | XLSX – Prototype
Hi Chris
Have you thought of using magnets embedded in the bottom lumber load to hold the load to the car, but make it removable during an operating session? Seems doable to me.
Regards
Blair
(Good news – up to my ears in a new house, complete with big train room and thick roof for Rasa. Bad news – so much to be done to finish new house and liquidate old holdings that I’ll be another year before I catch my breath. Oh well! We’ll be down in March for the double header tour, unless we make it before then)
I haven’t found that necessary so far, but there’s some pretty small rare earth magnets you can get, and it should be pretty easy to drill a hole in the bottom of one of the lower blocks to glue in a magnet (probably using epoxy to make sure it stays in there).
The loads are removable, and so far gravity/friction seems to do a fine job on a bulkhead flat.
Aside from N and HO I also model in Z scale.Would it be ok with you if your PDFs were converted to Z scale and posted on Z Central Station ( http://zcentralstation.com ) ?
Catt:
Sure thing!
My goal with doing most of this was that others would find it useful.
Chris,
I have a flatcar load of lumber on CN Newfoundland. It came from the Mainland somewhere. It is not the greatest photo. If I send it to you, can you have a look to see if you recognize it? Most of the lumber shipped were stacked on flatcars with no covering.
Thanks
Andrew
Sn42 CN Newfoundland
No promises, but try me.
chris at vanderheide.ca
Hi Chris,
I found the load that I was looking for. Now to figure out how to make the paperwork so I can print off to cover the lumber.
http://www.jwdpremiumproducts.com/duha-11283-20-irving-plastic-wrapped-lumber-ho/
Andrew
Hi Chris awesome work you have done. I know you’re a 1:87 modeller but have you any advice for converting your graphics to 1:160 (N) ? I guess mainly for the wood blocks. I think the conversion for the wraps would be like 54% or something similar.
Thanks in advance!
Eric ??
Hi Eric, the prototype size of the bundles is generally 2’6″ high x 4′ wide x 8’/10’/12’/14’/16′ long. Measuring against my scale rule, that works out to an actual size of 0.175″ or 4.5mm high x 0.300″ or 7.6mm wide for N scale.
The technique for making the graphics file is as follows:
When laying out the template Excel file, you can size the row height to a specific printed height. Insert the image, resize so it fits the row height exactly, then adjust the column width so it fits exactly to the image. (Highlight multiple columns to resize them all the same at once – then insert/delete extra columns as necessary.) Then copy and paste to the other cells ad nauseum to tile the image. Then print out, cut, and glue as per the instructions at the top of this page.
Do any pre assembled loads for us poor folks with little modeling time?! 🙂
I’m not sure *I* have that much modelling time either! 😉
There’s a certain amount of effort involved, I think pre made would sell for a decent amount to make it worth while.
Philip
Well, there are ‘fake’ loads, like the Walthers one for their Centerbeams:
https://www.walthers.com/wrapped-lumber-load-for-walthersmainline-72-centerbeam-flatcar-weyerhaeuser
but I doubt that’s what you’re looking for. Individually wrapped bundles, stacked, spaced, and fastened together? I can’t see that. It takes quite a bit of work to do enough for one of these cars. I spent most of a day sawing lumber to dimensions last month, and the yield was enough to do about 25 cars. I figure I can make those 25 loads in about another 3-4 days effort, maybe more. So if you work it out, that’s about an hour and a half per carload, maybe more. How much do you get paid per hour?
I look forward to your results Blair.
Hi Chris, I model 1983 on the SP in Oregon, and would love to have a few Weyerhaeuser wrapped loads on some bulkheads. I thoroughly understand the time and craftsmanship involved. Just was curious to know your thoughts and feelings, and level of interest in the project. Thanks for the time.
Philip
WOW! All l can say Chris is WOW! You have done the hobby an incredible service! l am modeling a BN branch line which did lumber loads from all over N.A. in the mid 80’s to mid 90’s in N scale. Cannot thank you enough. Gonna try printing ’em on white decal paper, see what happens. Not ready to work on ’em yet. Recognized quite a few of the logo’s from back then. Thanks again, Lord bless you for your hard work and generosity!!! J. Barrett
Thanks John.
It’s good.However it doesn’t help if you have no Nscale.
I’ve got N scale that is what I run.
I guess I’m getting no help.So let me ask this.How to I convert HO to Nscale. Someone as to know that.
Bundles are usually 4′ wide, 2 1/2′ tall, and from 8′ to 16′ long in even lenghts (i.e. 8′, 10′, 12′, etc.) There’s a table of prototype & converted scale sizes at the top of this page. There are also blank template files for different scales at the top of the files links.
The graphics are designed to wrap over the top of a block of wood so that the graphics show properly on both sides of the block (see the illustration images at the top of this page). While most of the examples here have HO scale files, it’s easy to make N scale versions, or simply apply a 55% scaling factor to convert from HO to N scale when you print the file (if you download and print the PDF version of the file, the reader program should allow you to set this option when printing).
Also, I don’t check this every day for comments, and it’s the middle of the Christmas-New Years holidays. And your first couple of questions are a little unclear as to exactly what you’re asking.
Ok.I guess this site can’t or want answer my question.
Well, sir, if you’d ask a complete, coherent question, with supporting context in proper sentences, you might find responses forthcoming.
It’s actually very hard to figure out just what your problem is, given the quality of your postings so far.
Just a suggestion.
Great website cant wait to start building ho lumber loads.do you have wrappers for osb a d plywood as wait a go guys this great.do I have to have windows 10 to do this?
No, you definitely don’t need to have Windows 10! 🙂
I have done several types of these loads and have found them to be tedious but very satisfying when finished. I construct mine the same way. I find that gluing the paper to the wood eliminates that “puffy” look that some modelers get. Gluing the stacks of wood together is also an excellent Idea. I have found that if you use poster putty (sort of a sticky Play Dough substance found at any craft store) it makes the loads removable from the car with no damage to loads or the car. I just bought two Exact Rail 67 foot bulkhead flats and am gonna do the same treatment to them. Your loss look great and thanks for the info and paper designs. Will send photos when finished.
Great stuff Jimmy!
Thanks for doing the hard work and then making these available. During the the 2000’s I worked as a printing press operator for a company that made a lot of these lumber wraps. Kinda nostalgic, seeing these logos, they look great to me.
Thanks again
Great article really can use this on my n scale cars as I model-based fall of 1979
Hi somebody else gave me an idea. Ever thought about crates of snowmobiles or atv that are being shipped. Like Yamaha or Ski Doo
If it’s a simple box with printed graphics on it, you could do it with a similar technique. Obviously the sizes and graphics would be a bit different, but the execution could be similar.
Chris: I am fairly new to the scratch build loads part of the hobby. I model in N-Scale and so much is related to HO. I have just read this article and it is very interesting and informative. You must have tons of experience in railroad modeling. Is there a conversion formula for reworking the HO stuff into N or are there files already out there where I can just insert the logo?
P.S. I read your article on the pulpwood loads in the Feb 2020 MRH. I grew up in TImmins Ontario and saw plenty of these loads running on the ONR through Hoyle to Porquis Junction. Great work on the article and I am going to use your tips for my N-Scale ONR loads.
Hi Randy, there is a blank template on this page for N scale, which your desired images can be pasted in. One thing to keep in mind is what the actual sizes of these bundles are – 4′ wide, [usually] 2 1/2′ tall and 8′ to 16′ long in 2′ increments. These can be converted to scale dimensions using the scale factor or measuring with a scale ruler.
One thing is that converting down to N scale these bits and pieces, and the printed graphics will start to get pretty small.
Also if there are certain names that are more popular, I might upload versions in different scales here.
Chris: Thanks for the comments. I am looking forward to spending a Sunday afternoon or two getting these done. One other question, on the Algoma Central and possibly ONR pulpwood loads, would they actually haul longer logs length ways?
Longer logs could be carried lengthwise on cars with side stakes.
Not 100% sure about logs were actually shipped on ONT, but their 66′ flatcars had removable side stakes (though I’ve seen limited photos of them), Algoma Central shipped larger saw logs in gondolas, and Canadian Pacific had a unit train operation that hauled tree length logs to a mill near Espanola west of Sudbury.
Examples:
https://www.onrhts.org/Rolling-Stock/Flatcar/10000s/
https://www.onrhts.org/Rolling-Stock/Flatcar/4000s/i-QSdnKwV
http://trainweb.org/algoma/Images/Action/M_Turney19_1995.jpg
http://canadianfreightcargallery.ca/cgi-bin/image.pl?i=cpi25050&o=cprail
These are great, just finished 2 bulkhead loads and 2 centrebeam loads, one of each for Irving and Twin Rivers. Thank you for creating them.
I might even try to make one for a local mill that has closed, assuming I can find a sample of their wrapping.
Hi Chris. Remembered this blog page from years ago and just went back to print off some wraps. Just starting my lumber loads project. Many thanks for the printable graphics.
Andrew Kerr
This is an amazing job and thank you for sharing this with the modeling world. What an inspiration!!!!
I’m having with the mm for the 8′ Long.Is the Lenght and with the with on the car on the wraps.Unsure need help.
I was wanting to ask a question.The question is this when making the Nscale Lumber Loads.
The Wraps are from side to side.
I do Nscale.I have graphics for HO Lumber loads.I would like to convert them to Nscale
I replied to one of your other comments above….
You can print out the HO file at 55% scale to convert to N scale, or you can use the N scale blank template file and re-make the file(s) with your own graphics.
Measurements for cutting the wood pieces are provided in the text on this page.
If there are certain company graphics here that are particularly popular I can add uploads of other scale versions of those files (there are a few that have O and N scale versions posted here already), but I’m not going to sit here and guess at that, and spending a huge amount of time slogging through every single one doesn’t interest me.
Hi Chris, can’t thank you enough for putting together this resource. What a treasure trove!
I have been trying to identify the load in the following picture without success. Would you mind taking a look? I’d greatly appreciate any thoughts you have.
https://www.flickr.com/photos/91431315@N07/36474631616/in/album-72157674289207066/
Thank you!
It kinda feels like the lettering is something like “HINES”…. there’s an Edward Hines Lumber Co, est. 1892.
It’s definitely an American company, that’s not a Canadian flatcar.
You are spot-on about it being Edward Hines Lumber Co.! After a little poking around online I discovered Edward Hines owned the Oregon & Northwestern Railroad, which shipped lumber from a sawmill in Hines, OR. I found a couple pictures showing the same lumber wraps as in the photo I linked. It also appears the ONW rostered flat cars like the one in the photo. So you solved two mysteries for me, thanks so much!
Glad I could contribute at least a little in connecting the dots!
Unfortunately I don’t have access to a table saw. Do you think 9mm thick foam board could be successfully cut into rectangles and wrapped? I know it wouldn’t add much weight to the car.
I see no risk in trying that, although the corners of the blocks would be far more likely to get dinged up.