Here I will discuss how I created my own car cards and waybills using Microsoft Excel’s spreadsheet software.
Note: this will not be intended to be a detailed tutorial on Excel, or the specific features I’m using; I will show enough to convey how I’m using the feature(s), but for additional details I will refer you to Excel’s documentation or other help sites. It should also be possible to achieve these results using similar tools in other spreadsheet software, but I leave that research to the reader as to how the tools in those softwares may differ from Excel.
Car Cards
The specific design of the car cards and waybills is inspired by the ones we use at the club created and printed using the Ship-It model railroad software. They follow the same dimensions and general form factor, although I have tweaked the design a little to customize it for my own purposes (especially of the shipment waybill insert slips – see below).
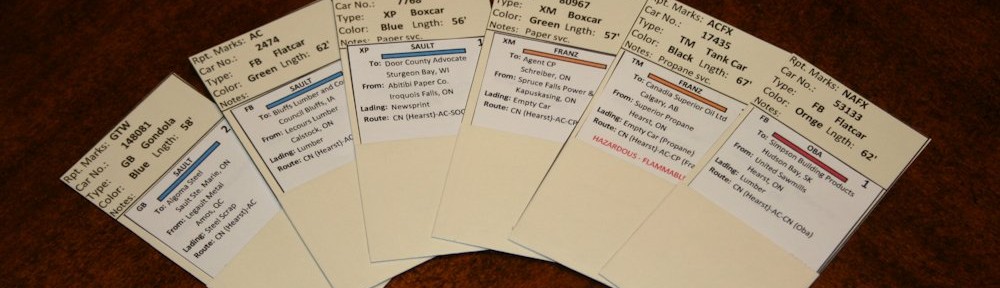
On the car card, the car information goes at the top, with the most important information (identifying reporting mark and number) in the central place of prominence. Other descriptive information such as type, colour and length are included below to assist in visually identifying the car. The Notes field may indicate other special features of the car, or usage restrictions (for example, “Paper service only” on boxcars meant for such).
The bottom of the card is designed to fold up and be taped to form a pocket into which the shipment/routing portion of the paper work (waybill) is inserted.
Below we see the Excel sheet I use for printing out my car cards. It took some tweaking to get the column sizes exactly correct, but otherwise looks pretty straightforward. However, under the hood all of the fields are defined with formulas that pull data from another sheet in the workbook. I didn’t want to copy and past page after page after page of hand-coded car cards (and especially the waybills with their vastly higher number of fields and flopped orientation) so I made one template page, and used Excel lookup functions to pull the data from another sheet, so the car data could be tracked and manipulated far easier in a standard grid format, and any arbitrary range selected for actual printing. In this way, car cards for a large fleet of hundreds of cars can easily be created.

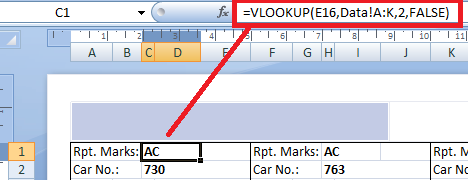
You’ll see in the first image above of the car card template sheet, a “Starting ID” cell below the cards (in cell E16, highlighted). I’m going to use the value in this cell to feed into the Excel lookup functions, which will extract data from the actual roster sheet, and populate it into the fields in the car card template for printing.
Below is the actual roster information, contained in another sheet within the same workbook. Way easier to read and keep track of, and much more additional notes and information can be added in further columns to the right; our lookup only needs to deal with the first ten columns. Note in particular the first column with the heading “ID”. This is the value we’re going to lookup, and then populate the date from the other columns in the same row into the template sheet for printing.
Excel has several data lookup functions, and the one we want is the “VLOOKUP” function. The VLOOKUP function scans through a specified range of data, looking for a specific value in a particular column. Once that value is found in the search column, it can return a value from another column in that row. The VLOOKUP function in Excel looks like this:
=VLOOKUP( [value],
          [source sheet name]![data columns],
          [column # in data to pull result from],
          [allow approximate matches])
In my case above, we’re pulling the lookup value (the car ID) out of cell E16, so the reference to that cell is the value. (For the subsequent car cards, we want to pull the next several cars in the data sheet, so the lookup value will be the value of (E16)+1, (E16)+2, etc., so if the starting ID is 1, car cards 1 through 5 will be printed.)
The name of my second sheet with the car data is “Data”, and the data is in columns A through K in that sheet. (The VLOOKUP function will scan the first column trying to find the lookup value.)
The last argument should be set to FALSE as we only want an exact match.
Put that all together, and the lookup for the reporting mark field on the first car card looks like this:
One thing to know about the VLOOKUP function in excel, is that if the returned cell in the data sheet is blank, the VLOOKUP function will display that as a 0 in the display cell. For some fields here, like the Notes and Empty return information, I definitely want the cell to be blank if there’s no data, not rendered as zeroes. To protect that, any cell that’s using a VLOOKUP that you want to allow to be blank will need to be wrapped with an Excel IF function, which looks like this:
=IF ([condition], [value if true], [value if false])
In this case, my condition will be if the value from the lookup function is blank (“”), make the cell blank, otherwise insert the returned value. If I do this for the example cell in the image above, it would end up looking like this:
=IF (VLOOKUP(E16,Data!A:K,2,FALSE)="", "", VLOOKUP(E16,Data!A:K,2,FALSE))
… which actually looks far more complicated than it is, since the whole lookup function is pasted in there twice.

Waybills
I also used these tools to create my own custom waybill template. This was a lot more work than the car cards simply owing to the sheer number of fields involved in each waybill compared to the car card, and managing to fit 10 of them per sheet as opposed to 5 per sheet for the car cards. However, it was largely a matter of just taking the time and effort to copy and adjust the lookup functions much as above. While there are quite a number more fields to deal with, and more waybills fit onto a page than the car cards, the general method is exactly the same. Just time consuming to do that many fields. But once it’s done, you have a dynamic template that can easily and quickly create and print out hundreds of different waybills.

My waybills are “two-cycle” with each one printed on one side of the paper and having two separate moves (generally an empty move and a loaded move), one of which is visible at a time and rotated (between sessions) in the car card pocket to display the second move when the first move is completed. This required printing the second move upside-down to the first – although Excel doesn’t allow you to set the text orientation in a cell to “upside down”. It does however let you do “up” and “down”, so I just designed the waybills sideways with each half oriented a different way, as seen in the image above.
Two-sided four-cycle waybills can also be created, just more of the same effort to set up the additional fields on the second page, and a bit of playing with the page margins and column positions to find the proper alignment so that when the second page is printed on the reverse of the first, the waybill edges line up properly for cutting them out. I only needed two-cycle bills, so I did not bother with this effort.
You’ll see that my waybill template includes a block code for switching/routing at the very top, as generally this is the most important information required when switching or handling cars – “Where does this go?” and using a routing or block code at the top of the waybill makes it easier to identify the car’s immediate destination. This is reinforced with a colour-coded bar below the block code which matches the block. (I plan on making a chart of the blocks and a system map readily available to operators in the model railroad’s timetable document.)
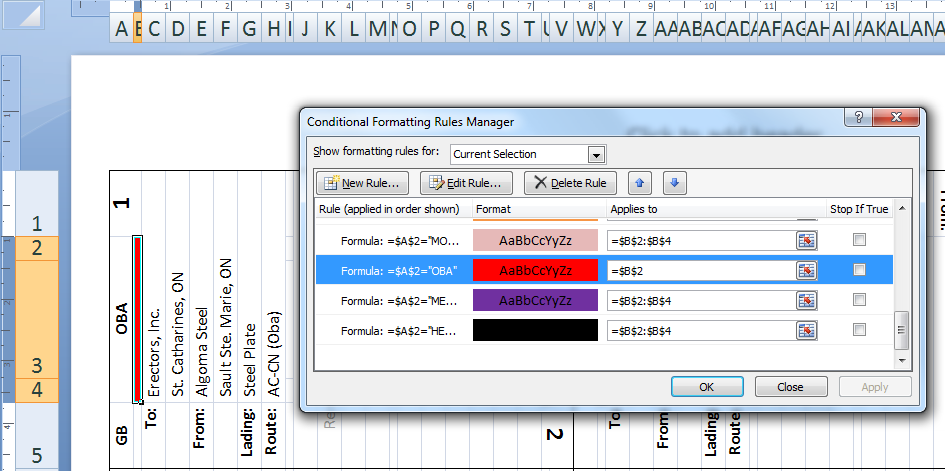
To make the colour coded bar, I created a series of Conditional Formatting rules to apply a fill colour to this cell based on the text value in the block code cell above/beside it.
Once the waybill template is completed, it’s a matter of playing around in the data grid to create the various shipment information, and then printing them out in the template by adjusting the starting ID/group to fill in the data and print the results. Cut out with scissors, insert into the appropriate car cards, and voilà:

Files
A few people asked if I would share the actual Excel files. Here they are.
- Car Cards (without logos)
- Car Cards (w/ RR Logos)
- (2-cycle) Waybills
- 4-cycle Waybills file modified by Brent Ciccone
Notes: The car cards file is useable as-is by anyone. I cleared out my own roster information so the entire world doesn’t know my inventory, just leaving the first few cars behind to illustrate how the data works. For the waybills file, I actually uploaded my file as-is, including all my data. Consider it a gift to other ACR modelers, and shows how the data works. Note that if you’re adapting the file to your own railway and want to include the colour coded bars that match to the destination block codes, you’ll have to go in and edit all the conditional formatting rules for your own station/block names. Note that this workbook also contains the customer order sheet described in my previous post.
If clicking on the link doesn’t open the file properly, right click and choose “Save As…” from the menu that comes up. (Mac users with a one-button mouse, I believe you hold the “Command” key and click for this menu.)
Update: see also followup post where I add company logos to the cards.
Are you willing to make your excel files available?
Sure, I can add them this evening.
Chris,
It was good of you to share this. I am going to try it out on my computer this weekend. I’ve always wanted to do operations like this, but I just never wanted to hand write all the cards. This will probably take as long to set up, but should be much quicker to change. Thank you very much.
Chris – You’re the BEST for sharing your ideas AND your waybill and car-card templates! I am trying to operationalize my transition era PRR pike (N scale) and I think your posting and spreadsheets have provided THE ANSWER!
Thanks very much for sharing your expertise. Happy New Year to you!
Thanks Bill.
Thanks for sharing your files. I was about to start my own spreadsheet to generate Waybills, but you have saved me a lot of work.
Hello!
Thanks a lot for sharing your ideas and files.
It’s great that they are in Excel too, that way we can tweak a bit using VBA to create some automation on our own. I’m trying to make 4 side waybills.
All the best.
Cheers,
António
Hi Antonio, you should be able to see what I did there and continue on with it to create a second sheet for printing double-siding 4 move waybills.
It’s mainly a matter of spending the time doing the tedious work copying out the formulas to all the new cells in the second sheet, and then adjusting the margins so they line up properly when printed double sided. I haven’t thought of using VBA for anything, but if you have some ideas there that could be implemented using that, that could be an interesting addition.
Thank you for this. Made my work a lot easier
Hi Chris,
Thank you very much for having shared this very interesting set of cards. I plan to use it on my layout CAChALO.
Thanks for Sharing these files. Took a little work to set up, but working great so far. My Layout is pretty simple, so I made some changes. Now to find some guinea pigs to try this out!
Just found your car cards and waybill, wow saved me a lot of work.
I’m adapting it for my line, and spent today learning how it works.
Thanks for allowing it use for us all.
Simon
Thanks for this. I took your files and modified them. I made a 4 cycle version for the way bills. If you are interested I can send you that file.
I’d certainly be interested in the 4 cycle version.
Simon
Brent, send it to me at cv_acr [at] yahoo.com and I’ll add it to this post.
FYI Brent’s version is now embedded in the original post alongside my own files.
Hello Van der Heide, many thanks for allowing your card files to be used.
Makes the task of producing the cards very simple.
Great work
Best
Mark
Van Der Heide
Thank you for the files one question is can this be setup to automatically print say 100 car card with out having to completely duplicate each sheet
Hi Anthony,
I designed the Car Card and Waybill sheets to be able to print 5 (CC) or 10 (WB) at a time without having to copy and re-do those pages.
Those sheets have a bunch of lookup functions built in to them (which I sort of describe the usage of in the main posting but if you download my files they’re all built in and ready to go for you.)
In each of the CC and WB spread sheets, there is an individual sheet for the formatted cards to print out, and another sheet that contains the data. You’ll notice a spot on each of the printable card sheets to specify a starting point which corresponds to a value in the first column of the data sheet that’s used to look up the data in that row.
For example, in the Card Card worksheet, there’s a cell below the formatted cells to enter a “Starting ID”. You’ll noticed the first column in the “Data” sheet in that file is an ID column that contains a number value. This starts at 1 and counts up. Enter all your car data in table form in the “Data” sheet (I left a few examples in the sample file – you can also see this in the screenshots of the Car Card sheets up in the original post) and when finished, go to the first “Car Cards” sheet. If you enter “1” in the starting ID cell, the data from the rows with values 1 through 5 in the first column of the “Data” sheet (“ID”) will be displayed. Print the sheet.
Change the starting value from 1 to 6. Print.
Change the starting value from 6 to 11. Print.
etc.
This way you can print a large number of car card data very quickly without duplicating effort. Just update the starting value to the number of the first CC you want to print.
The Waybill file is similar but a little different. Because there are 10 waybills to print out, I broke everything up into specific groups of 10. In the sample data included in the waybill file, notice in the “Data” sheet, the first column (called “Group”) has IDs in the form of GroupName-1 through GroupName-10. On the first (“Waybills”) sheet in that file, find the bordered cell below the “Group” label, and type in that “GroupName”. What this will do is take that “GroupName” and add the “-1”, “-2”, etc. in order to look up data from the rows that have those values (i.e. GroupName-1, GroupName-2 etc.) in the first column.
Each group only has 10 waybills; if you desire more than 10 waybills for a particular group (say boxcars), you’ll have to create more groups, e.g.
BoxcarsOne-1 … BoxcarsOne-10
BoxcarsTwo-1 … BoxcarsTwo-10
etc.
Then on the printable Waybills sheet, in the “Group Name” cell, enter “BoxcarsOne” (without the quotes though), which should bring up the data from the first group. Print.
Change “BoxcarsOne” to “BoxcarsTwo”. The data should update. Print.
etc.
I started out by copying sheets to make new waybills but quickly realized that was a pain in the butt and hard to enter the data in sideways cells all the time, and built out these sheets using the lookups so I could just enter all the data in an easy to edit table format and then with a couple of button clicks print any CCs or WBs I want from my data.
Hope this reply made some sense. There is also an on-going thread on the Model Railroad Hobbyist forums about making waybills in excel that has sort of evolved into a more detailed discussion of my own files, and you may glean some addition info there as well:
https://model-railroad-hobbyist.com/node/36974
thank you very much for the info i look forward to working with these
Just to say thanks – I have been struggling to understand waybills and car cards as a total newcomer to this area of railway operations – your explanation and files has suddenly made sense of it all.
Thanks Keith.
The key thing about the car card + waybill system developed for model railroads is that *together* the two pieces kinda represent a mini version of shipping document for moving cargo in a rail car from point A to point B.
Back in the 70s or so someone came up with the idea that if you just separated the “car” and “cargo/route” information you could make all the paperwork totally reusable. While in real life the car number is a piece of information on the waybill, by making a separate card for the car, with a pocket to insert the shipment “waybill” information, and having the “empty” and “loaded” moves on opposite sides of the “waybill”, the shipment part can be flipped around from empty to load and everything is flexible and reusable without ever printing new paperwork for each session.
The minimum information you need is the car initials/number (on the card) and the destination (on the “waybill” insert). All the rest is variations, tips, and tricks.
Hello. Thank you for sharing your files and all of the excellent info. I am using OpenOffice instead of Excel (I have OO on my laptop where I do my car card work, I have Excel on my work computer). I bring this up as I cannot get the logos to come over. At first I thought maybe I had taken the formula out by accident, so downloaded again. That did not fix it. I double-checked to make sure I was putting the reporting marks down in column A and in Column B did insert>names>define and added the reporting marks then pasted the logos in those cells. I still am not able to get the logos to come thru. Any help would be appreciated. Thank you.
That function may not be available in Open Office. You would need to search the Open Office help files to find something equivalent.
Hello. Could you give me the formula and where it should be located? I am not sure that I am finding it in the worksheet anywhere (not that I am the most literate excel person). I can try to input it myself.
The other formulas works and bring the info from the data sheet. It is the items from the logo page that is not coming thru.
Pretty excited with the overall function of the program.
The feature might only work properly on Excel?
I don’t have OpenOffice but have LibreOffice on my work laptop and downloaded my file there. On initial load it showed the logos for the five cars that were there by default, but when changing the starting index to load information for different cars the logos aren’t updating to match the rest of the data. So it looks full support for the feature used is broken in these free versions. I don’t know if there’s a way to modify it for these other programs.
So if you want to use the logos, you may need to actually use MS Excel. If you don’t have excel, you may need to forego the logos and download the earlier version that doesn’t include the logos. 🙁
Forgot to mention. I will bring it up on my other computer with excel on it and see if it comes up that way.
Hello. So I got it to work on my office computer with Excel.
A few of my images it has distorted for some reason, just a few, not all.
Checking them to see if there is any differences in the way they are tagged, and have not been able to see it. I closed excel and restarted, same problem. Instead of bring them over from the Open office copy I moved the logo folder over to the office computer and used the logos from my folder, still same problem. Getting closer just not gettin all of them! Any ideas?
Thanks Dan
Go to the tab that has the logos and adjust the row and column width so that they are larger than the logos. Also, the logo’s have to be a certain size, make sure that the image isn’t too big.
Sir,
Came across your page when searching for carcards, etc. Recently retired and created a new HO layout. Last time I was involved in Model Railroading was late 70’s. Wow has things changed.
Much appreciate the work that went into creating these.
Hello Chris I am also name Chris lol 😂 well any who I all ways enjoy watching your videos on YouTube it’s interesting gets me some ideas for my Railroad a ho scale Model railroader cents I was six years old I never goting tired from it never so my collection grows over the years I am happy about it with my hobby’s so this lit you know my Railroad is base on the newly formed of the Milwaukee Road no as the Milwaukee Southern Railway Lines I got awesome videos from my Railroad you should check it out TMClancy Railaction Videos so happy railroading keep up the good work Chris
Fantastic stuff. Have been procrastinating for a number of years around creating the 4 way car cards. Your excel files are just perfect and will remove the cork from my bottle. Thanks for sharing.
Your Excel workbook that you authored which may be called Waybill4 is is exactly what I have been searching for. I downloaded what I could find. I am unable to select which waybills to print. I really would appreciate it if you can help me acquire a working copy.
Thanks for your consideration.
Royal Bruce
You’ll see in the data format there’s a “Group” column with a name or code, and these are in groups of 10…
e.g.
Steel-1
Steel-2
Steel-3 and so on.
On the actual card sheet, there’s a place to enter the group “name”; put in the name “Steel” and it’ll populate the page with all the data from the Steel-1 through Steel-10 rows.