Net Storage Boxes

These storage boxes are a simple detail, but due to their position right at the top centre of the door (yep, the box is actually mounted right on the door itself) makes for a prominent feature on the A end of the car.

These boxes were used to stow mesh netting, which would be used to cover a load of woodchips to (try to) prevent the contents from blowing out of the car while in transit.

IMG_2518

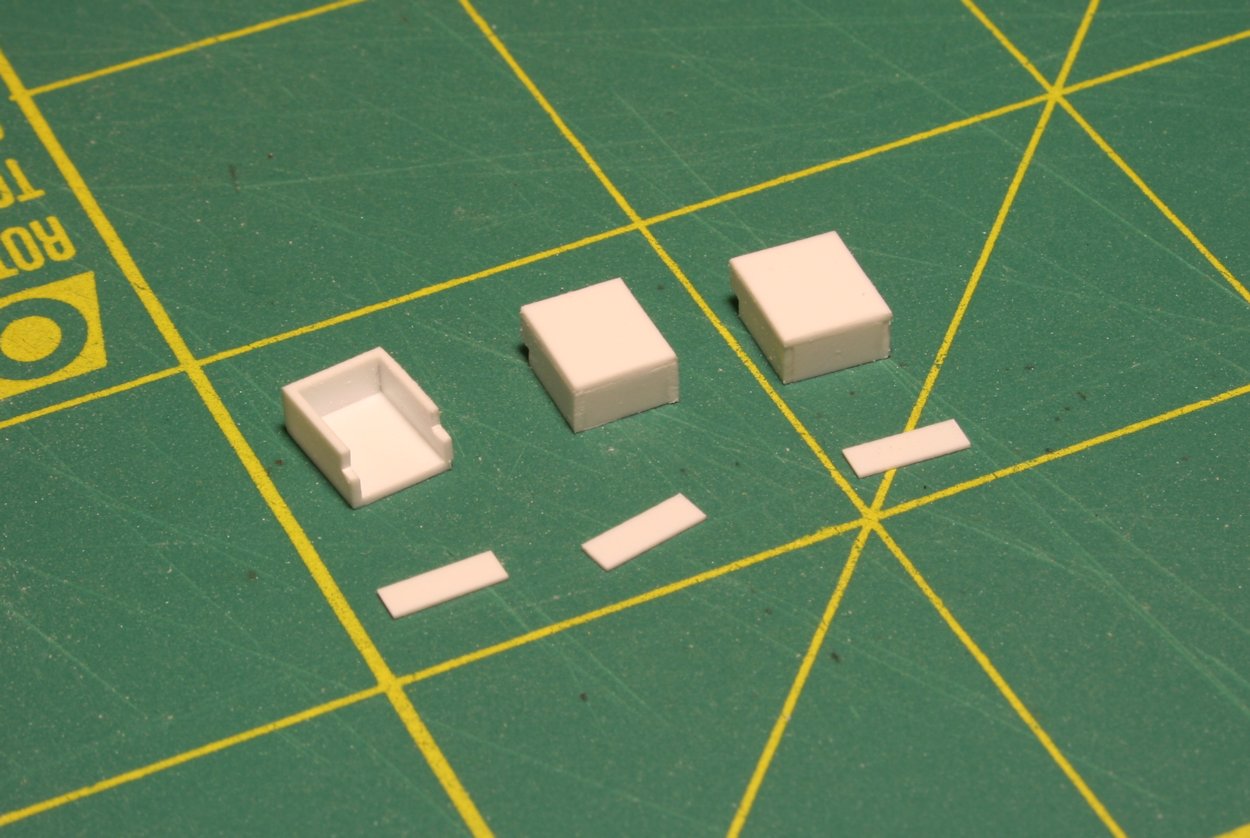
The boxes of course are straightforward simple construction, with a front cut from .020″ sheet and sides and bottoms cut from pieces of .020x.100″ strip. Of course the one wrinkle is that the box does come over the top frame of the door, so the top corners have to be carefully notched .040x.040″ to clear the frame but not leave any visible gap when finished.

The lids (installed after the assembled boxes were cemented to the end assembly) are pieces of .010x.080″ strip.

IMG_2519

Here’s one of the partly completed ends with the storage box installed.

Apart from grab iron and ladder details, my stack of parts is really starting to look like something now.

AC Woodchip Car Progress and Doors

IMG_2517

Over the could of weeks I’ve been continuing to make some progress on my scratchbuilt Algoma Central woodchip gondolas. I’ve completed some more sides so that I have enough for three cars currently and I’ve also been getting some work done on the door ends of the cars.

These took some careful laying out, but other than that have been going together fairly well. Like the other parts of the car so far, this mainly consists of a .020″ sheet forming the backing of the main door with .040″ square styrene strip for the vertical ribs on the door. The corner posts are .060″ square and the top beam is .080″. These parts of the frame are glued to the edges of the .020″ door sheet, not using the surface backing.

The trickiest part actually turned out to be cutting the angles on the bottom sheet representing the reinforced end sill on theses cars (since the majority of the end isn’t structural, but a top-hinged door that can open up like a dump truck). I had to throw out a few attempts that weren’t quite symmetrical.

IMG_2515

The hinge detail was also a little tricky to manipulate due to the extreme small size of the pieces, but otherwise the design is pretty straightforward.

The vertical parts of the hinges attached to the door are .010x.040″ strip while the hinge mounts were carefully cut out of bits of .010x.080″ strip.

There’s still some additional detail to add (ladders, grab irons, latches and a storage box attached to the door for mesh nets used to contain loads and prevent chips from blowing away in transit), but otherwise I have all the major pieces now to complete three bodies except for the next major project: the underframe/floor.