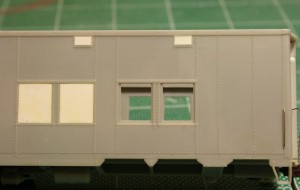
The next step with these cars involves plating over the carbody vents and the unwanted windows. The upper vents were all plated over on these cars, but the windows varied from car to car, and were done later. Up until the late 1960s and probably into the early 1970s, the cars all would have had their original windows still. In the 1970s however, some of the cars started to have windows blanked out and plated over when they received a full shopping.
The car I’m currently working on represents AC 306 (ex-AC 205, ex-US Army 7883). Photos I’ve collected from various sources online show that on one side of the car, 3 windows (2 to the right and 1 to the left of the baggage door) were plated over, while on the opposite side, only one window to the right of the door was plated.
Note that the windows I’m referring to here are all in the first double pair of windows; the original troop sleepers have a single window on either side of the original entry door, but both of these windows and the original man door are overlapping with the space where the baggage car door will go. Those windows will need to be completely gone, not just plated over with the frame still in place. That’s a little bit more involved, so I’m leaving that until later.
I plated the required windows quite simply by cutting rectangles of .010″ styrene sheet to fit the window openings. (Actually I cut this just slightly oversize and then carefully file down the edges so that it fits in perfectly.) When you look at the windows on the model, you can see the riveted frame around the window, and then an inset window sash, which on the rear car would have been the moveable part of the window. To plate over the window, I just cut the plate to fit just inside the outer frame, and lay down on top of the recessed sash. The .010″ thickness of the styrene sheet set on top of the recessed sash perfectly represents the plated over opening.

Car with upper vents and two windows at left plated over. The two windows at right will remain open and receive the original kit window glass pieces when the car is fully completed.
Similarly the vents along the top of the car body were also plugged with .010″ material but in this case their narrow width meant a 010″x.080″ strip cut to length will fit perfectly in the vent opening. Again the recessed depth is such that a .010″ strip is almost perfectly flush.
That takes care of the easy part of the car side modifications; cutting out the door, removing the single windows and smoothing everything up again will be considerably more invasive surgery.
