Here’s a good view of what the end of one of these cars looks like:
http://rrpicturearchives.net/showPicture.aspx?id=1251473
While the stock Walthers model basically just has some generic raised-tread pattern on the end, you can see that the pattern of walkway grating is quite distinctive, and I wanted to capture this.
The following wreck photo also highlights quite clearly how the grating is open, and would be see-through:
http://algomacentral.railfan.net/images/AlgoCenRy/AC_Mile_5_wrk-5_5-14-1980.jpg
If I were only doing one of these cars, I might consider completely cutting away the end platforms and rebuilding them from scratch to have the open grating, however for the sheer volume of these cars that I need, I’ve decided this would be far too much time and effort to be worth it.
I do however wish to at least replicate the tread pattern, which is a big difference from the model. To this end, after disassembling the cars and removing the handrail pieces, I filed the top surface of the end platforms smooth to remove the existing tread texture.
I cut the new walkways out of etched brass walkway/grating material. The walkways are a rectangular “Apex” tread pattern. I’ve been using etched brass material from Details Associates. I just used a regular pair of scissors to cut the thin brass sheet.
There’s two parts to the walkway tread on these cars. There’s the grating on the open area of the platform, and an extra bit of grating leading to the end ladder. The platform grating is cut out of the etched material in a rectangle 2.5 by 10.75 scale feet in size. The cut piece should all be whole rectangles, with the “grain” following the width of the car.
The walkway to the end ladder grabs is oriented perpendicular to the platform grating. With the sizing of the rectangles in the Details Associates etching, I cut a strip from the etched sheet 3 rectangles wide; this is perfectly the size to fit between the platform grating and the car body. I then cut these into approx. 1.75 scale foot pieces.
With all the piece cut, I attached them to the prepared underframe pieces using CA adhesive. Very carefully, trying not to glue my fingers to themselves or the car, I used a toothpick to spread the CA across the bottom surface of the grating, and then applied the grating material to the car. For the smaller pieces I used a pair of curved tweezers to move them into position.

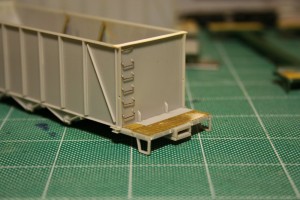
Completed walkway/platform grating with the underframe and body fitted together, showing how the walkway accesses the end ladder.
This is the current point I’m at with these cars (well, the 9 I’m [semi-]actively working on). 5 cars now have the grating complete (I just finished a few of them up tonight) and another 4 have the platforms filed and prepared (and actually have for quite some time now).
After I finish this current batch of cars, (I’m hoping to try to bring these 9 all the way through to completion now) I’ve got another 50 or so of these Walthers cars waiting for the same treatment at some point!


