Fast Tracks Freight Crates

A couple of weeks ago I had an email in my inbox advertising the latest product available from FastTracks: a model rolling stock storage/transportation box called the “Freight Crate”. The Freight Crate is manufactured out of laser cut hardboard, and is shipped as an unassembled flat kit, to be put together by the modeller. They’re available in a few different sizes for different sized equipment (standard 40′, 65′ and 90′ lengths, and extra-deep versions of the same three sizes for taller cars) and the HO scale versions each hold 8 pieces of equipment.

IMG_9748

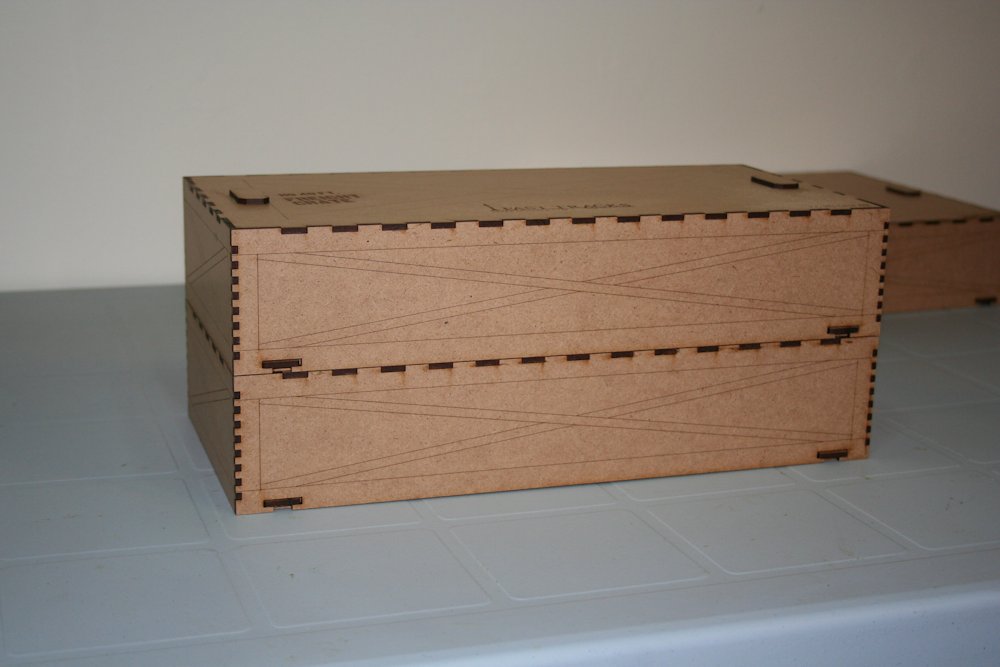
A pair of assembled and stacked 40′ Freight Crates.

With a lot of modern Ready-to-Run equipment, the existing packaging really holds and protects the cars quite well, although putting cars into one of these freight cars make take up a little less space, but obviously be a little more expensive. I find keeping this equipment in their original boxes protects them quite nicely. However I have a lot of equipment that is (or will be) extensively kitbashed and modified, and lots of kit-built (like the many Intermountain 40′ boxcar kits I have for various projects) and scratchbuilt equipment as well. For these, the original box (if there even is one) is just a plain box with the kit parts and sprues inside, and when the car is built, the box doesn’t really come with its own padding to protect the car and prevent it from bouncing around.

If you’re like me, and you’re still building and collecting equipment for that “someday” layout, most of the cars I’m acquiring, building or detailing will remain in storage for some time. And since I currently live in a rented apartment with only space for a small switching layout, my rolling stock collection probably has a few more changes of address in its future before they truly find their home on a “permanent” layout.

With that in mind, I ordered a few of these new Freight Crates: two for 40′ cars (perfect for Intermountain and Accurail boxcar kits), and three for cars up to 65′ in length (as I have several 50′ boxcar kits, coil steel cars kits, some scratchbuilt/kitbashed gondola and flatcar projects, and some Walthers 65′ gondolas that may not fit exactly back into their original packaging once shortened and kitbashed with bulkhead ends, etc.).

The box assembles pretty easily in about 20 minutes with regular carpenter’s glue, and Fast Tracks has an assembly instruction video on their site/YouTube channel which illustrates the entire process quite clearly, so I won’t spend too many words talking about that, as it goes together just as shown in their video, other than to remark that the build is quite straightforward. The parts are all laser cut with alignment tabs so everything fits right together exactly and precisely.

Once assembled, the box is nice and sturdy, and the crates are designed to be easily stackable with each other, with tabs on the top of the lid locking in place into holes in the base which also serve as the access points for the sliding key locks that hold the lid securely in place on the box. This is a pretty nice feature that holds everything together nice and safely.

IMG_9751

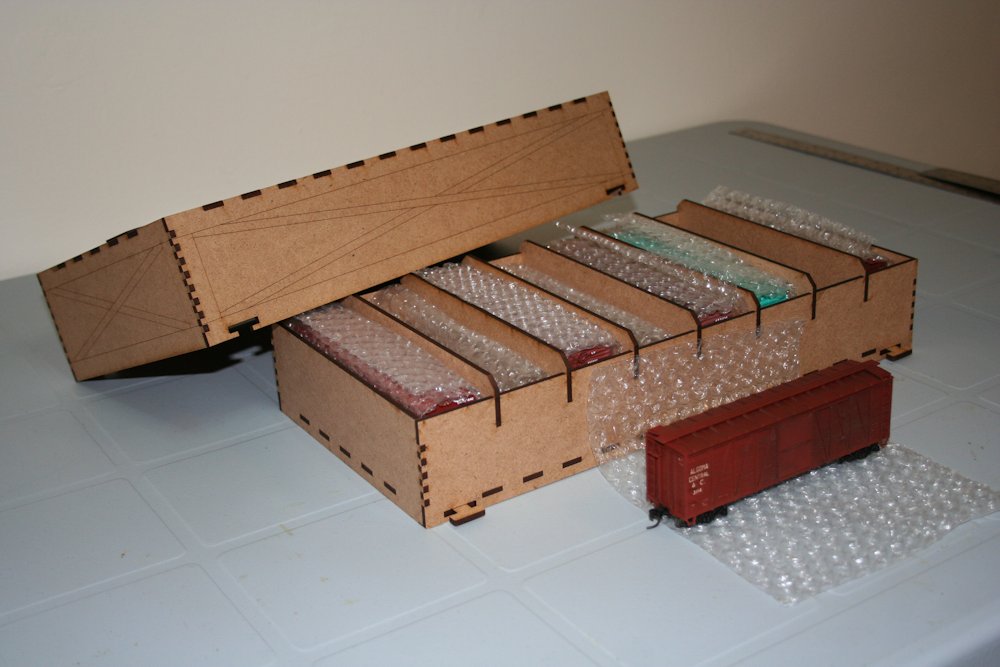
My finished Freight Crate, loaded up with 40′ boxcars.

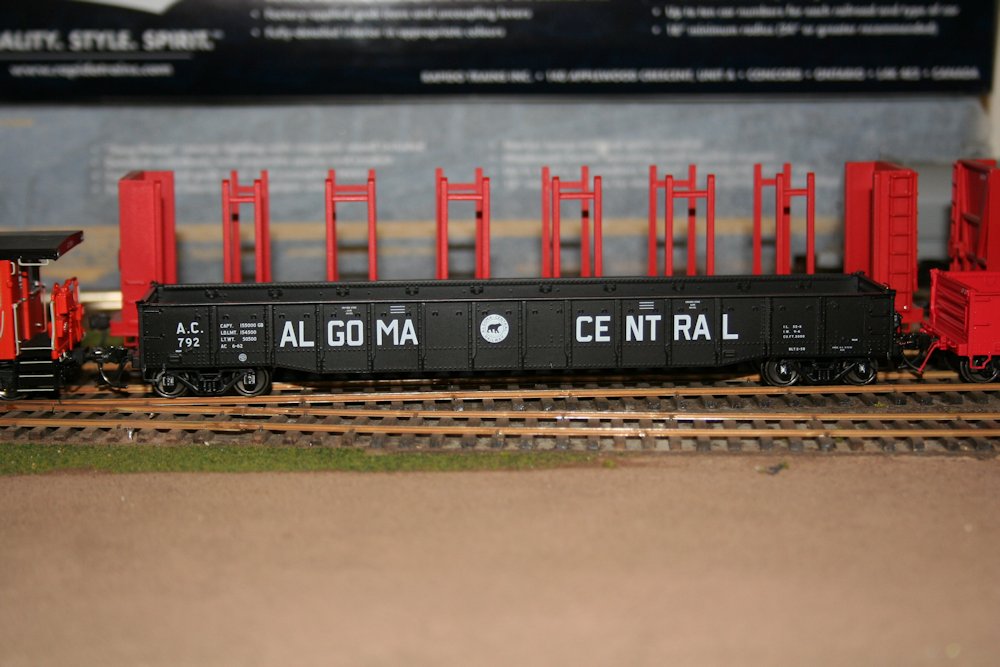
The compartment slots in the box are perfectly sized to hold the model equipment. With the standard 40′ version of the box, a 40′ boxcar wrapped in the provided sheet of bubble wrap slid down snugly into the slot, with just a little bit of room on either side of the couplers on each end and an assembled 50′ boxcar fit nice and securely in the 65′ box.

The Freight Crates are not necessarily inexpensive; the basic Standard 40′ box is $25 and there are alternative products on the market of a similar purpose made of cardboard and foam which are likely much cheaper, but the hardboard construction is well engineered and pretty solid and should be quite durable and do a good job of protecting equipment over the long run. The alignment tabs on the lids for stacking also makes for a nice sturdy pile when you have multiples of these crates, as they won’t slide off of each other, and the smaller boxes can stack on top of the larger ones as these tabs are all the same size and centered on the box. It’ll definitely protect that $40 craftsman kit you spent 20 hours on building and detailing and painting better than a few layers of tissue paper in the original plain box in a stack of other such cardboard boxes on a storage shelf.

You may be finding more of my collection of kit built, scratchbuilt and kitbashed custom cars residing in boxes like these.

True Line Trains CC&F Snowplow Announcement – Including AC

tltplowannounce

This past Friday, True Line Trains made an announcement for their next rolling stock model: a HO scale Canadian Car & Foundry snow plow, based on a common design that was owned by Canadian National, Pacific Great Eastern (later British Columbia Railway), Ontario Northland and Algoma Central. (Apparently they will be doing CP versions with different details next.) A fall 2014 release is currently projected.

Some of the features of the model include DCC controlled operating lights and wing blades, and even sound (air horn, and I’m guessing air noises for the pneumatically operated moveable equipment on the plow). While fascinating to have all of these operating features, I wonder how many people actually model a winter layout and would actually make much use of these, and as I’m modeling a summer period it seems a little excessive for something that will sit on a side track in Hawk Junction yard and essentially be little more than a scenic item (non-DCC/sound versions are not listed as going to be available). But I guess this is still better than trying to track down some long out of production brass model of a CN plow to custom paint. And even with the fancy electronically controlled operating features that probably won’t get used much other to test them out and say “Hey, that’s pretty neat!” this is still probably cheaper than the alternative.

The product list includes Algoma Central: plow AC 10105 and two paint versions are listed: a black scheme, and a red scheme. The black scheme would be the “true” AC colours; the ACR’s two plows, AC 10104* and 10105, were painted black into the 1990s when the ACR was acquired by Wisconsin Central in 1995. Sometime shortly after the WC purchase, the two plows were both repainted into the WC’s maroon and gold colours; this would be the “red” scheme mentioned and pictured (at bottom left) on the TLT ad copy.

(* Note the body details of AC 10104 are slightly different than the 10105, so the 10105 is the only one that this model is truly accurate for.)

Here’s a prototype photo of AC 10105 in the Algoma Central’s black paint for reference:

ac10105-1

Note that the prow above the curved plow blade has at some point been modified with a sheet metal extension. This type of modification is extremely common on these plows to help deflect rocks and debris back downwards.

Here’s a later shot of the 10105 repainted into WC maroon and gold:

ac10105-2

(Both photos above courtesy of Blair Smith.)

And finally here’s the AC 10105 at Steelton Yard in summer 2013, still in service and waiting for the heavy snows of winter. (My photo.)

IMG_5973

More love from Walthers for Algoma Central – 65′ Gondolas

Well this is interesting.

I was skimming over the product announcements in the latest Model Railroad Hobbyist online magazine and prominently displayed under Walthers was an announcement for several new paint schemes on their 65′ Thrall mill gondola – including Algoma Central.

A little bit of searching managed to turn up the product listing on Walthers’ site.

Of course these aren’t remotely accurate – the real cars from Algoma Central series AC 1001-1400 are 61′ (not 65′) inside length cars with riveted side construction (not welded like the model) and distinctive bulkhead ends.

ACR from Blair 039

AC 1014 at Steelton shops. Blair Smith photo.

On the other hand, the lettering style and font matches that used on the 61′ cars and looks well rendered, and if you’re careful and can touch up the paint cleanly, it could be possible to take a decorated car, shorten the end panels and scratchbuild the end bulkheads to come up with a pretty reasonable representation of one of these cars, which could be a huge advantage to modeling these cars as a decal set matching the font used on these cars doesn’t actually exist (the CDS dry transfer set is for the 52′ gons, matching the lettering font on the AC 601-875 which is a bit “blockier” in the curved letters like O and C) and adding a scratchbuilt bulkhead end to an existing model is easier than scratchbuilding the entire car, particularly with all of the side rivets.

Of course, since you’re chopping up a modern welded car to represent a prototype that was actually of riveted construction, this is still only a general representation, but with 400 of these cars rostered, they were actually more numerous and wide ranging than the 52′ gondolas and any serious ACR modeler really needs a fleet of these cars. Their large size and bulkhead ends made them particularly useful for everything from pulpwood logs to steel products, and loaded with steel from Algoma Steel these cars ranged all over North America, which means modelers of other Canadian railways can definitely also justify running one of these.

I might just pick up at least one of these to try the conversion and see how I like it.

Rapido 52′ Gondolas Arrived

This evening I stopped at the post office to pick up several packages – packages containing the new Rapido Trains 52′ Canadian gondolas. (I won’t tell you how many exactly I picked up, because this was partly a pooled group order of cars for the WRMRC layout, so better than half of the cars will end up belonging to others, but let’s just say I acquired “more than one” 6-pack of AC cars (plus a few CPs) for my own purposes.)

These models are based on a common design of 52’6″ gondola with riveted construction and drop ends that were built by Eastern Car Company during the 1940s-50s for most of the major Canadian railways. Similar cars were built by Canadian Car & Foundry and National Steel Car up into the early 1960s, with generally similar features, but some detail differences.

IMG_7351

The prototype Algoma Central cars were built in 1959-62 in two batches by National Steel Car. (AC 601-800 and 801-875. Another almost identical batch was built in 1962 as AC 900-924 with covers for coil steel service.) They actually differ from the model in two ways. One, the AC cars have a different style of structural ribs on the sides. While the model features the distinctive Z shaped ribs fashioned from simple angle stock, the later AC cars had a stamped rib with a more of a hat profile (if you cross-sectioned the rib). The AC cars were also a higher capacity car with a 4′ interior height instead of the 3’5″ height of the model. However, the number and spacing of the side ribs is still consistent on all of these Canadian cars, so that still makes these cars a better stand in than any model of an American prototype. (The older Proto2000 gondola, based on a design built by Greenville Steel Car and Bethlehem Steel Corp., was previously the best stand in, but has a different number of side ribs and panels, which alters the layout of the Algoma Central billboard lettering on the side of the car.)

The models are well packaged, but even so exercise care when removing the cars from the packaging and check for any minor damage in shipping. There’s been some reports of the delicate ribs damaged in shipping (I haven’t seen much of this yet, but I’ve only removed a couple of cars from their packaging so far) and I had a few ends knocked free and rattling around inside the box (the drop ends are just press fit in place, so this is no big deal).

Here’s a few photos of a sample AC and CP (Action Red scheme) car to see some of the detail on these new models:

IMG_8806 IMG_8816

The relief of the Z shaped ribs is a distinctive feature of this model. The individual ribs are actually separate pieces to achive this effect. So one will have to take some care when picking up these cars not to crush any delicate details.

IMG_8818

These CP red cars feature trucks with converted roller bearing journals, a nice touch.

IMG_8819

I weighed one car at 4.1oz, just slightly under the NMRA “recommended” weight for a 7″ car of 4.5oz (1oz + .5oz/inch), but then almost every factory car is slightly under this recommendation, and consistency is one of the most important things. The Rapido car actually weighed out exactly identical to one of the Proto2000 gondolas I had nearby.

And lastly, a couple of final shots of the two cars on my in progress switching layout. The cars both appeared to track and roll quite well, although admittedly I don’t have much track to roll them around on. The real test will be when we try dragging a set of these around in a train at the club layout.

IMG_8826 IMG_8828

Rapido FP9A Arrived

Today I got a package in the mail from my dealer containing one of the new Rapido FP9A locomotives factory decorated for Algoma Central #1750. Acquired by WC in 1995 for the ACR passenger trains, it’s a little completely out of my era, but I just “had” to collect a couple of Rapido’s models to put together a “modern” (1995-2000) version of the ACR’s regular passenger train. It’ll mostly reside on a display shelf, but be fun to run through every once in a while.

IMG_8608

In the box, with solid protective packaging.

The model comes packed in a protective plastic holder that securely wraps around the engine and holds it tightly, and did a good job of protecting it from any damage in shipping. Every little bit and piece appeared to be completely intact.

IMG_8614

Additional parts bag.

Little parts baggy including extra re-rail frogs, steam line connections and extra couplers and a part for a rear diaphraghm. The AC units didn’t have them (and neither did the majority of the old CN units, and many that did had them removed later), so that piece won’t need to be installed.

IMG_8620

The model, out of the box!

Here’s the model taken out of the box and set on the rails of my in-progress switching layout. You’ll have to excuse the background and the quality of some of these photos; this small layout isn’t very finished and the lighting in this room isn’t the best.

ACR From Blair 015

The real 1750 arriving at Steelton Yard on the head of the southbound Agawa Canyon Tour Train. Blair Smith photo, August 1996.

IMG_8625

Winterization hatch detail, with stack extension.

The model has a lot of gorgeous detail, although a couple of things stuck out. On the large winterization hatch over the radiator fans, there’s a tall exhaust stack extension which doesn’t appear to have been present on the AC units. This may have been applied at some point in the past to the CN units that eventually (by way of VIA) became AC 1750 and 1751, but weren’t there under ACR ownership. Fortunately with a bit of firm but careful pressure, this stack extension can be pulled out. The hatch also doesn’t appear to be quite fully seated all the way down on the close side, but this should be fixable.

IMG_8627

Rear detail, also showing exhaust stack extension removed. The back-up light to the left of the door lights up when the engine is set in reverse.

Since I got the DCC/Sound version, naturally I wanted to get the locomotive fired up on the NCE PowerCab I’m powering the switching layout with. At first – nothing happened. I checked the manual with the model, and the text indicated that the decoders are set by default to address “3”. (3 is the standard default address for a decoder, but I kind of expected the installed decoder to be set to the model’s road number in this case. No big deal, reprogramming a decoder address is a pretty standard task.) Once I was able to select and send a command to the engine, a quick tap of the F8 function key on the throttle (Function 8 is the standard mute/un-mute function for most sound decoders) brought the sound to life. The sound sounded quite agreeably like the EMD 567 engine in the FP9, which it well should – Rapido has a couple of videos on their YouTube channel of their antics in recording the actual sounds off a pair of real FP9s on a tourist railroad in the US. The sound volumes will probably eventually be adjusted down, but aren’t nearly as loud as many other sound decoders are on their factory settings, which usually seem to be set to “max”, when 25-50% level would probably sound much better.

I haven’t quite finished the points on several switches on this layout, so I was only able to run the engine back and forth about a foot or two. It seemed to run reasonably well (although it was a little jerky on speed step 1, but smoother on step 2), and the sound revved up and down nicely, but I think I’ll need to take it out to the club layout sometime to really give it a good breaking in.

The engine has some nice lighting functions as well. Headlight and ditch lights are independently controllable, as are the class lights and numberboard lights (although the numberboards end up being just about as bright as the headlight). The headlight, ditch lights and numberboards appeared to have a slight greenish tint to them, when I’d prefer a more “natural” incandesant-looking warm yellow. Note sure yet if I’ll look at possibly replacing the LEDs used.

IMG_8626

Powered up with headlights, ditch lights and white class lights lit. Numberboards are also able to independently light up, but turned off in this photo.

The class lights lit up nice and bright white; the instructions indicated that the F10 function should switch them between Off, White and Green, but I seemed to only be getting them rotating between Off and White. No green. Not sure if I did something wrong, or if it’s something in the programming setup of the decoder, but it’s not too likely that I’ll ever be running this particular unit on the head of a train with additional sections following.

(Edit: Jason from Rapido pointed out in a comment that the decoder on this model is changed and the white and green lights are separately controlled on F10 and F11. This was actually indicated on a technical reference insert sheet for the decoder, which I hadn’t closely read at the time as I didn’t realize the functions would be mapped differently from the information in the original instruction manual for the FP9s.)

IMG_8629

A full set of Rapido Algoma Central passenger equipment: FP9A locomotive, steam generator car, baggage car and coach.

The silver paint on the locomotive is a good match to the shade used on Rapido’s previous offerings: the steam generator car, baggage car and second run of coaches (the original run of AC coaches came out in an odd tan colour, which was changed for the later run(s)). With one of each, it makes a nice solid train.

The lettering and decoration looks pretty good. The model does not have the reporting marks and numbers on the sides near the rear – these were added a little bit later, not when they were originally painted, so it’s not inaccurate, although the units would have spent more of their lives with the numbers than without. So it might have been nice if the side numbers were included, or if a small decal sheet with the numbers was included so modellers could choose. Since I actually model the 1980s, I’m not running this set as any particular year, but it is something that some might wish to note.

Postscript:

Included in the box was a flyer for Rapido’s upcoming CN/VIA F9B models. The fine print at the bottom is a classic example of the geeky institutional humour brought by Rapido’s founder and owner, Jason Shron:

IMG_8612

Always read the fine print…